Witch Hat Cookies Recipe
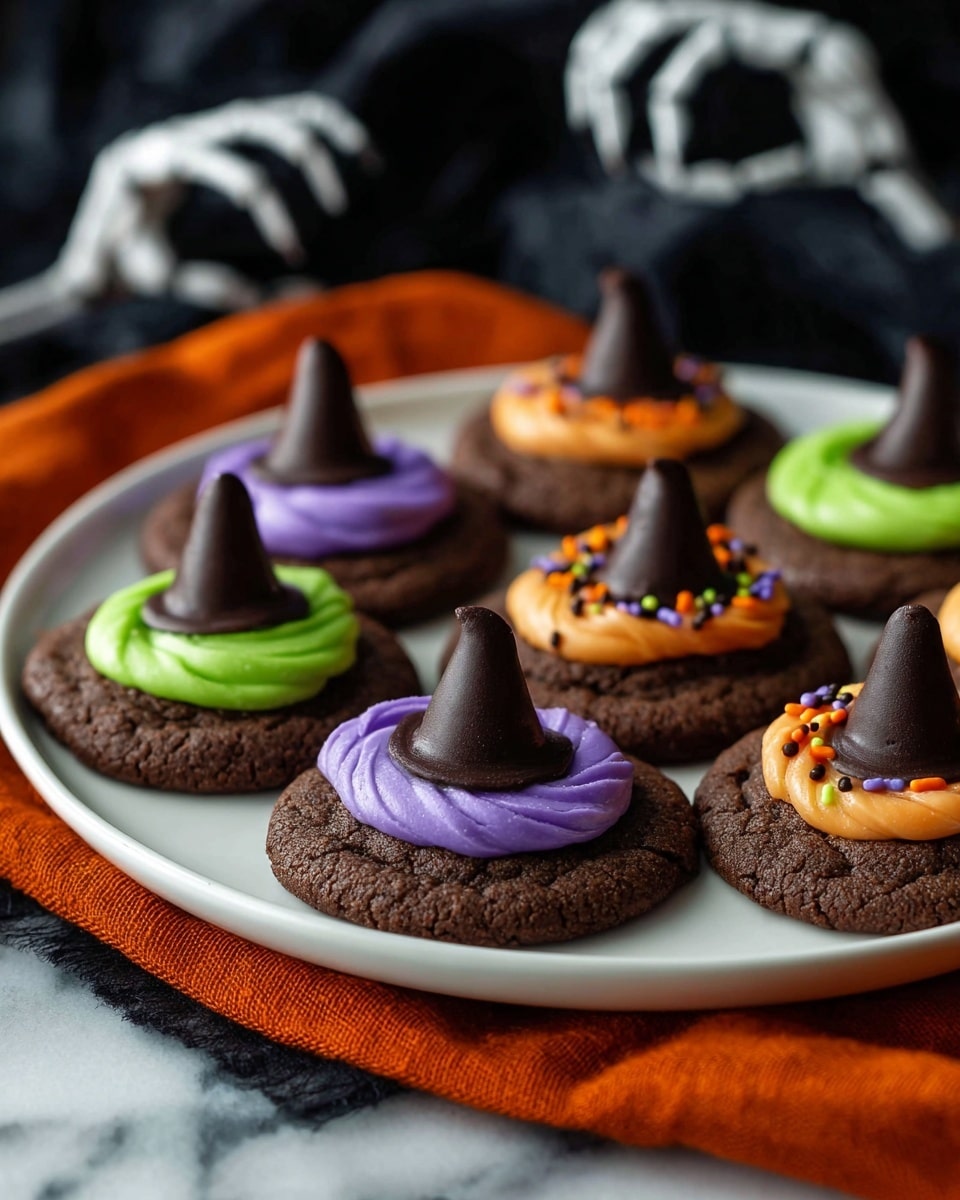
If you’re looking for a fun, festive treat that’s as cute as it is delicious, you’re going to love this Witch Hat Cookies Recipe. These adorable little cookies are perfect for Halloween parties, cozy fall afternoons, or whenever you want a fun twist on classic chocolate sugar cookies. Trust me, once you make them, you’ll be hooked on the way the rich cocoa cookie base combines with soft, fluffy frosting and a Hershey’s Kiss “hat tip” on top. Keep reading—I’m sharing all my tips so you nail this recipe with zero stress!
Why This Recipe Works
- Perfect Texture: The cookie dough includes both granulated and brown sugars creating a chewy yet soft cookie base.
- Simple Ingredients: You probably already have everything in your pantry — no hunting for specialty items.
- Fun Presentation: The Hershey’s Kiss and colorful frosting instantly turn plain cookies into festive witch hats.
- Quick to Make: From start to finish, you can have these baked and decorated within 30 minutes.

Ingredients & Why They Work
This Witch Hat Cookies Recipe balances rich chocolate flavor with a simple vanilla frosting, and the ingredients come together really smoothly. Shopping for fresh cocoa powder and good quality butter makes a noticeable difference in both taste and texture, so I always recommend grabbing the best you can find.

- All purpose flour: The base of the cookie, standard flour gives structure while keeping these soft and chewy.
- Natural unsweetened cocoa powder: Use natural cocoa for a deep chocolate flavor; it pairs perfectly with the sweet frosting.
- Baking soda: Helps the cookies rise just enough for that soft texture without getting cakey.
- Salt: A pinch balances the sweetness and elevates the chocolate notes.
- Unsalted butter: Softened for creaming; it enriches the dough with moisture and tenderness.
- Granulated sugar: Adds sweetness and helps with the crispy edge on the cookies.
- Brown sugar: Brings moisture and chewiness to the cookie, plus a hint of caramel flavor.
- Large egg: Binds everything together while adding richness.
- Vanilla extract: Adds warmth and depth to both dough and frosting.
- Granulated sugar (for rolling): Coats the outside of the dough balls for a subtle crunch and sparkle.
- Powdered sugar: Essential for creamy, fluffy frosting consistency.
- Gel food coloring: Your go-to for vibrant frosting colors without watering down the texture.
- Hershey’s Kisses: The iconic “point” on the witch’s hat; fun and delicious!
- Halloween sprinkles: Totally optional, but they add a festive, playful touch.
Make It Your Way
What I love about this Witch Hat Cookies Recipe is how easy it is to customize. Whether you want to make it kid-friendly, more indulgent, or a little healthier, you’ve got options to make these your own.
- Variation: I once swapped vanilla extract for almond extract to mix things up, and the subtle nuttiness gave the cookies a cozy, unexpected twist. Totally delicious!
- Dietary Modifications: You can swap all-purpose flour for a gluten-free blend, just be mindful the texture might be slightly different—but the flavor still stands strong.
- Color Themes: Customize the frosting colors for different holidays—think orange and black for Halloween or purple and green for a magical party vibe.
Step-by-Step: How I Make Witch Hat Cookies Recipe
Step 1: Mix Your Dry Ingredients
First things first, preheat your oven to 350ºF. Then in a medium bowl, combine the flour, natural cocoa powder, baking soda, and salt. Give everything a good whisk to make sure the cocoa powder is evenly distributed—you don’t want any surprise clumps of powder sneaking into your dough!
Step 2: Cream the Sugars and Butter
In a separate mixing bowl, use a mixer on low speed to cream together the softened butter, granulated sugar, and brown sugar until the mixture looks fluffy and lightened—this usually takes about 2-3 minutes. This step is key for that melt-in-your-mouth texture, so don’t rush it.
Step 3: Add Egg and Vanilla
Next up, crack in your egg and vanilla extract and beat until just combined. Keep the mixer on low to avoid overmixing, which can make your cookies tough.
Step 4: Combine Wet and Dry Ingredients
Gently fold the dry ingredients into your wet mixture. You want to mix just until you no longer see streaks of flour—overmixing will make the cookies dense. This is a perfect time to switch to a spatula if you’re comfortable folding by hand.
Step 5: Shape and Sugar the Dough Balls
Use a small cookie scoop or tablespoon to scoop out uniform portions of dough. Roll each ball between your palms to smooth it out, then roll the dough balls in granulated sugar. This extra sugar coating creates a sweet, slightly crackly surface once baked—trust me, it makes a delightful difference!
Step 6: Bake and Cool
Place your sugared dough balls about 2-3 inches apart on a silicone-lined baking sheet. Bake one sheet at a time for 8-11 minutes, or until the cookies have set but still look soft in the middle (they’ll firm up as they cool). Resist the urge to overbake! Let them cool on the sheet for 10 minutes before transferring to a cooling rack.
Step 7: Prepare the Frosting
While cookies cool completely, whip up the frosting by beating butter, powdered sugar, and vanilla extract on medium speed until fluffy. Divide the frosting into bowls and tint with your favorite gel food coloring for the perfect witch-hat vibe.
Step 8: Decorate and Assemble
Spoon frosting into a piping bag (or a sandwich bag with the corner cut off). Pipe a dollop right in the center of each cooled cookie, then gently press a Hershey’s Kiss into the frosting so it spreads out slightly, mimicking a witch’s hat tip. Add Halloween sprinkles if you want to get extra festive. Voilà—your Witch Hat Cookies are ready to enchant!
Tips from My Kitchen
- Use Room Temperature Butter: It creams better with sugar and helps create a soft, tender cookie—cold butter won’t incorporate as well.
- Don’t Overbake Your Cookies: They might look slightly underdone right out of the oven but will set beautifully while cooling.
- Roll in Sugar for Crunch: Don’t skip rolling the dough balls in granulated sugar – it adds texture and a little shimmer that makes the cookies festive.
- Pipe Frosting on Cooled Cookies: Always ensure your cookies are fully cool before frosting to prevent melting and sliding.
How to Serve Witch Hat Cookies Recipe
Garnishes
I love topping mine with rainbow Halloween sprinkles or tiny edible stars for an extra magical touch. If you want to get fancy, try a dusting of edible glitter on the frosting once piped to catch the light beautifully.
Side Dishes
These cookies are fantastic with a big mug of spiced hot chocolate or warm apple cider. They also pair well with creamy vanilla ice cream if you’re serving them as a dessert after a Halloween dinner.
Creative Ways to Present
For a party, arrange these Witch Hat Cookies Recipe beauties on a platter surrounded by mini pumpkins and candy corn. Little cauldrons or bowls of Halloween candy placed around the display instantly elevate the spooky vibes. I once presented mine on a tiered cake stand with little “spells” name cards—such a hit!
Make Ahead and Storage
Storing Leftovers
Store leftover Witch Hat Cookies in an airtight container at room temperature. They keep beautifully for up to 4 days — just keep an eye on the frosting so it doesn’t dry out. A piece of parchment paper between layers helps protect the decorations.
Freezing
I’ve found you can freeze the baked, unfrosted cookies in a single layer on a baking sheet, then transfer to a freezer bag for up to 3 months. When ready, thaw them completely before frosting and assembling for best results.
Reheating
These cookies are best enjoyed at room temperature. If you want to warm them slightly, a few seconds in the microwave (without frosting) works, but avoid heating the decorated cookie—it can melt the frosting and ruin the hat shape.
FAQs
-
Can I make these Witch Hat Cookies without cocoa powder?
You can skip the cocoa powder, but the cookies won’t have that rich chocolate flavor or dark color that make them look like classic witch hats. If you prefer a vanilla version, you might want to tweak the frosting design and color accordingly.
-
What if I don’t have a piping bag for frosting?
No worries! You can use a sandwich bag and just snip a small corner off to pipe out the frosting. Alternatively, a small spoon works fine for dolloping, though piping gives you the neat “hat” look.
-
Can I make this recipe vegan?
Yes, you can substitute vegan butter and an egg replacer like flaxseed meal mixed with water to make this recipe vegan-friendly. Keep in mind the texture might vary slightly, but it’s a delicious alternative!
-
How do I prevent the frosting from sliding off the cookies?
Make sure your cookies have cooled completely before frosting. If the cookies feel warm, the frosting will melt and slide off. Also, piping the frosting on rather than spreading helps it “stick” better.
-
Can I add other toppings instead of Hershey’s Kisses?
Absolutely! Mini chocolate chips, candy eyeballs, or small gumdrops can work if you want to switch it up, but Hershey’s Kisses are classic and have the perfect shape for the witch hat peak.
Final Thoughts
This Witch Hat Cookies Recipe has become one of my go-to treats every fall because it strikes the perfect balance between fun and deliciousness without being complicated. I hope you enjoy making (and eating!) them as much as I do. Whether you’re baking with kids or just want a festive snack, these cookies bring a little magic to the kitchen. Give them a try—you might just find they become a seasonal favorite in your house too!
Print
Witch Hat Cookies Recipe
- Prep Time: 15 minutes
- Cook Time: 13 minutes
- Total Time: 28 minutes
- Yield: 16 cookies
- Category: Dessert
- Method: Baking
- Cuisine: American
Description
These Witch Hat Cookies are a fun and festive treat perfect for Halloween. Chocolate cookie bases are rolled in sugar and baked to a soft perfection, then topped with colorful frosting and a Hershey’s Kiss to create adorable witch hats. Decorated with sprinkles, these cookies are sure to delight kids and adults alike.
Ingredients
For the Cookies
- 1 ½ cups (180g) all purpose flour
- ¼ cup (21g) natural unsweetened cocoa powder
- ½ tsp baking soda
- ½ tsp salt
- ½ cup (113g) unsalted butter, 1 stick, softened
- ½ cup (99g) granulated sugar
- ½ cup (107g) brown sugar
- 1 large egg
- 1 tsp vanilla extract
- ⅓ cup (66g) granulated sugar, for rolling
For the Frosting
- 1 stick unsalted butter, room temperature (1/2 cup)
- 1 cup (113g) powdered sugar
- 1 tsp vanilla extract
- Gel food coloring
- Hershey’s Kisses
- Halloween sprinkles
Instructions
- Preheat and mix dry ingredients: Preheat the oven to 350ºF. In a mixing bowl, combine the all purpose flour, cocoa powder, baking soda, and salt.
- Cream butter and sugars: In a separate mixing bowl, cream the unsalted butter, granulated sugar, and brown sugar together using a mixer on low speed until combined and smooth.
- Add egg and vanilla: Add in the egg and vanilla extract to the creamed mixture, mixing again on low speed until incorporated.
- Combine wet and dry ingredients: Gently add the dry ingredients to the wet ingredients, mixing on low or stirring by hand just until combined. Do not overmix.
- Shape and coat dough balls: Use a small cookie scoop or tablespoon to form tablespoon-sized balls from the dough. Roll dough between your hands to form uniform balls, then roll each ball in ⅓ cup granulated sugar.
- Arrange and bake cookies: Place the sugared dough balls 2-3 inches apart on a silicone-lined baking sheet. Bake in the preheated oven for 11 minutes.
- Cool cookies: Allow the cookies to cool on the baking sheet for 10 minutes before transferring to a wire rack to cool completely. Bake one sheet at a time for best results.
- Prepare frosting: In a mixing bowl, beat the unsalted butter, powdered sugar, and vanilla extract with an electric mixer on medium speed until fluffy.
- Color frosting: Divide the frosting into separate bowls and tint each with gel food coloring as desired.
- Assemble witch hats: Transfer the colored frosting to a piping or sandwich bag with the corner cut off. Pipe a dollop of frosting onto the center of each cooled cookie. Press a Hershey’s Kiss into the frosting, allowing the frosting to squish out slightly around the edges.
- Add sprinkles and finish: Decorate with Halloween sprinkles as desired. Repeat this process until all cookies are frosted and decorated.
Notes
- For softer cookies, do not overbake; remove from oven as soon as edges are set.
- You can substitute Hershey’s Kisses with mini chocolate cones or other small candies for different variations.
- Use gel food coloring to prevent frosting from becoming too runny.
- Rolling dough balls in sugar creates a nice crunchy texture on the outside of cookies.
- Cool cookies completely before applying frosting to prevent melting.
- Store cookies in an airtight container at room temperature for up to 3 days.
Nutrition
- Serving Size: 1 cookie
- Calories: 160 kcal
- Sugar: 12 g
- Sodium: 90 mg
- Fat: 8 g
- Saturated Fat: 5 g
- Unsaturated Fat: 3 g
- Trans Fat: 0 g
- Carbohydrates: 20 g
- Fiber: 1 g
- Protein: 2 g
- Cholesterol: 20 mg


