Vegan Garlic Herb Bread Recipe
If you’re craving something irresistibly fragrant, soft, and full of flavor, you’re going to love this Vegan Garlic Herb Bread Recipe. It’s one of those bakes that turns a simple loaf into a showstopper, and I promise you, once you try it, you’ll want it on your table all the time. Imagine biting into warm bread with a perfectly herbed garlicky filling that’s just bursting with freshness—total comfort food vibes, but vegan-friendly and incredibly easy to whip up. Stick around because I’ll walk you through everything step-by-step with tips from my kitchen to yours.
Why This Recipe Works
- Perfect Balance: The combo of garlic, fresh herbs, and vegan butter creates a deeply flavorful filling without overpowering the bread.
- Soft Yet Crispy: Using bread flour gives you that classic fluffy crumb, while the almond milk brushing ensures a golden, crispy crust.
- Twisted Beauty: The unique shaping technique not only looks impressive but also showcases those herby layers beautifully.
- 100% Vegan & Friendly: Completely free from animal products but loaded with flavor—perfect for everyone at the table.

Ingredients & Why They Work
This Vegan Garlic Herb Bread Recipe strikes the perfect chord by blending simple pantry staples with fresh, vibrant herbs. It’s worth hunting for the best quality vegan butter and fresh herbs since they really shine here. Also, choosing bread flour is key to getting that lovely chewy texture you want in a good loaf.
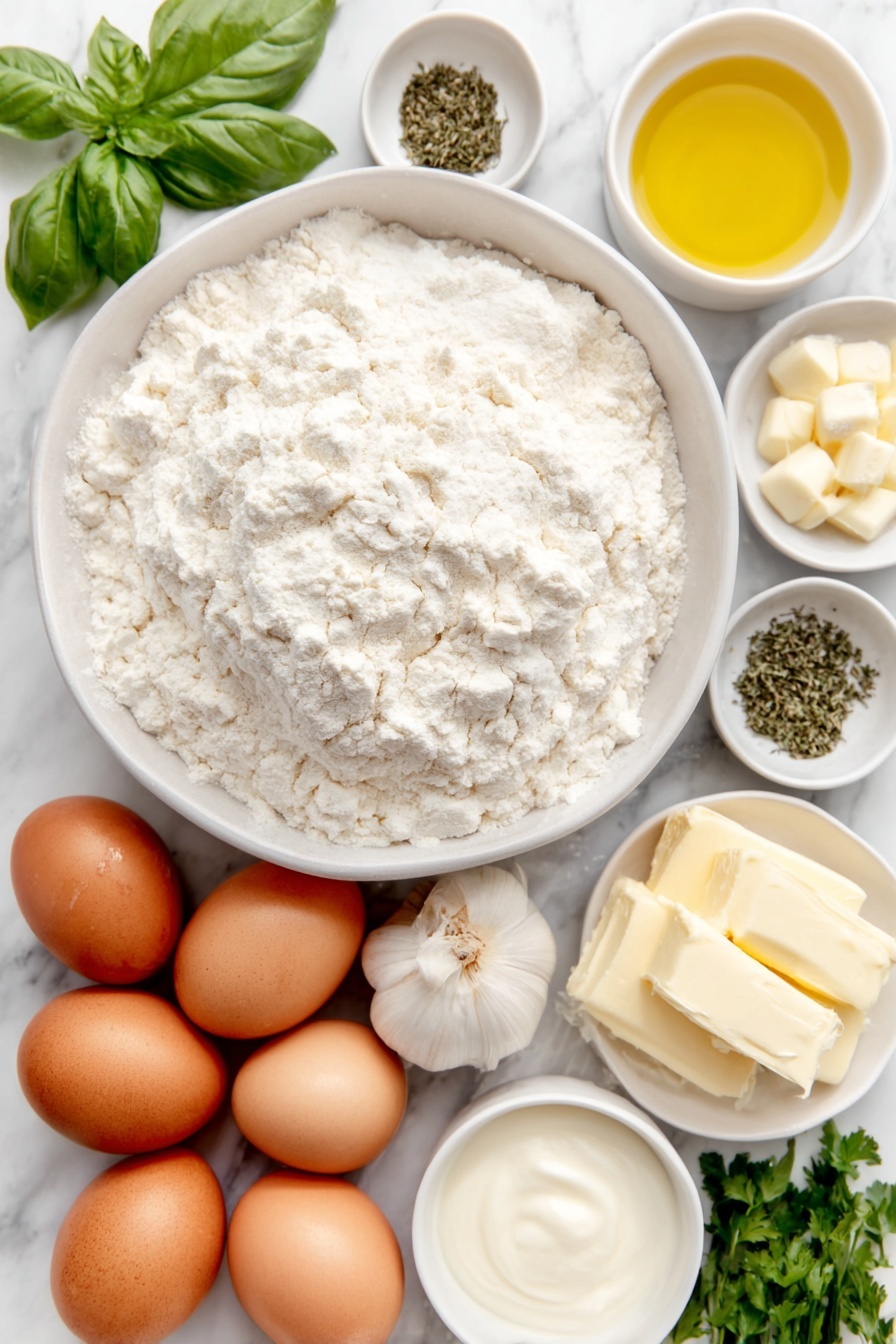
- Lukewarm Water: Activates the yeast without killing it—temperature is crucial, so test with your wrist rather than your finger.
- Instant Yeast: Quick-rising for a reliable proof without the wait of traditional yeast.
- Olive Oil (or light oil): Adds moisture and helps keep the bread tender.
- Bread Flour: Higher protein content develops more gluten, which means better structure and fluffiness.
- Salt: Enhances flavor but keeps the yeast in check when added last.
- Unsweetened Almond Milk: For brushing—creates a golden crust with a subtle sweetness.
- Vegan Butter: The creamy base of your filling, rich and perfect for mixing with herbs and garlic.
- Garlic: Eight cloves might seem like a lot but that punch of garlicky goodness is what makes this bread unforgettable.
- Dried Parsley & Thyme: The heart of earthy flavor that complements the fresh herbs.
- Fresh Coriander & Basil: Bright, zesty notes that lift the entire filling mixture.
Make It Your Way
I love this Vegan Garlic Herb Bread Recipe as is, but I’m all about adding your own flair. Maybe you want it spicier or with different fresh herbs hacking your herb garden, or even stuffed with a vegan cheese for an extra indulgent twist—there’s plenty of room to experiment.
- Variation: Adding a pinch of chili flakes to the herb butter really kicks it up a notch, which I discovered when hosting friends who love heat.
- Herb Swaps: Try rosemary or oregano instead of coriander and basil for a heartier, more Mediterranean vibe.
- Difficulty Level: For beginners, you can shape into a simple loaf rather than the twist—still delicious and easier if you’re short on time.
- Seasonal Twist: In summer, I swap in fresh chives and dill—light and beautifully fragrant.
Step-by-Step: How I Make Vegan Garlic Herb Bread Recipe
Step 1: Activate That Yeast Gently
Start with lukewarm water that’s around body temperature so it wakes up the yeast without killing the little guys. Stir in your instant yeast, and let it sit for a few minutes while you prepare the rest of your ingredients. I often give it a quick swirl—it’ll get a bit foamy, which tells you it’s working perfectly.
Step 2: Mix and Knead the Dough
Add your oil, then your bread flour and sprinkle the salt on top of the flour (not directly on the yeast mixture). Mixing it all together until it forms a rough dough gives you that first sense that this bread is going to be amazing. I usually turn it out onto a floured surface and knead for 5-10 minutes, until it springs back when poked—this is a great test for gluten development.
Step 3: Let It Rise
Once your dough is smooth and elastic, place it in an oiled bowl, cover it with a damp cloth, and let it sit somewhere warm for about an hour. You’ll know it’s ready when it’s doubled in size and fluffy to the touch. This waiting period gives you time to prepare the delicious herb garlic filling—total multitasking win!
Step 4: Prepare the Garlic Herb Filling
Pop your garlic cloves, vegan butter, dried herbs, fresh coriander, basil, and salt into a food processor and blitz until it becomes a rough paste. Don’t have a food processor? No worries! I once had to do this by hand with a fork, pressing the butter creamy and chopping the herbs finely—it worked like a charm and gave me some arm exercise too.
Step 5: Shape and Fill the Dough
After the dough has risen, punch it down gently to release air, then roll it into a rectangle roughly half a centimeter thick. Spread your garlic herb filling generously over the dough. I like to roll it from the short side into a tight log—that way, the loaf holds plenty of filling in every bite. Then, make a neat slit down the middle, leaving the top uncut, and carefully twist the two strands over each other to expose the gorgeous swirls of herby filling.
Step 6: Proof, Brush & Bake
Let the loaf proof for another 45 minutes so it puffs up beautifully. Right before baking, brush it with unsweetened almond milk—that touch helps it develop the most beautiful golden crust. Bake at 190°C fan (or 210°C if you don’t have fan) for 30-35 minutes until it’s crisp and golden. I always keep an eye from 25 minutes on, just to make sure it doesn’t get too dark. And then? Pure joy when you slice into that aromatic masterpiece.
Tips from My Kitchen
- Water Temperature Matters: Using water that’s too hot kills the yeast, and too cold slows it down—lukewarm is your golden middle ground.
- Pinch and Tuck: When twisting the loaf, pinching the dough ends tightly and tucking them under prevents unraveling during baking.
- Use Bread Flour: Trust me on this! It gives the dough that perfect elasticity you need for handling and helps keep the loaf airy.
- Watch Your Oven: Every oven is different, so check on your loaf 5 minutes before time is up to avoid overly dark crust.
How to Serve Vegan Garlic Herb Bread Recipe

Garnishes
I love sprinkling a bit of flaky sea salt and freshly cracked black pepper over the warm bread right out of the oven—it adds just that extra pop. Sometimes, I even add a light drizzle of good-quality olive oil or vegan parmesan for a touch of decadence.
Side Dishes
This bread pairs beautifully with a hearty lentil stew or a big bowl of roasted seasonal veggies. For lighter meals, I serve it alongside my favorite fresh salads or a creamy vegan tomato soup—comfort and freshness in one meal.
Creative Ways to Present
For dinner parties, I’ve sliced and fanned this Vegan Garlic Herb Bread on a wooden board surrounded by an assortment of vegan dips—hummus, baba ganoush, and olive tapenade—always a hit! For holidays, I arrange the twisted loaves in a wreath shape and garnish with rosemary sprigs and edible flowers for a stunning centerpiece.
Make Ahead and Storage
Storing Leftovers
Once cooled completely, I wrap the leftover loaf tightly in plastic wrap and keep it in an airtight container on the counter—it usually lasts me 2 days perfectly. If I know I won’t finish it that fast, I slice it first for easier reheating.
Freezing
This bread freezes beautifully. I wrap it tightly in foil and place it in a freezer bag. When thawing, I let it come to room temperature covered in foil before warming it slightly in the oven—it tastes just like freshly baked.
Reheating
I pop slices straight onto a baking sheet and warm them in a 180°C (350°F) oven for about 8 minutes. For a crispier crust, I leave them uncovered. You’ll get that fresh-out-of-the-oven vibe every time.
FAQs
-
Can I make this Vegan Garlic Herb Bread Recipe gluten-free?
Gluten-free baking usually requires special blends and adjustments because bread flour’s gluten is what gives structure and bounce to the dough. For this recipe, bread flour is key, but you can experiment with gluten-free bread flour mixes designed for yeast breads—just be aware the texture and rise might differ.
-
Can I substitute fresh herbs with dried ones?
For the filling, fresh herbs add brightness and aroma that dried can’t fully replicate. If using dried, reduce the amount by about half to avoid overpowering the filling’s texture, but you’ll want to add some fresh if possible for that perfect herbaceous punch.
-
What if I don’t have a food processor for the filling?
No worries! You can soften the vegan butter by gently warming it and mash it with a fork. Finely chop your fresh herbs and mince garlic, then mix everything by hand until it’s well combined—a bit more elbow grease but just as delicious.
-
How do I know if my bread is fully baked?
Look for a deep golden-brown crust and a crispy exterior. You can also tap the bottom of the loaf once cooled—it should sound hollow. If you have a kitchen thermometer, the internal temperature should be about 90-95°C (195-205°F).
-
Can I prepare the dough and filling in advance?
Absolutely! You can prepare the dough and refrigerate it after the first rise, covered, for up to 24 hours—just bring it back to room temperature before shaping. The filling can be made ahead and kept refrigerated wrapped tightly.
Final Thoughts
This Vegan Garlic Herb Bread Recipe holds a special place in my kitchen because it’s that one recipe that feels like a warm hug every time I bake it. The combination of garlic and herbs encased in fluffy bread is pure magic, vegan or not. I’m excited for you to try this and see how easy it is to transform basic ingredients into something unforgettable. Trust me, once you bake it, it won’t be your last time—your kitchen will smell amazing, and your friends and family will be asking for seconds!
Print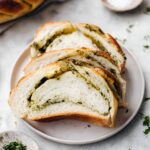
Vegan Garlic Herb Bread Recipe
- Prep Time: 15 minutes
- Cook Time: 35 minutes
- Total Time: 2 hours 30 minutes
- Yield: 10 slices
- Category: Side Dish
- Method: Baking
- Cuisine: Vegan
- Diet: Vegan
Description
A delightful Vegan Garlic Herb Bread featuring a fluffy, well-shaped white bread rolled with a flavorful garlic and mixed herb filling. This bread is perfect as a side dish with meals or as a savory snack. The bread is naturally vegan, using unsweetened almond milk for brushing and a delicious herb butter filling made from vegan butter and fresh herbs.
Ingredients
For the Bread
- 205 ml lukewarm water (¾ cup plus 2 tbsp)
- 3.5 g instant yeast (1 ⅛ teaspoon)
- 1 tablespoon olive oil or any other light oil
- 325 g strong white bread flour (2 ⅝ cup)
- 1 teaspoon salt
- 1 tablespoon unsweetened almond milk (for brushing only)
For the Filling
- 60 g vegan butter (¼ cup)
- 8 cloves garlic
- 1 teaspoon dried parsley
- 2 tablespoons dried thyme
- 6 tablespoons fresh coriander
- 7 tablespoons fresh basil
- ½ teaspoon salt
Instructions
- Activate Yeast: Combine the lukewarm water and instant yeast in a large bowl. Stir gently and let it activate for a few minutes until slightly frothy.
- Mix Dough: Add the olive oil followed by the bread flour, and finally sprinkle the salt on top of the flour. Stir the ingredients together until they begin to form a rough dough.
- Knead Dough: Turn the dough out onto a floured surface and knead it for 10 minutes until the dough springs back when touched, then shape into a ball.
- First Rise: Place the dough in an oiled bowl, cover with a damp cloth, and leave to rise for 1 hour or until doubled in size.
- Prepare Filling: While the dough is rising, prepare the filling by placing all filling ingredients into a food processor or blender and pulse until a rough paste forms. If no food processor is available, soften the vegan butter with a fork and finely chop the fresh herbs before mixing thoroughly by hand.
- Deflate Dough: Once risen, turn the dough onto a floured surface and gently knock the air out for 5-10 seconds using your fists.
- Shape Dough: Roll the dough into a thin rectangle approximately 0.5-1 cm thick, 35 cm long and 20 cm wide (about 0.4 x 14 x 8 inches).
- Spread Filling: Evenly spread the prepared garlic herb filling across the surface of the rolled-out dough.
- Roll Dough: Starting from one of the short sides, roll the dough tightly into a thick, short roll.
- Slice and Twist: Cut a slit down the middle of the bread roll, leaving the top part uncut. Gently turn the filling outwards and then fold one strand over the other repeatedly along the length until you reach the bottom, keeping the filling exposed to create beautiful layers.
- Seal and Tuck: Pinch the bottom of the twisted bread tightly and tuck this pinched portion under the loaf to secure the shape.
- Final Proof: Place the loaf on a baking tray and let it proof for 45 minutes while preheating the oven to 190°C (374°F) on fan setting; if using a conventional oven, preheat to 210°C (410°F).
- Brush and Bake: After proofing, brush the loaf with unsweetened almond milk and bake for 35 minutes until the bread is golden brown and crispy on the outside.
Notes
- Use bread flour for better gluten development and fluffy texture; plain flour can cause tearing during baking.
- Keep salt and yeast separate until mixing to avoid inhibiting yeast activation.
- Always use lukewarm water to activate yeast; hot water will kill it.
- Firmly pinch and tuck the end of the dough to prevent the twist from unraveling during baking.
- Finely chopping the fresh herbs helps mix the filling more evenly if mixing by hand.
Nutrition
- Serving Size: 1 slice
- Calories: 180 kcal
- Sugar: 1 g
- Sodium: 210 mg
- Fat: 7 g
- Saturated Fat: 3 g
- Unsaturated Fat: 4 g
- Trans Fat: 0 g
- Carbohydrates: 24 g
- Fiber: 2 g
- Protein: 4 g
- Cholesterol: 0 mg


