RIP Halloween Dessert Shooters Recipe
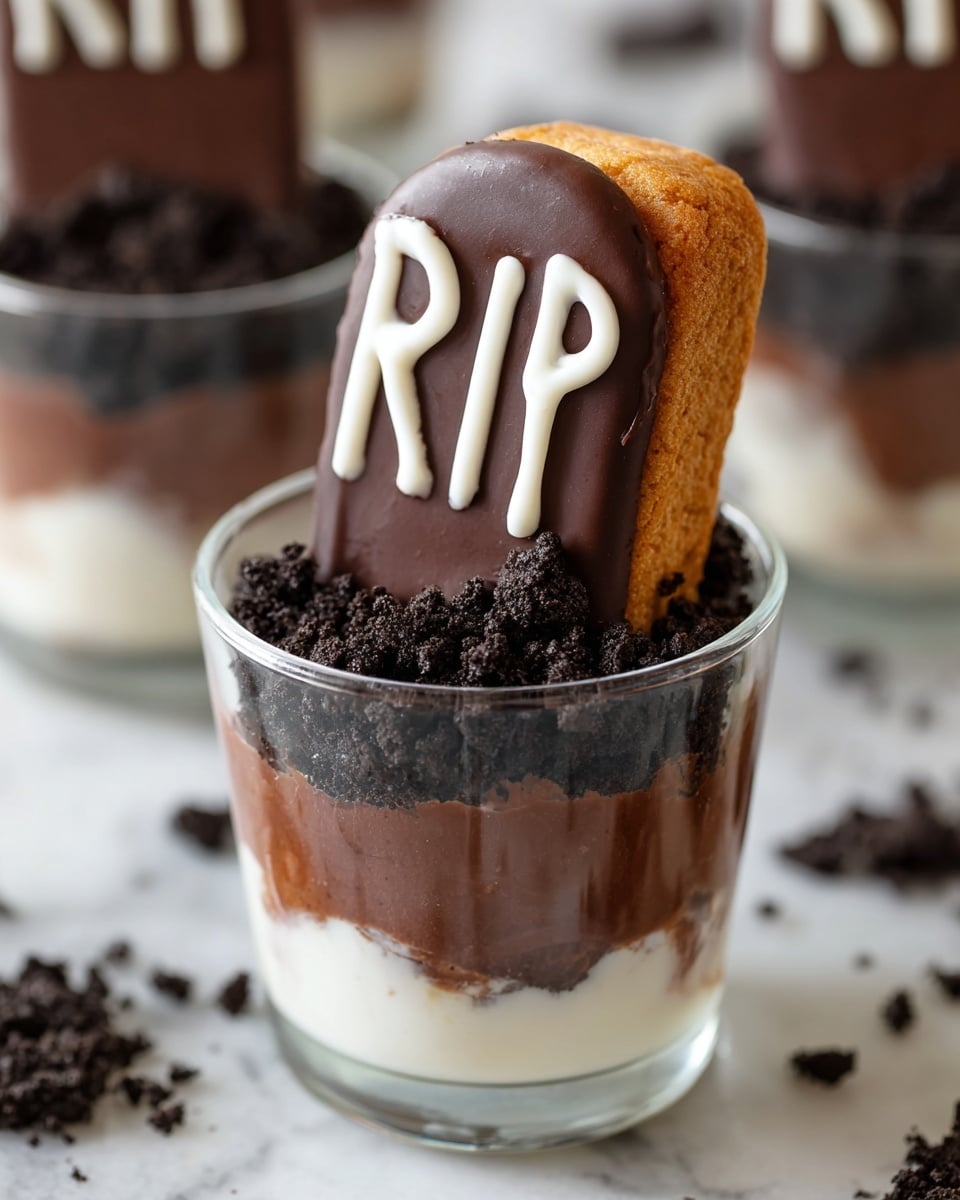
If you’re looking for a spooktacular treat that’s just as fun to make as it is to eat, you’re in for a real treat with my RIP Halloween Dessert Shooters Recipe. These tiny, layered desserts pack all the creepy charm of Halloween into a bite-sized shooter glass, combining creamy pudding, crunchy Oreo “soil,” and chocolate-dipped ladyfinger “gravestones” that will have everyone talking. Trust me, once you make these, you’ll want to whip them up for every Halloween bash and maybe even sneaky weeknight dessert! Keep reading and I’ll walk you through exactly how to nail this recipe.
Why This Recipe Works
- Textural contrast: The creamy pudding meets crumbly Oreo crumbs and crisp chocolate-coated ladyfingers for a multi-layered experience.
- Perfect portion size: These shooters are small and easy to serve, making them ideal for parties or getting a festive dessert fix without overdoing it.
- Visual impact: The mini “gravestone” toppers with the classic “RIP” icing make the presentation super fun and thematic.
- Simple yet impressive: Despite their fancy look, these dessert shooters are straightforward to make and perfect even for baking newbies.

Ingredients & Why They Work
Every ingredient here is chosen to create a fun, cohesive Halloween treat. You’re blending creamy pudding with the dark crumb of Oreo cookies for “soil” and topping it off with chocolate-covered ladyfingers designed as gravestones—plus a sweet royal icing touch. They all work together to nail the spooky vibe and deliver delicious flavor and texture.

- Oreo cookies: They make the perfect “soil” with their dark crumbs and that hidden vanilla filling adds extra creaminess when mixed in.
- Pudding powder: Choose your favorite flavor here—chocolate, vanilla, or even pumpkin spice if you want to customize the vibe.
- Semisweet or dark chocolate: Melts smoothly for dipping the gravestones and adds richness without being too sweet.
- Unsalted butter: Adds creaminess when melted with chocolate and keeps the gravestones tender.
- Ladyfingers: These act as delicate “gravestones” and hold their shape well after dipping and decorating.
- Egg white: Whisked with powdered sugar for the royal icing, perfect for writing “RIP” on each gravestone.
- Powdered sugar: Provides the right sweetness and smooth texture for the royal icing.
Make It Your Way
One of the things I love most about this RIP Halloween Dessert Shooters Recipe is how easy it is to make your own spin on it. I’ve tried swapping pudding flavors and even playing around with different cookie crumbs to suit what I had on hand. The beauty here is in the layering—you can totally make it your own.
- Flavor swaps: I once swapped in pumpkin spice pudding and crushed gingersnaps for an autumn twist—and it was a hit at my Halloween brunch.
- Dairy-free option: Use dairy-free pudding powder and check your ladyfingers for allergens to keep things allergen-friendly.
- Mini pumpkin topping: Instead of the “RIP” gravestones, I’ve tried adding little candy pumpkins on top for a cute variation.
- Extra spooky: Adding a tiny plastic spider or edible eyes on top took the presentation from sweet to seriously spooky at my last party.
Step-by-Step: How I Make RIP Halloween Dessert Shooters Recipe
Step 1: Prep the Oreo “Soil”
First, carefully scrape the white filling from each Oreo cookie—you can use a butter knife or the back of a spoon for this. Put the filling in a separate bowl and set aside. I’ve found that scraping the filling before processing the crumbs really improves the texture because you want the soil crumbly but with a little creamy touch mixed in later. Once the filling is removed, pulse the Oreo cookies in a food processor until you get a fine crumb that looks like dirt—perfect for your dessert shooters.
Step 2: Make the Pudding and Mix in the Filling
Prepare the pudding according to the package instructions. A tip I’ve learned is to stir in the reserved Oreo filling while the pudding is still hot—this helps melt the filling slightly, creating a deliciously creamy, rich pudding base. Let it cool just enough so it won’t melt your Oreo crumbs or chocolate later on but doesn’t set completely yet. Then, pour the pudding halfway up into your shooter glasses and pop them in the fridge to chill.
Step 3: Make Your Chocolate “Gravestones”
While your pudding chills, melt the chocolate and butter together gently over simmering water—take your time here to keep it silky and smooth. Next, slice each ladyfinger in half to make manageable gravestones. Spread a thin layer of the melted chocolate over each piece and place them on parchment or baking paper to set. Once the chocolate firms up, you’re ready to add that cheeky “RIP” message with royal icing. Don’t worry if your handwriting isn’t perfect—homemade charm counts on Halloween!
Step 4: Royal Icing and the Final Assembly
To make your royal icing, beat the egg white with powdered sugar until smooth and foamy—I love using a fork because it’s quick and effective. Transfer the icing to a small plastic bag, snip off a tiny corner, and pipe “RIP” onto each chocolate-covered ladyfinger. Patience is key here, so take your time with the lettering. Finally, after the pudding has set in the fridge, sprinkle the Oreo crumbs on top to create your “soil” layer. Stick the decorated gravestones into the crumbs, and voila! Your spooky shooters are ready to chill until party time.
Tips from My Kitchen
- Keep chocolate drip-free: Let your chocolate cool slightly before spreading on ladyfingers to avoid sogginess.
- Use fresh egg whites: For the best royal icing, fresh or pasteurized egg whites work best; avoid powdered substitutes for this.
- Pudding consistency matters: Don’t overcook the pudding; it should be thick but still pourable to layer nicely.
- Chill fully before assembling: Pudding needs to set a bit before adding crumbs or gravestones to keep layers distinct.
How to Serve RIP Halloween Dessert Shooters Recipe
Garnishes
I personally love keeping it classic with the “RIP” gravestones topped on Oreo crumbs—that contrast always impresses my guests. Sometimes, I sprinkle a few edible glitter stars or add tiny plastic spiders for an extra spooky touch. Fresh mint leaves don’t usually make the cut here because they clash with the Halloween vibe, but candy eyeballs or orange sprinkles? Absolutely.
Side Dishes
These dessert shooters shine most on their own, but pairing them with a light salad or a pumpkin soup as a starter keeps the meal balanced. If you want to keep the Halloween theme going, I like serving them alongside caramel apples or cinnamon-spiced popcorn for a fun dessert table spread.
Creative Ways to Present
One time, I set these shooters into a mini “graveyard” display made from crumpled black tissue paper and small plastic tombstones—talk about a conversation starter! You could also line them up on a spooky tray with dry ice steam effects for Halloween parties. For a kid-friendly spin, switch out the “RIP” for smiley faces or mini Halloween stickers on the ladyfingers.
Make Ahead and Storage
Storing Leftovers
I store leftover RIP Halloween Dessert Shooters in an airtight container in the fridge. Because of the delicate layers and chocolate gravestones, I try to keep them upright and separate so they don’t get smooshed. They stayed fresh and delicious for up to 2 days in my experience—any longer and the ladyfingers start to get soggy, so enjoy them sooner rather than later!
Freezing
Freezing these shooters isn’t my personal favorite because the pudding’s texture changes and the chocolate can lose its snap. However, if you must freeze, remove the crumb topping and gravestones first, then freeze the pudding base separately. Thaw in the fridge and reassemble just before serving for the best result.
Reheating
Because these are cold pudding shooters, reheating doesn’t really apply. Instead, just let them sit at room temperature for about 10 minutes if they come straight out of the fridge, so the flavors open up and the textures soften a bit before enjoying.
FAQs
-
Can I use homemade pudding instead of the packet?
Absolutely! Homemade pudding can add a fresh and richer flavor to your RIP Halloween Dessert Shooters Recipe. Just be sure it’s firm enough to hold its shape in the shooters but still creamy enough for that smooth texture.
-
How do I make the royal icing without raw egg?
If you want to avoid raw egg whites, you can use meringue powder mixed with water as a safe alternative that still creates a smooth, pipeable royal icing perfect for writing “RIP.”
-
Can I make these shooters gluten-free?
You can use gluten-free cookies as the “soil” and gluten-free ladyfingers or thin gluten-free biscuits for the gravestones. Just double-check all your ingredients and pudding mix to ensure they’re gluten-free certified.
-
What size glasses work best for these dessert shooters?
I use small glasses about 1.5 oz (45 ml) capacity—not too big, so the portions remain just right and layered beautifully without the pudding getting lost.
-
How do I store leftover royal icing?
Leftover royal icing can be stored in an airtight container in the fridge for a few days. Before using again, stir it gently or add a few drops of water to loosen it up if it thickens too much.
Final Thoughts
Honestly, this RIP Halloween Dessert Shooters Recipe has become my go-to when I want something festive but not fussy. It hits all the right notes for Halloween—playful, a little spooky, and deliciously sweet without requiring hours in the kitchen. If you want to wow your guests or just treat yourself to a little seasonal magic, give this recipe a try. You’ll be surprised how easy it is to pull off and how much fun it brings to your Halloween celebrations. Can’t wait to hear what twists you come up with!
Print
RIP Halloween Dessert Shooters Recipe
- Prep Time: 40 minutes
- Cook Time: 0 minutes
- Total Time: 40 minutes
- Yield: 24 servings
- Category: Dessert
- Method: No-Cook
- Cuisine: American
Description
RIP Halloween Dessert Shooters are spooky and delicious treats perfect for Halloween parties. These mini desserts feature creamy pudding layered with Oreo cookie ‘soil’ and decorated with chocolate-coated ladyfinger gravestones marked with ‘RIP’ royal icing, creating a fun and eerie presentation that delights both kids and adults.
Ingredients
For the soil:
- 12 Oreo cookies
- 1 packet pudding powder of your choice (1.4 ounces / 43 grams)
For the Gravestones:
- 2 ounces semisweet or dark chocolate (60 grams)
- 3 tablespoons unsalted butter
- 12 ladyfingers
- 1 tablespoon egg white
- 5 tablespoons powdered sugar, sifted
Instructions
- Prepare Oreo soil: Scrape the white filling from each Oreo cookie and place it in a bowl. Set aside. Put the Oreo cookies, without filling, into a food processor and pulse until they reach a crumb-like texture.
- Make pudding mixture: Prepare the pudding according to the packet instructions. While still hot, stir in the reserved Oreo filling until well combined. Let the pudding cool slightly before layering.
- Assemble shooters base: Pour the pudding mixture into small glasses, filling each about halfway to leave room for Oreo crumbs and gravestones. Place the glasses in the refrigerator to chill.
- Make chocolate coating: Melt the semisweet or dark chocolate with the unsalted butter over a pot of simmering water until smooth and combined.
- Prepare gravestones: Cut each ladyfinger in half. Using a spatula, spread the melted chocolate over each half. Place them on a sheet of baking paper and let the chocolate set completely.
- Prepare royal icing: Beat the egg white with a fork until foamy, then gradually mix in sifted powdered sugar until smooth. Transfer the icing to a ziplock bag and cut a tiny hole in one corner for piping.
- Decorate gravestones: Once the chocolate coating on ladyfingers has set, pipe the letters ‘RIP’ onto each ladyfinger gravestone using the royal icing.
- Finish assembling shooters: Once pudding has partially set, sprinkle Oreo cookie crumbs over the pudding in each glass. Insert a decorated ladyfinger gravestone into each shooter. Refrigerate until ready to serve.
Notes
- The glasses used for these dessert shooters have a capacity of approximately 1.5 ounces (45 ml), ensuring perfectly sized servings.
- If a food processor is unavailable, place Oreo cookies in a sealed plastic bag and crush with a rolling pin to create crumbs.
- For a dairy-free option, use vegan butter and non-dairy pudding mix.
- For easier piping, use a small piping tip instead of a ziplock bag for royal icing decoration.
- These shooters can be prepared a few hours in advance and stored in the refrigerator covered to maintain freshness.
Nutrition
- Serving Size: 1 shooter (approximately 1.5 oz)
- Calories: 150 kcal
- Sugar: 20 g
- Sodium: 90 mg
- Fat: 7 g
- Saturated Fat: 4 g
- Unsaturated Fat: 3 g
- Trans Fat: 0 g
- Carbohydrates: 22 g
- Fiber: 1 g
- Protein: 2 g
- Cholesterol: 15 mg


