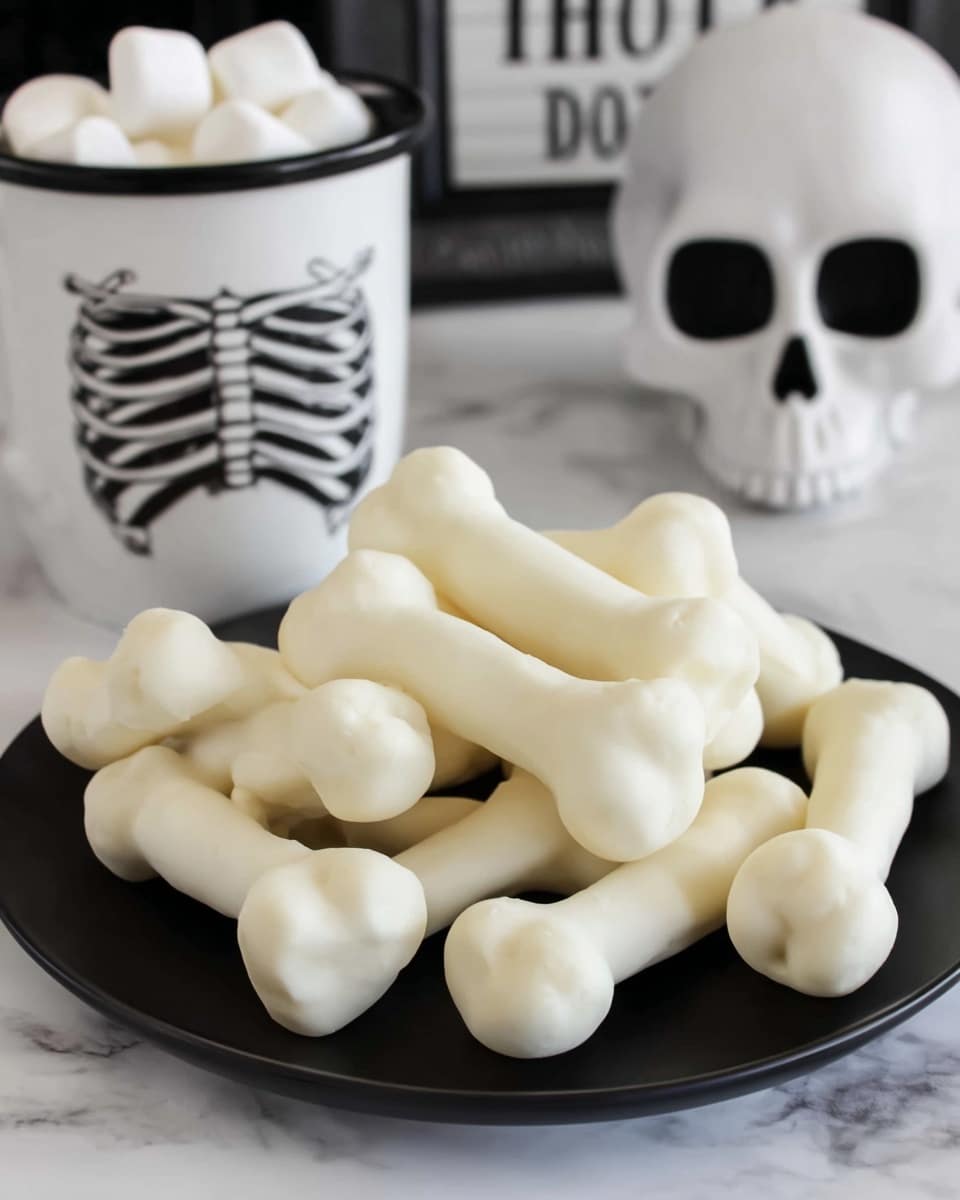
Pretzel Bones Recipe
Okay, friends, I have a treat for you today that’s as fun to make as it is to eat – my absolutely fan-freaking-tastic Pretzel Bones Recipe. These little guys are perfect for parties, Halloween, or even just a quirky snack to impress your crew. They’re crunchy, sweet, and have that irresistible white chocolate coating that takes them over the top. Trust me, once you try this recipe, you’ll want to keep a stash ready all year round. So, grab your apron, and let’s dive into this deliciousness!
Why This Recipe Works
- Simplicity Meets Fun: You only need three ingredients to create a snack that feels festive and special.
- Perfect Texture Balance: The crunch of pretzels combines flawlessly with the soft marshmallow center and smooth white chocolate coating.
- Customizable and Quick: Want to add sprinkles or a drizzle? It’s super easy to tweak to your taste without extra fuss.
- Kid-Friendly and Party-Ready: These adorable “bones” are a hit for Halloween or anytime you want to wow guests without stress.

Ingredients & Why They Work
Let’s chat about the magic behind your ingredients. Each one plays a key role in making these Pretzel Bones irresistible. Plus, choosing quality items and understanding their function helps you nail this recipe every time.

- Mini Marshmallows: These act as the “joint” in your pretzel bone. The smaller size fits perfectly and melts a bit inside for a gooey texture.
- Pretzel Sticks: Provide that salty crunch and structure—grab the slender ones for easy assembly.
- White Candy Melting Chips: They melt smoothly and harden nicely for a crisp coating; I’ve found quality white chocolate chips work best rather than bars for melting.
Make It Your Way
I love playing around with this Pretzel Bones Recipe depending on the season or occasion—it’s such a simple canvas for creativity!
- Variation: Sometimes I swap white chocolate for milk chocolate chips for a sweeter, creamier coat that my kids adore.
- Add a Pop of Color: Sprinkling crushed candy canes or rainbow sprinkles before the chocolate sets adds personality and flavor.
- Healthier Twist: You can lightly toast the pretzel sticks beforehand to boost that deep, nutty flavor if you want a slightly more sophisticated bite.
Step-by-Step: How I Make Pretzel Bones Recipe
Step 1: Assemble Your Bones
Start by pushing a mini marshmallow onto one end of a pretzel stick, then another marshmallow on the opposite end, creating that classic “bone” shape. It’s easier than it sounds—gentle pressure works best so you don’t break the pretzel. I like to line them all up on parchment paper while I work to keep things tidy.
Step 2: Melt Your White Chocolate
Place your white candy melting chips into a microwave-safe bowl. Heat for 45 seconds, then stir well. Repeat in 15-30 second intervals until smooth and glossy—you want silky chocolate, not burnt or lumpy. A quick tip: stirring between heats really helps distribute the warmth evenly.
Step 3: First Dip and Chill
Grab a fork and carefully dip each pretzel bone into the white chocolate, fully coating it. Let excess drip off before placing it on your parchment-lined baking sheet. Pop the tray into the fridge for about 10 minutes to allow the chocolate to set just right—not too soft, not too hard.
Step 4: Trim & Double Dip
If you notice any chocolate pooling or uneven edges after the first dip, use a sharp knife to trim the mess before the chocolate fully hardens. Then, heat your chocolate again for 30 seconds and stir. Dip each bone a second time to get that perfectly thick, even coating. Back into the fridge for another 10 minutes, and voilà—your Pretzel Bones are ready!
Tips from My Kitchen
- Marshmallow Placement: I found pushing marshmallows all the way to the edges keeps the bone shape crisp and distinct.
- Chocolate Consistency: If your chocolate feels too thick for dipping, add a tiny drop of vegetable oil to smooth it out.
- Cooling Trick: Always chill your dipped pretzels on parchment to avoid sticking or melting chocolate when removing.
- Double Dip Magic: That second coat of chocolate not only looks gorgeous but gives your bones that satisfying crunch and neat finish.
How to Serve Pretzel Bones Recipe
Garnishes
I adore topping these Pretzel Bones with some fun garnishes depending on the mood—think crushed peppermint for winter, orange sanding sugar for Halloween, or rainbow sprinkles just for everyday brightness. It’s such an easy way to personalize and make them pop!
Side Dishes
Pair your pretzel bones with a cup of spiced apple cider or a rich hot chocolate for a cozy snack. For parties, they’re a hit alongside savory cheese platters or even paired with a bowl of salty nuts for a sweet-salty combo.
Creative Ways to Present
Once, I arranged a dozen Pretzel Bones sticking out of a carved pumpkin like quirky “bones in a graveyard” for Halloween. Another time, they formed little edible bouquets wrapped in colorful cellophane bags for a kids’ party favor. Feel free to get playful—the shape makes them perfect for themes and celebrations.
Make Ahead and Storage
Storing Leftovers
I store leftover Pretzel Bones in an airtight container at room temperature for up to a week. Just make sure they’re kept away from heat or humidity to keep that chocolate crisp and marshmallows fresh.
Freezing
If you want to stash Pretzel Bones for later, freezing works surprisingly well. Arrange them on parchment in a single layer, freeze until solid, then transfer to a freezer-safe bag. When you’re ready, thaw at room temp to preserve the texture.
Reheating
I don’t recommend reheating since the chocolate coating is best enjoyed firm and crisp. If the marshmallow softens a bit, don’t worry—it just adds a nice chewy surprise.
FAQs
-
Can I use regular marshmallows instead of mini ones for Pretzel Bones Recipe?
You can, but mini marshmallows fit better on the pretzel ends and create the distinct bone look. If you use large marshmallows, they might overpower the pretzel or fall off more easily.
-
What if I don’t have white candy melting chips? Can I use white chocolate bars?
White chocolate bars can work but are trickier to melt smoothly and might seize if overheated. Candy melting chips are specifically designed to melt evenly without tempering, making them a safer bet for dipping.
-
Can I add flavors to the melted chocolate?
Absolutely! A drop of peppermint or almond extract can add a lovely twist. Just be careful not to add too much liquid or it can affect the chocolate’s texture.
-
How long do Pretzel Bones stay fresh?
Stored properly in an airtight container at room temperature, they stay fresh for up to one week. After that, marshmallows can start to harden, but they’ll still taste delicious.
Final Thoughts
I genuinely love making this Pretzel Bones Recipe because it’s simple, fun, and a guaranteed crowd-pleaser—especially when you want something a little different but not complicated. They bring a smile every time I bring them out, and sharing them with friends feels like sharing a little bit of magic. Give it a try, you’ll be surprised how quickly these become a new favorite in your snack lineup!
Print
Pretzel Bones Recipe
- Prep Time: 15 minutes
- Cook Time: 20 minutes
- Total Time: 35 minutes
- Yield: 40 servings
- Category: Snack
- Method: No-Cook
- Cuisine: American
- Diet: Vegetarian
Description
This fun and spooky Pretzel Bones recipe combines crunchy pretzel sticks and soft mini marshmallows dipped in creamy white candy coating to create a perfect Halloween treat or party snack.
Ingredients
Main Ingredients
- 80 mini marshmallows
- 40 pretzel sticks
- 16 oz white candy melting chips or white candy melting tray
Instructions
- Prepare Baking Sheet: Line a baking sheet with parchment paper to prevent sticking and for easy cleanup.
- Assemble Pretzel Bones: Push one mini marshmallow onto each end of a pretzel stick to form the bone shape.
- Melt White Candy Coating: Heat the white candy melting chips in the microwave for 45 seconds, then stir well. Repeat heating in short bursts and stirring until the candy is fully melted and smooth.
- First Dip: Using a fork, dip each pretzel bone completely into the white chocolate coating, shaking off any excess chocolate, then place onto the parchment-lined baking sheet.
- Chill to Set: Place the tray in the refrigerator for 10 minutes to allow the coating to harden.
- Trim Excess Chocolate: Optionally, use a sharp knife to trim any excess chocolate that has dripped off and hardened around the bones.
- Reheat Chocolate: Heat the white candy coating again for 30 seconds and stir to keep it smooth and workable.
- Second Dip: Dip each pretzel bone again into the white chocolate coating for a thicker layer, shaking off excess and returning them to the tray.
- Final Chill: Refrigerate for another 10 minutes until the coating is fully set and firm.
Notes
- You can substitute regular-sized marshmallows cut in half for mini marshmallows if needed.
- Use good quality white candy melts for smoother coating and easier melting.
- Make sure to shake off excess white chocolate to avoid large drips that are hard to trim.
- Store the pretzel bones in an airtight container at room temperature for up to 3 days.
- For extra fun, decorate with edible markers or colored sprinkles before chilling the second time.
Nutrition
- Serving Size: 1 piece
- Calories: 90 kcal
- Sugar: 8 g
- Sodium: 120 mg
- Fat: 3 g
- Saturated Fat: 2.5 g
- Unsaturated Fat: 0.4 g
- Trans Fat: 0 g
- Carbohydrates: 15 g
- Fiber: 0 g
- Protein: 1 g
- Cholesterol: 0 mg


