Peppermint Cheesecake with Chocolate Ganache Recipe
If you’re a fan of festive desserts that are both refreshing and indulgent, you’ve got to try my Peppermint Cheesecake with Chocolate Ganache Recipe. It’s the perfect balance of creamy cheesecake, cool peppermint flavor, and rich chocolate that will have everyone smiling after the first bite. Truly, this cheesecake feels like a cozy holiday hug and I can’t wait to walk you through every step so you can nail it in your own kitchen.
Why This Recipe Works
- Creamy Texture: Full-fat brick-style cream cheese and sour cream create irresistible smoothness that melts in your mouth.
- Balance of Flavors: The cool peppermint extract and warm chocolate ganache complement each other perfectly, making each slice a party in your mouth.
- Oreo Crust Magic: Using whole Oreos for the crust adds indulgent chocolate cookie crunch and extra flavor depth.
- Water Bath Baking: Baking the cheesecake in a water bath ensures it stays moist and avoids the dreaded cracks, giving you a flawless finish.

Ingredients & Why They Work
This Peppermint Cheesecake with Chocolate Ganache Recipe combines every ingredient thoughtfully to create a harmonious dessert. From cookie crumbs to peppermint essence, each piece plays an important role in both flavor and texture.

- Oreo Cookies: Their deep chocolate flavor and classic crunch form the perfect base for your crust, no need to add extra sugar here.
- Unsalted Butter: Melts into the crust crumbs to bind everything, giving it that buttery crispness.
- Cream Cheese: Use full-fat, brick-style for the creamiest, richest cheesecake. No shortcuts with low-fat versions here!
- Granulated Sugar: Sweetens gently without overpowering, balancing the tang of the cream cheese.
- Sour Cream: It adds a subtle tang and smooths out the texture beautifully; plain Greek yogurt works in a pinch too.
- Cornstarch or Flour: Acts as a stabilizer to give your cheesecake that perfect set without being rubbery.
- Peppermint Extract: The star of the show! Adds a cool, refreshing note; adjust it to taste so it’s just right for you.
- Eggs & Yolks: Provide structure and creaminess, beating them in while not over-mixing keeps the batter light.
- Semi-Sweet Chocolate: For the ganache, finely chopped works best for smooth melting and luscious drip effect.
- Heavy Cream: Whisked into the chocolate for silky, glossy ganache that feels luxurious.
- Candy Canes: Crushed on top adds a festive crunch and a final peppermint flourish.
- Whipping Cream: Optional for decorating – it’s a lovely light touch to balance the rich ganache.
Make It Your Way
While this peppermint cheesecake is pretty flawless as is, I love adjusting the peppermint and chocolate levels depending on my mood or occasion. Don’t be shy to make it your own and try little tweaks!
- Double the Peppermint: If you’re a peppermint fanatic like me, add an extra teaspoon of peppermint extract. Just be careful not to overdo it—the flavor can become intense quickly.
- Dairy-Free Variation: I experimented with full-fat coconut cream instead of sour cream and cream cheese substitutes for dairy-free guests; the texture changes a bit but still delicious!
- Chocolate Ganache Swap: Try white chocolate ganache with peppermint for a sweeter, creamier finish—perfect if you don’t want anything too dark.
- Festive Colors: Using red food coloring in the filling lets you customize for holidays—try green for St. Patrick’s too!
Step-by-Step: How I Make Peppermint Cheesecake with Chocolate Ganache Recipe
Step 1: Prep Your Pan Like a Pro
First things first — preheat your oven to 325°F (170°C). Then take a 9-inch springform pan and wrap the outside really well with foil. I like to use an oven bag before wrapping it multiple times with foil—this is key to avoiding leaks during the water bath bake. Trust me, this step saves you a lot of cleanup stress later.
Step 2: Crush Those Oreos for the Perfect Crust
Pop the Oreos (all parts – wafers and filling!) into a food processor until you have super fine crumbs. No food processor? No worries! Put them in a ziplock bag and crush with a rolling pin. Mix those crumbs with melted butter; a few quick pulses or stirring with a fork does the trick. Press the mixture firmly into the pan—don’t forget to create a slight lip on the edges for crust stability.
Step 3: Bake the Crust
Bake the crust for about 10 minutes so it’s set and begins to crisp up. This step helps prevent sogginess when the filling goes in. Once baked, keep the oven running and leave the crust aside while you make the filling.
Step 4: Whip Up That Luscious Cheesecake Filling
In a big bowl, beat your room temperature cream cheese with sugar until creamy—this usually takes about 2-3 minutes, and don’t forget to scrape the sides so everything blends evenly. Add in sour cream, sifted cornstarch (this little trick helps keep it smooth), peppermint extract, and red food coloring if you want that festive tint. Give it a taste and adjust peppermint if you want a stronger kick. Next, whisk your eggs and yolks separately, then slowly add them to the mixture on low speed until just combined. The key here is not to overmix to keep the filling light and airy.
Step 5: Get Ready for the Water Bath Bake
Pour your filling right onto the Oreo crust and smooth it out. Place the springform pan into a larger roasting pan, then pour in hot water until it comes halfway up the side of your springform pan. This water bath keeps the heat gentle and even, helping avoid cracks and drying out. Pop everything into the oven and bake for about 50-60 minutes. The cheesecake should look set on top but still have a little wobble in the center like soft jelly when you gently shake it.
Step 6: Cool and Chill with Patience
Remove the pans carefully and let the cheesecake cool in the water bath to room temperature—this gradual cooling helps prevent cracking. Once cooled, remove the springform pan from the water bath, cover, and refrigerate for at least 6 hours or overnight so it can set fully.
Step 7: Melt Down the Chocolate Ganache
Finely chop your semi-sweet chocolate and put it in a heatproof bowl. Warm your heavy cream in the microwave in short bursts—stop just before it boils. Pour the hot cream over your chocolate and let it sit undisturbed for 2 minutes, then whisk until silky smooth. If any lumps remain, a gentle zap in the microwave on medium power will do the trick. Keep this ganache warm until your cheesecake is ready.
Step 8: Bring It All Together
Take your chilled cheesecake out, run a thin knife gently around the edge, and release it from the springform pan. Use a paper towel to blot away any moisture on top before pouring over the chocolate ganache—you want it to drip beautifully over the edges for that wow factor. Pop it back into the fridge to set the ganache for at least an hour before serving.
Step 9: The Finishing Touch — Candy Canes!
Right before serving, crush some candy canes with a rolling pin and sprinkle generously on top. It adds not just texture but a final peppermint punch that ties everything together perfectly. Slice with a thin sharp knife — sharpening your knife between slices helps you get those neat clean pieces, especially cutting through the crust.
Tips from My Kitchen
- Room Temperature is Key: Letting your cream cheese, sour cream, and eggs warm up for 30 minutes before starting helps the batter come together without lumps.
- Don’t Skip the Water Bath: I learned the hard way—baking without it caused cracks and dryness. This step makes a huge difference in texture.
- Mix Eggs Gently: Beat them separately then add in small batches on low speed to avoid over-incorporating air, which can cause cracks.
- Sharp Knife for Slicing: Wiping your knife clean and warming it in hot water between slices helps keep your cheesecake looking picture perfect.
How to Serve Peppermint Cheesecake with Chocolate Ganache Recipe

Garnishes
I love keeping the garnish simple but festive—crushed candy canes for that peppermint crunch and a few delicate dollops of freshly whipped cream on top. Sometimes, I add a sprinkle of cocoa powder or a few mini chocolate chips for an extra chocolaty touch. It’s those little extras that get compliments every time!
Side Dishes
This cheesecake is rich enough to stand on its own, but pairing it with a light, fresh fruit salad or a citrusy compote cuts through the richness perfectly. If it’s holiday time, spiced mulled wine or a peppermint mocha on the side create an all-around festive vibe.
Creative Ways to Present
For parties, I’ve served slices on individual spoons or mini plates with a tiny peppermint stick as a garnish—it’s super cute and makes for great photo moments. You can also layer the cheesecake batter and ganache in clear glasses for a no-bake option, turning it into an elegant parfait.
Make Ahead and Storage
Storing Leftovers
I tightly cover leftover slices and store them in the fridge. The cheesecake stays fresh and creamy for up to 4 days — longer than that and the crust tends to soften too much. Eating it chilled really keeps the peppermint flavor bright and refreshing.
Freezing
I’ve frozen this cheesecake a few times wrapped securely in plastic wrap and foil. It holds up well for up to 2 months. Thaw in the fridge overnight, then add ganache and candy canes fresh before serving to keep that fresh-pulled-together look and flavor.
Reheating
I actually prefer eating cheesecake cold, but if you want it slightly less chilled, just let the slice sit at room temperature for 15-20 minutes before serving. Avoid microwaving, or you’ll risk melting the ganache and altering texture.
FAQs
-
Can I use regular vanilla extract instead of peppermint extract?
You definitely can, but keep in mind the peppermint extract is what gives this cheesecake its signature refreshing flavor. If you use vanilla extract, you’ll end up with a classic cheesecake without the minty twist, so it really changes the character of the dessert.
-
Why do I need to use a water bath to bake this cheesecake?
The water bath provides gentle, even baking heat that prevents the cheesecake from cracking and drying out. It creates a moist environment in the oven that lets the filling cook softly and set just right, which is especially important for delicate recipes like this Peppermint Cheesecake with Chocolate Ganache.
-
Can I prepare this cheesecake ahead of time?
Absolutely! In fact, making this cheesecake a day ahead works wonderfully because it needs to chill for at least 6 hours to set properly. You can also add the chocolate ganache and candy cane topping just before serving to keep them fresh and vibrant.
-
What’s the best way to avoid cracks in my cheesecake?
Use room temperature ingredients, don’t overmix the batter especially after adding eggs, and always bake in a water bath. Cooling the cheesecake slowly in the water bath and then refrigerating it without moving also helps keep the surface smooth.
Final Thoughts
This Peppermint Cheesecake with Chocolate Ganache Recipe has become my go-to dessert when I want to wow guests without spending all day in the kitchen. The layers of creamy filling, chocolaty crust, and refreshing peppermint are indulgent yet bright. I hope you’ll enjoy making and sharing it as much as I do—it truly brings a little magic to the table. Invite a friend over, slice it up, and savor every bite together.
Print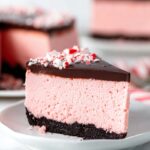
Peppermint Cheesecake with Chocolate Ganache Recipe
- Prep Time: 45 minutes
- Cook Time: 60 minutes
- Total Time: 7 hours 35 minutes
- Yield: 12 servings
- Category: Dessert
- Method: Baking
- Cuisine: American
- Diet: Vegetarian
Description
This Peppermint Cheesecake features a rich Oreo cookie crust, creamy peppermint-infused cheesecake filling, and a decadent chocolate ganache topped with crushed candy canes. Perfect for festive occasions, this dessert combines cool peppermint flavor with classic cheesecake creaminess and a crunchy chocolate crust.
Ingredients
Oreo Crust
- 30 Oreo cookies, wafers and filling
- 1/3 cup unsalted butter, melted
Cheesecake Filling
- 24 oz cream cheese, full-fat, brick-style
- 1 1/4 cup granulated sugar
- 1 cup sour cream
- 1 tablespoon cornstarch (or 2 tablespoons all-purpose flour)
- 1-2 teaspoons peppermint extract
- 2-4 drops red food coloring (optional)
- 3 large eggs
- 2 large egg yolks
Chocolate Ganache
- 6 oz semi-sweet chocolate, finely chopped
- 2/3 cup heavy cream
- 2 crushed candy canes
- Whipping cream, for decorating
For the Waterbath
- Hot water
Instructions
- Preheat and Prepare Pan: Preheat the oven to 325F (170C). Wrap the outside of a 9-inch springform pan with an oven bag, then wrap it at least 4 times with aluminum foil, covering bottom, sides, and seams completely to prevent water seepage during baking.
- Make Oreo Crust: Process Oreo cookies (including filling) into fine crumbs using a food processor or crush them in a zip-lock bag with a rolling pin. Mix crumbs with melted butter until combined. Press mixture evenly into the bottom of the springform pan, creating a slight lip around edges. Bake crust for 10 minutes, then remove from oven but keep oven on and pan wrapped.
- Prepare Cheesecake Filling: In a large bowl, beat cream cheese and sugar until soft and creamy (about 2-3 minutes), scraping down bowl sides and bottom. Add sour cream, sifted cornstarch, 1 teaspoon peppermint extract, and red food coloring drops; beat until smooth. Taste and adjust peppermint extract and food coloring as desired. In a separate bowl, whisk together 3 eggs and 2 yolks. Slowly beat eggs into cream cheese mixture in two additions on low speed, stopping as soon as no egg streaks remain.
- Assemble and Bake Cheesecake: Pour filling over baked crust in the springform pan. Place pan into a large roasting pan. Pour hot water into roasting pan to reach 1/2 to 1 inch depth around the springform pan. Bake in oven for 60 minutes or until top is set with a slight wobble like pudding when nudged.
- Cool and Chill: Remove roasting pan from oven. Let cheesecake cool in waterbath to room temperature, then remove springform pan from waterbath, cover, and refrigerate for at least 6 hours to chill and set completely.
- Make Chocolate Ganache: Place chopped chocolate in heatproof bowl. Heat heavy cream in microwave at 30-second intervals until nearly boiling. Pour hot cream over chocolate and let sit for 2 minutes, then whisk until smooth. If chocolate isn’t fully melted, microwave for 30 seconds at medium power and whisk again.
- Finish Cheesecake: Remove cheesecake from fridge and run a thin knife around edge of springform pan before unclamping the ring. Blot any moisture from top with paper towel. Pour ganache over cheesecake, allowing it to drip down sides. Return cheesecake to fridge to set ganache.
- Decorate and Serve: Just before serving, sprinkle crushed candy canes over the ganache. Slice cheesecake with a thin, sharp knife, ensuring to cut through crust fully. Optionally, add whipped cream for decoration.
Notes
- Use room temperature cream cheese, sour cream, and eggs for best blending—remove from fridge 30 minutes before starting.
- Only use brick-style, full-fat cream cheese for creamy texture; avoid low-fat or whipped varieties.
- Sour cream can be substituted with plain Greek yogurt for similar consistency; avoid flavored yogurts.
- Peppermint extract is key to flavor and is found in most baking aisles; adjust amount to taste.
- Use 5 eggs total: 3 whole eggs plus 2 additional egg yolks, discard whites.
- For ganache, semi-sweet or dark chocolate (around 50%) works best; chopped chocolate melts smoother than chips.
- Wrap springform pan meticulously to prevent water from leaking into the cheesecake during the waterbath baking.
- Make cheesecake a day ahead to allow thorough chilling and set ganache and toppings for best flavor.
- Store leftovers tightly covered in fridge for up to 4 days.
Nutrition
- Serving Size: 1 slice
- Calories: 450 kcal
- Sugar: 30 g
- Sodium: 290 mg
- Fat: 32 g
- Saturated Fat: 18 g
- Unsaturated Fat: 10 g
- Trans Fat: 0.5 g
- Carbohydrates: 35 g
- Fiber: 2 g
- Protein: 7 g
- Cholesterol: 150 mg


