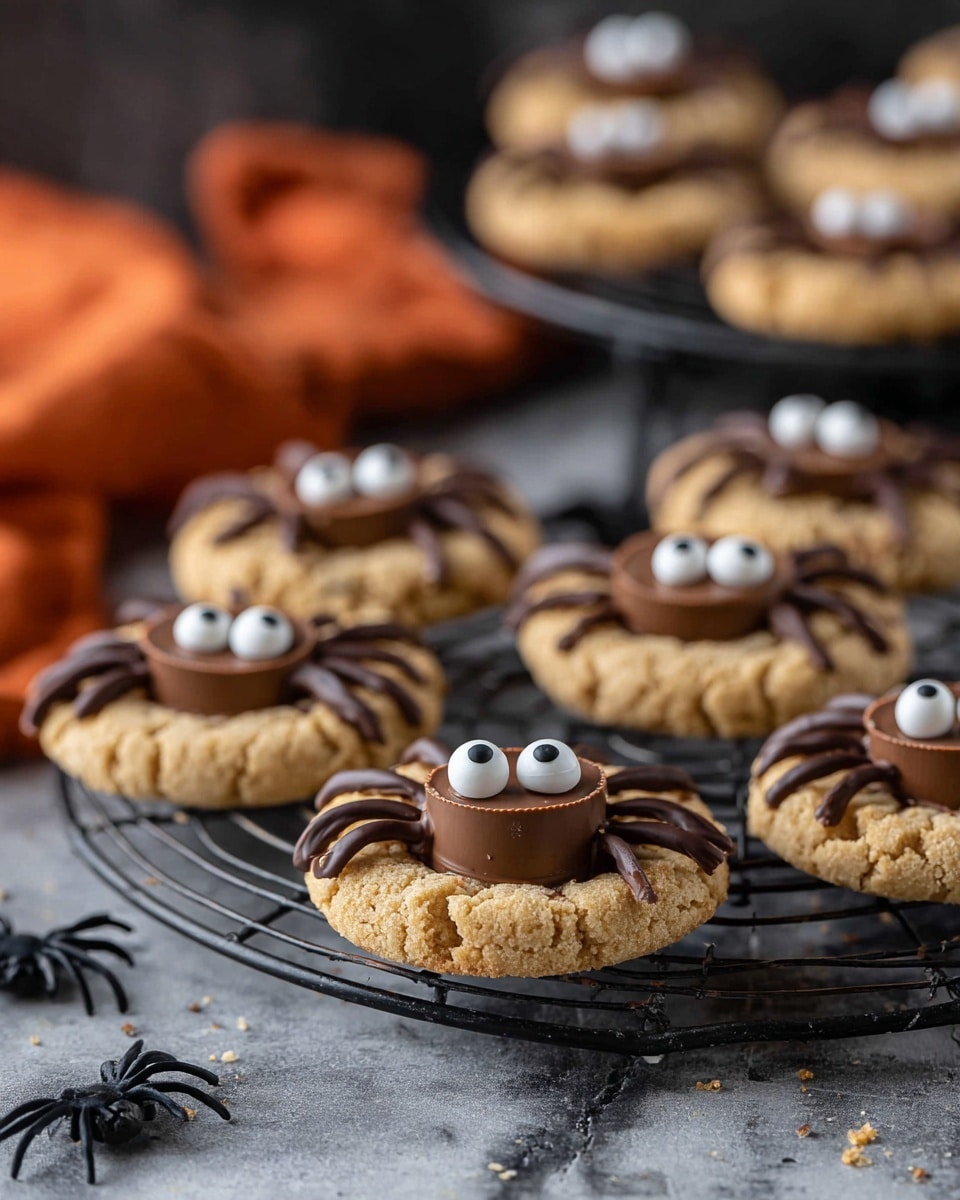
Peanut Butter Spider Cookies Recipe
If you’re looking for a fun, nostalgic treat that also packs in that rich, peanut buttery goodness, you’re in for a real treat with this Peanut Butter Spider Cookies Recipe. These aren’t just any peanut butter cookies—they’ve got mini Reese’s Peanut Butter Cups nestled right in the center and playful “spider legs” made of melted chocolate, topped off with candy eyeballs. Trust me, once you make these, they’ll become a favorite for Halloween parties, bake sales, or anytime you want a whimsical cookie that tastes seriously good. Stick around—I’ll walk you through every step and share my personal tips to make these perfect every time.
Why This Recipe Works
- Perfect Texture: The combination of baking soda and powder gives these cookies just the right amount of chewiness with a soft center and slightly crisp edges.
- Peanut Butter Cup Center: Freezing the mini Reese’s ensures they keep their shape and don’t melt completely into the cookie.
- Fun Presentation: The melted chocolate legs and candy eyeballs make these cookies a kid-pleaser and a perfect Halloween treat.
- Simple Ingredients: Most are pantry staples, making this recipe easy and accessible for every home baker.

Ingredients & Why They Work
Every ingredient in this Peanut Butter Spider Cookies Recipe plays a role, whether it’s for flavor, texture, or that fun finishing touch. Let me share with you why I love each component and how it helps make these cookies so irresistible.

- Unsalted butter: Using room temperature unsalted butter allows you to control the salt and ensures a creamy, tender cookie base.
- Brown sugar: Adds moisture and a deep, caramel-like sweetness that pairs beautifully with peanut butter.
- Granulated sugar: Helps create a slight crispness on the outside when combined with rolling sugar.
- Creamy peanut butter (not natural): I go for the creamy, not natural, because it blends better and makes the cookie extra smooth and rich.
- Egg: Acts as the binder that holds everything together while giving a little lift.
- Vanilla extract: Enhances the overall flavor, balancing the sweetness and nuttiness perfectly.
- All-purpose flour: The main structure builder for that classic cookie texture.
- Baking soda and baking powder: These two work hand in hand to ensure the cookies rise just right—enough puff without too much spread.
- Salt: Highlights the peanut butter’s flavor and balances the sweetness.
- Granulated sugar for rolling: Adds a fun sparkle and a subtle crunch to the cookie exterior.
- Mini Reese’s Peanut Butter Cups: The star of the show! Freezing them beforehand helps them stay neat and just gooey enough once baked.
- Semi-sweet chocolate chips: Melted and piped for the spider legs, they add a nice chocolatey contrast.
- Candy eyeballs: These bring the cookies to life and make them whimsical—kids and adults both love them!
Make It Your Way
I love how versatile this Peanut Butter Spider Cookies Recipe is. While the classic version is fantastic (in my humble opinion), you can totally switch things up to suit your mood or occasion. Here are a few ways I’ve jazzed these cookies up for different vibes.
- Variation: Sometimes I swap Reese’s for chopped peanut butter cups or even chocolate-covered caramel candies. It changes the melt and texture in a delightful way.
- Nut-free version: For friends with allergies, I’ve used sunflower seed butter instead of peanut butter and dairy-free chocolate chips gifted from a specialty store—still delicious but safe.
- Seasonal twist: Around Halloween, I add orange zest to the dough for a subtle citrusy brightness that complements the peanut butter beautifully.
- Extra crunch: Mixing in chopped roasted peanuts adds a lovely crunch, which I sometimes do when I want a more textured cookie.
Step-by-Step: How I Make Peanut Butter Spider Cookies Recipe
Step 1: Prep the Mini Reese’s Cups and Preheat the Oven
The first thing I do is unwrap about 24 mini Reese’s Peanut Butter Cups and toss them into a bowl in the freezer. This is a game changer—I learned early on that freezing them keeps their shape instead of melting into a peanut buttery puddle when you press them onto hot cookies. Meanwhile, preheat your oven to 350°F so it’s ready when your dough is mixed.
Step 2: Cream Butter and Sugars
Grab a mixing bowl and beat together the softened unsalted butter, brown sugar, and granulated sugar with an electric mixer. I usually do this for about a minute until the mixture is fluffy and smooth. This step is crucial because good creaming traps air, helping the cookies rise nicely.
Step 3: Add Peanut Butter, Egg, and Vanilla
Next, add the creamy peanut butter, one large egg, and vanilla extract right into the butter and sugar mixture. Beat again until everything is just combined—less than a minute is perfect here. Overbeating after adding the egg can toughen the dough.
Step 4: Mix in Dry Ingredients
In a separate bowl, whisk together the all-purpose flour, baking soda, baking powder, and salt. Then slowly add this to your wet ingredients, mixing on low speed or folding by hand with a spatula until just combined. Don’t overmix this step; you want to keep the dough tender and soft.
Step 5: Form and Sugar-Coat the Dough Balls
Use a small cookie scoop or tablespoon to scoop out dough balls about the size of a tablespoon. Roll each ball between your hands until smooth, then gently roll it in granulated sugar—that little step adds a slight sparkle and an addictive outer crunch. Place the sugar-coated dough balls on a silicone-lined baking sheet, making sure to space them 2-3 inches apart so they can spread evenly.
Step 6: Bake and Press in Peanut Butter Cups
Bake the cookies for 8-11 minutes. You want to watch for cracks on the edges and a gorgeous golden color—that’s your cue. Immediately after pulling them from the oven, press one frozen mini Reese’s cup into the center of each cookie. Then, let the cookies rest on the baking sheet for 15-20 minutes to cool and set properly. Don’t try to move them too soon or the peanut butter cups can sink and lose their shape.
Step 7: Melt Chocolate and Decorate Spider Legs and Eyes
While the cookies cool, melt the semi-sweet chocolate chips in a microwave-safe bowl. I do this on 50% power for three minutes, stirring every minute to ensure smooth melting without burning. Transfer the melted chocolate to a squeeze bottle or a small sandwich bag with a tiny corner snipped off. Use this to carefully pipe four spider legs on each side of the cookie. Then, using a dab of chocolate, attach candy eyeballs on top of each Reese’s cup. Let the chocolate set before serving or moving.
Tips from My Kitchen
- Freeze the Reese’s first: Don’t skip this step—frozen peanut butter cups keep their shape and make your cookies look Instagram-ready.
- Use a cookie scoop: Uniform cookie sizes help everything bake evenly and look beautiful on the tray.
- Don’t overbake: Pull the cookies right when edges crack and turn golden; overbaked peanut butter makes the cookies dry.
- Pipe spider legs carefully: I use a squeeze bottle for precision, but a zip-top bag with a small hole works great too—just steady your hand!
How to Serve Peanut Butter Spider Cookies Recipe
Garnishes
For garnish, I typically stick with the candy eyeballs because they’re cute, easy to find, and make such a fun impact. Sometimes, I’ll add a sprinkle of flaky sea salt right before baking for a subtle pop of savory contrast—it really brings out the peanut butter flavor.
Side Dishes
These cookies are a star on their own, but for a party or themed dessert tray, I like to pair them with simple sides like cold milk (classic, right?) or a scoop of vanilla ice cream for extra indulgence. I’ve also served them alongside pumpkin spice cookies for an autumnal cookie plate that guests rave about.
Creative Ways to Present
For Halloween, I arranged a bunch of these Peanut Butter Spider Cookies Recipe treats around a large “web” made of spun sugar or cotton candy on a large platter—and it was a total hit! Another time, I packed them in clear cellophane bags with a little spider ring attached as a cute party favor. Don’t hesitate to get creative—it’s part of the fun.
Make Ahead and Storage
Storing Leftovers
I store leftover cookies in an airtight container at room temperature. They actually stay deliciously soft for about 3-4 days. If you want to keep the “legs” crisp and intact, be sure to place parchment paper between layers to prevent sticking and breakage.
Freezing
If you want to freeze these cookies, I recommend freezing the unbaked dough balls first on a tray, then transferring them to a freezer-safe bag. Bake directly from frozen, just add a minute or two to the baking time. Alternatively, fully baked cookies freeze well wrapped tightly in plastic wrap and stored in an airtight container.
Reheating
To reheat, I pop cookies back into a 300°F oven for 5 minutes or so to get them slightly warm and freshly baked in texture. Avoid microwaving—they can get chewy or lose the crispness on the edges.
FAQs
-
Can I use natural peanut butter for this Peanut Butter Spider Cookies Recipe?
You can, but natural peanut butter tends to be oilier and less stable when baking. This might affect the cookie’s texture and spreading. I recommend using creamy peanut butter that’s not natural for the best results—your cookies will hold their shape and have that perfect soft chew.
-
Why do I need to freeze the mini Reese’s before baking?
Freezing the mini Reese’s Peanut Butter Cups helps them maintain their shape when you press them into the warm cookies. If you don’t freeze them, they might melt too much and lose that adorable spider body shape you want.
-
How do I get the spider legs to look neat?
Melting the chocolate slowly on 50% microwave power and stirring every minute helps achieve smooth chocolate that’s easier to pipe. Using a squeeze bottle or small piping bag with a tiny hole ensures you have control over your chocolate lines. Practice piping on parchment paper first if you’re nervous.
-
Can I make these cookies vegan or dairy-free?
Absolutely! Replace the butter with vegan margarine, substitute the egg with a flax egg (1 tbsp ground flaxseed + 3 tbsp water), use dairy-free peanut butter cups, and dairy-free chocolate chips. The texture will be slightly different, but still delicious and festive.
Final Thoughts
If you ask me, this Peanut Butter Spider Cookies Recipe is one of those feel-good bakes that’s as much fun to make as it is to eat. The combo of rich peanut butter, sweet sugar crunch, melty chocolate, and playful touches like candy eyes really brings these cookies to life. I hope you try this recipe soon—you’ll find it’s perfect for sharing with friends, surprising kids, or just treating yourself to a sweet, nostalgic moment. Happy baking!
Print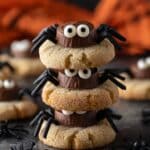
Peanut Butter Spider Cookies Recipe
- Prep Time: 15 minutes
- Cook Time: 11 minutes
- Total Time: 26 minutes
- Yield: 24 cookies
- Category: Dessert
- Method: Baking
- Cuisine: American
Description
These Peanut Butter Spider Cookies are a fun and festive treat perfect for Halloween or any spooky occasion. Crispy on the edges and soft inside, each cookie is topped with a mini Reese’s Peanut Butter Cup and decorated with chocolate legs and candy eyeballs to resemble adorable spiders. The combination of creamy peanut butter and rich chocolate makes these cookies irresistible.
Ingredients
Cookie Dough
- ½ cup (113g) unsalted butter, room temperature
- ½ cup (107g) brown sugar
- ⅓ cup (66g) granulated sugar
- ¾ cup (201g) creamy peanut butter, not natural
- 1 large egg
- 1 tsp vanilla extract
- 1 ½ cups (180g) all purpose flour
- 1 tsp baking soda
- ½ tsp baking powder
- ½ tsp salt
For Rolling
- Granulated sugar, for rolling the cookies
Toppings and Decoration
- About 24 mini Reese’s Peanut Butter Cups
- ½ cup (85g) semi-sweet chocolate chips, for melting
- Candy eyeballs
Instructions
- Prepare Reese’s Cups: Unwrap about 24 mini Reese’s Peanut Butter Cups and place them in a bowl. Put the bowl in the freezer to keep the cups firm when added to the warm cookies later.
- Preheat Oven: Preheat your oven to 350ºF (175ºC) to have it ready for baking the cookies.
- Mix Butter and Sugars: In a mixing bowl, combine the unsalted butter, brown sugar, and granulated sugar. Beat with an electric mixer for 1 minute until the mixture is smooth and fluffy.
- Add Peanut Butter, Egg, and Vanilla: Add in the creamy peanut butter, egg, and vanilla extract to the butter and sugar mixture. Beat again for less than 1 minute until everything is well incorporated.
- Add Dry Ingredients: Mix in the all purpose flour, baking soda, baking powder, and salt on low speed or fold in with a spatula just until combined. Avoid overmixing to keep cookies tender.
- Shape and Roll Cookies: Use a small cookie scoop or tablespoon to form tablespoon-sized balls of dough. Roll each ball between your hands to smooth it, then roll it in granulated sugar to coat. Place the cookie dough balls 2-3 inches apart on a silicone-lined baking sheet.
- Bake Cookies: Bake in the preheated oven for 11 minutes or until the edges are cracked and golden. The centers will be slightly soft but will firm up as they cool.
- Add Reese’s Cups: Remove the cookies from the oven and immediately press a mini Reese’s Peanut Butter Cup into the center of each cookie. Let the cookies cool on the baking sheet for 15 to 20 minutes to prevent the cups from sinking.
- Melt Chocolate: Place the semi-sweet chocolate chips in a microwave-safe bowl. Microwave at 50% power for 3 minutes, stirring after each minute until fully melted. Transfer the melted chocolate into a squeeze bottle or a sandwich bag with a small corner cut off.
- Decorate Cookies: Use the melted chocolate to draw four legs on each side of the cookie, creating spider legs. Use a small dab of melted chocolate on the back of candy eyeballs to attach them to the center Reese’s Cup. Allow the chocolate to set before serving or transferring the cookies.
Notes
- Freezing the mini Reese’s cups helps them keep their shape when placed on warm cookies.
- Be careful not to overmix the dough to avoid tough cookies.
- Roll cookies in granulated sugar before baking for an extra sweet and crisp texture on the outside.
- If you don’t have a squeeze bottle for chocolate, a sandwich bag with a small corner cut off works perfectly for piping.
- Allow cookies to cool completely before moving to a cooling rack to maintain the structure of the Reese’s cups.
- For extra festive fun, try using different colored candy eyeballs or seasonal decorations.
Nutrition
- Serving Size: 1 cookie
- Calories: 180 kcal
- Sugar: 15 g
- Sodium: 120 mg
- Fat: 10 g
- Saturated Fat: 3 g
- Unsaturated Fat: 6 g
- Trans Fat: 0 g
- Carbohydrates: 18 g
- Fiber: 1 g
- Protein: 4 g
- Cholesterol: 25 mg


