Orange and Black Halloween Marble Cake Recipe
If you love Halloween treats that look as good as they taste, you’re going to fall head over heels for this Orange and Black Halloween Marble Cake Recipe. It’s the perfect spooky centerpiece for your holiday party or just a fun bake to share with friends (or keep all to yourself—I won’t judge). I’ve played around with this recipe a bunch of times, finding that how the orange and black colors swirl in marble makes every slice a little surprise. Stick with me here because I’m going to walk you through every step and share some handy tips so your cake comes out perfectly moist, beautifully swirled, and totally festive.
Why This Recipe Works
- Balanced Flavors: Combining pumpkin spice and black cocoa powder gives a perfect mix of warmth and rich chocolate that’s unmistakably autumnal.
- Eye-Catching Marble Effect: The alternating spoonfuls and skewer swirling create dramatic orange and black swirls – a total showstopper!
- Moist Texture: Creaming butter and sugar thoroughly with the right folding technique keeps this cake tender and not dense.
- Fun To Create: Adding food coloring and decorating with sprinkles and eyeball candy makes this recipe a blast to make with kids or friends.

Ingredients & Why They Work
Every ingredient in the Orange and Black Halloween Marble Cake Recipe plays a key role—not just in flavor, but also in texture and color. Picking pumpkin powder instead of canned pumpkin keeps it dry and perfect for baking, and black cocoa powder delivers a deep black that regular cocoa just can’t match. Let me explain a few favorites.
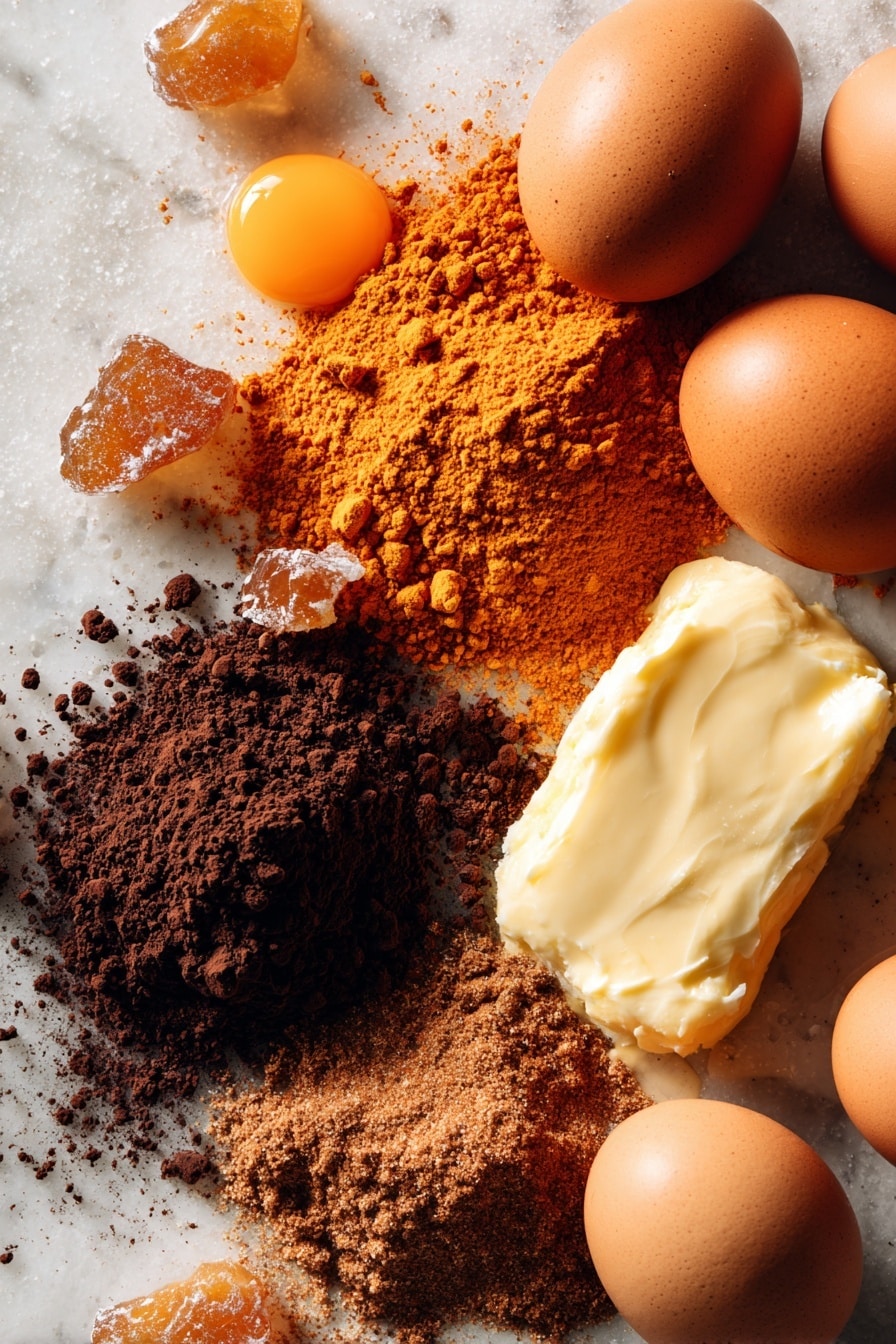
- Self-raising flour: The built-in raising agent makes the cake rise perfectly without extra fuss.
- Butter (salted): Adds richness and moisture; I always use salted butter here for a subtle flavor balance.
- Soft brown sugar: Provides a caramel-like depth and keeps the crumb tender.
- Eggs: Bind ingredients and add structure; room temperature eggs work best to avoid curdling.
- Milk: Hydrates the batter and helps create a soft crumb.
- Black cocoa powder: This specialty cocoa powder gives the glorious dark color without bitterness.
- Pumpkin powder and pumpkin spice mix: For that essential fall flavor without changing batter consistency.
- Baking powder and salt: Balance rising and flavor, making sure the cake isn’t flat or bland.
- Vanilla extract: Enhances all the other flavors making them pop.
- Orange and black food coloring: This is the magic to get the spooky Halloween hues just right.
- Glaze and decoration ingredients: Powdered sugar and warm water create a shiny drizzle that holds the sprinkles and candy eyes better than frosting.
Make It Your Way
One thing I love about the Orange and Black Halloween Marble Cake Recipe is how easy it is to make your own twist. Whether you want to add a little extra spice, swap dairy for a plant-based option, or turn it into cupcakes instead of a loaf, it’s very forgiving. I encourage you to experiment!
- Variation: I once added chopped toasted pecans to the orange batter for a bit of crunch, and it was a delightful surprise—totally worth trying.
- Dietary substitutions: You can swap the butter for a vegan spread and use a flax egg to make it dairy and egg-free, but baking times may need adjusting.
- Seasonal tweak: Swap pumpkin spice with chai spice blend for a different warm flavor profile that’s equally cozy.
Step-by-Step: How I Make Orange and Black Halloween Marble Cake Recipe
Step 1: Prepare Your Pan and Ingredients
First things first—preheat your oven to 175℃ and grease and flour an 8×4 inch loaf tin, at least 3 inches deep. This pan size works perfectly to hold the marbled effect without getting too thick. I like to use parchment paper on the bottom too, just in case. Also, make sure your eggs are warmed to room temperature; this little trick helps your batter come together smoothly without weird lumps or curdling.
Step 2: Cream Butter and Sugar Until Fluffy
Pop your butter into a large mixing bowl and cream it until it’s soft and light. Then add the brown sugar and keep beating for at least two minutes on medium speed, scraping the bowl halfway through. You’ll notice your mix transform to a lighter, fluffy texture—that’s exactly what you want here. Don’t rush this step; it makes a big difference in the final cake’s tenderness.
Step 3: Add Eggs Carefully
Add the eggs one at a time, mixing well after each addition until you don’t see any streaks of egg. Just a heads up—don’t overbeat once the eggs are in! Overworking the batter here can lead to a tougher cake, so gentle mixing is your friend. Scrape the bowl well so everything is evenly combined.
Step 4: Combine Dry Ingredients and Fold in Alternately with Milk
In a separate bowl, whisk together the flour, baking powder, salt, and pumpkin spice mix. Then sift one third of this dry mix into your wet batter and fold gently with a spatula. Next, pour in half the milk and fold again. Repeat this with the next third of dry mix, the remaining milk, and finish with the last third of dry mix. Folding (rather than beating) keeps the batter light and prevents gluten from developing too much—this keeps the cake soft. Don’t forget to scrape down the sides and bottom for an even mix!
Step 5: Divide Batter and Add Color & Flavor
Take about one third of the batter out into a separate bowl and sift in the black cocoa powder. Mix well and then let it rest for a couple of minutes—the black color actually deepens as it sits. If it still isn’t dark enough, add a few drops of black gel food coloring; this really packs a visual punch. For the remaining batter, sift in pumpkin powder and a few drops of orange food coloring until you get that perfect Halloween orange glow. Mixing gently here is important so your colors stay vibrant.
Step 6: Layer and Swirl the Batters
Now comes the fun part: spoon orange batter into the pan, spreading it gently to form a base layer. Then randomly add spoonfuls of black batter on top. Alternate layers until you’ve used all your batter, finishing with orange on top. Use a skewer to swirl through the batter—start with horizontal lines, then vertical, and finally diagonal. It creates gorgeous marble patterns that look like they belong in a Halloween art gallery.
Step 7: Bake and Cool
Bake your cake in the preheated oven for about 45 minutes. To test doneness, insert a skewer or cake tester into the center—if it comes out clean with just a few crumbs, your cake is ready. Let it cool for a few minutes in the pan, then turn it out onto a wire rack. For the softest cake, I always cover it loosely with a kitchen towel while cooling and then wrap it in plastic wrap once it’s still warm but not hot, chilling it in the fridge before glazing.
Step 8: Glaze and Decorate
Make a simple glaze by mixing powdered sugar with warm water until smooth. Transfer this into a piping bag or ziplock with the corner snipped and drizzle over your cooled cake, letting it drip enticingly over the edges. Sprinkle with festive orange and black sprinkles and top with those adorable eyeball candies. Pro tip: place your cake on a tray during this step to catch any wayward sprinkles—it saves a lot of cleanup!
Tips from My Kitchen
- Butter Creaming: I always cream butter and sugar just a bit longer than I think needed to get that super fluffy batter—important for a light crumb.
- Color Patience: Wait a couple minutes after adding food coloring before deciding if you need more; colors deepen with time.
- Folding Technique: Always fold the dry ingredients and milk alternately by hand to avoid overmixing, which makes the cake dense.
- Cooling Strategy: Wrapping the cake when warm traps moisture and prevents dryness—trust me, it keeps the cake irresistibly tender.
How to Serve Orange and Black Halloween Marble Cake Recipe
Garnishes
For garnishes, I stick with classic Halloween colors — black and orange sprinkles add texture and festive flair, and those candy eyeballs give the cake that fun spooky personality. You can also add a light dusting of powdered sugar or little piped spider webs using a black or white icing for extra wow factor. I love how simple touches can make a cake so much more memorable.
Side Dishes
This cake pairs beautifully with a simple cup of chai tea or pumpkin spice latte, especially when serving at a Halloween brunch or afternoon gathering. For something more indulgent, dollop some whipped cream flavored with a dash of cinnamon or even a scoop of vanilla ice cream alongside—it’s a delightful combo that balances the cake’s spices and richness.
Creative Ways to Present
One of my favorite presentation tips is to slice this cake thick and serve it on a rustic wooden board surrounded by mini pumpkins, dried leaves, and flickering candles to set the Halloween mood. For kid parties, I like to serve the cake as mini cupcakes, each decorated with different candy eyes and sprinkles—total crowd-pleasers that are easy to grab and go.
Make Ahead and Storage
Storing Leftovers
I usually wrap leftover Orange and Black Halloween Marble Cake tightly in plastic wrap to keep it moist. Then I store it at room temperature for up to two days. After that, I refrigerate it to extend freshness. I found the glaze holds up well without melting or getting sticky, so it’s great for making ahead of time.
Freezing
This cake freezes really well! I slice it first and wrap individual slices in plastic wrap and then foil, so you can thaw just what you need. When you’re ready, thaw in the fridge overnight for the best texture. The pumpkin and spices maintain their flavor beautifully even after freezing.
Reheating
If you want to enjoy leftover slices a bit warm, I pop them in a 350℉ (175℃) oven for about 8-10 minutes wrapped loosely in foil. This gently warms the cake without drying it out or melting the glaze. Alternatively, a quick 20-second blast in the microwave works if you’re in a hurry.
FAQs
-
Can I make the Orange and Black Halloween Marble Cake Recipe gluten-free?
Absolutely! Try swapping the self-raising flour for a gluten-free baking blend that’s designed for cakes. Make sure it contains a raising agent or add baking powder accordingly. The texture might be slightly different but still tasty and festive.
-
What if I don’t have black cocoa powder? Can I use regular cocoa powder?
Black cocoa powder gives a much deeper color without added bitterness, which is why I love it for this recipe. Regular cocoa powder can work, but your “black” batter will be more of a dark brown. You might want to add black gel food coloring to get closer to that dramatic effect.
-
Will the food coloring affect the taste of the cake?
Not at all! I use gel food coloring, which packs vibrant color without impacting flavor or texture. Just add a few drops to intensify the colors where needed and let the batter rest briefly for color to deepen.
-
Can I make this cake ahead for a party?
Yes! In fact, making the cake a day ahead gives the flavors time to meld beautifully. Cool it completely, then chill it wrapped in plastic wrap. Do the glazing and decorating the day of the party for the freshest look.
-
How do I get the perfect marble swirl without overmixing?
Use a skewer or thin knife and gently drag it through the spooned batters in various directions without stirring too much. Overmixing will blend the colors instead of creating distinct swirls. A light hand is key!
Final Thoughts
Honestly, this Orange and Black Halloween Marble Cake Recipe is one of my favorite fall treats—not just because it looks festive, but because it tastes like autumn in every bite. Baking it feels a little like magic, watching those vibrant orange and black batters dance together. I really hope you give it a go; it’s a crowd-pleaser that’s fun to make and even more fun to eat. Plus, it’s a sweet way to celebrate the season and add some Halloween spirit to your kitchen. Go on, grab your mixing bowl and make some memories (and a little mess) with this one!
Print
Orange and Black Halloween Marble Cake Recipe
- Prep Time: 15 minutes
- Cook Time: 45 minutes
- Total Time: 1 hour 10 minutes
- Yield: 1 loaf cake
- Category: Dessert
- Method: Baking
- Cuisine: American
- Diet: Vegetarian
Description
A festive Orange and Black Halloween Marble Cake featuring swirled batters colored with black cocoa and pumpkin powder, topped with a sweet glaze, sprinkles, and candy eyes for a spooky celebration treat.
Ingredients
Cake
- 180 g self raising flour
- 180 g salted butter
- 180 g soft brown sugar
- 3 eggs
- 100 ml milk
- 7.5 g black cocoa powder (approximately 1 tablespoon)
- 15 g pumpkin powder (approximately 2 tablespoons)
- 2 teaspoon pumpkin spice mix
- ⅓ teaspoon baking powder
- ⅛ teaspoon salt
- ½ teaspoon vanilla extract
- A few drops of orange food coloring
- A few drops of black food coloring (optional)
Glaze and Decoration
- 75 g powdered sugar
- 1½ tablespoon warm water
- Black and orange sprinkles
- Eyeball candy
Instructions
- Preheat Oven and Prepare Tin: Preheat your oven to 175℃. Grease and flour an 8 inch by 4 inch loaf tin, ensuring it is at least 3 inches deep to accommodate the batter.
- Cream Butter and Sugar: In a large bowl, measure the butter and cream it until soft. Add the brown sugar and beat for at least 2 minutes on medium speed until light and fluffy, scraping down the sides halfway through.
- Add Eggs: Add the eggs one at a time, beating after each addition until fully incorporated but do not overbeat. Scrape the bowl frequently to mix evenly.
- Combine Dry Ingredients: In a separate bowl, whisk together the self raising flour, baking powder, salt, and pumpkin spice mix until well combined.
- Fold Dry Ingredients and Milk: Sift one third of the flour mixture into the creamed mixture and fold with a spatula. Add half the milk and fold again. Repeat with second third of flour and remaining milk, then fold in final third of flour, scraping the bowl as needed.
- Add Vanilla Extract: Fold in the vanilla extract gently to combine.
- Prepare Black Batter: Remove one third of the cake batter to a separate bowl. Sift the black cocoa powder into this batter and mix well. Let it rest 2 to 3 minutes to deepen color. If needed, add a few drops of black gel food coloring and mix.
- Prepare Orange Batter: Sift the pumpkin powder into the remaining batter and mix well. Add a few drops of orange food coloring to intensify the color and mix thoroughly.
- Layer Batters in Tin: Spoon orange batter into the prepared tin and level it with a spatula. Drop spoonfuls of black batter in random spots atop. Alternate layers of orange and black batter until all is used, finishing with orange. Use a skewer to swirl the batters in horizontal, vertical, and diagonal lines creating a marble effect.
- Bake Cake: Bake in the preheated oven until a skewer inserted into the center comes out clean, about 45 minutes. Remove from oven and let cool in the tin for a few minutes before transferring to a wire rack to cool completely.
- Make Glaze: Sift powdered sugar into a small bowl and add warm water. Mix until smooth to form a glaze.
- Decorate Cake: Place cooled cake on a cake plate. Transfer glaze to a piping bag, snip the tip and drizzle glaze over the cake edges to create drips. Sprinkle black and orange sprinkles over the top and place candy eyeballs decoratively.
Notes
- Use room temperature eggs to prevent curdling of the batter.
- Fold flour into batter by hand or very low mixer speed to avoid tough cake from overmixing.
- Sift cocoa powder and powdered sugar to prevent lumps.
- Food coloring intensifies after resting, so add gradually and wait before adjusting color.
- Cover cake with a kitchen towel while cooling to maintain moisture, then wrap in plastic and refrigerate before glazing.
- Decorate on a tray to catch excess sprinkles and keep kitchen tidy.
Nutrition
- Serving Size: 1 slice (1/12 of loaf)
- Calories: 320 kcal
- Sugar: 20 g
- Sodium: 150 mg
- Fat: 15 g
- Saturated Fat: 9 g
- Unsaturated Fat: 4 g
- Trans Fat: 0 g
- Carbohydrates: 40 g
- Fiber: 2 g
- Protein: 4 g
- Cholesterol: 70 mg


