No-Bake Cookie Butter Icebox Cake Recipe
If you’ve ever craved a dessert that’s creamy, crunchy, and irresistibly cozy without even turning on the oven, then you’re going to love this No-Bake Cookie Butter Icebox Cake Recipe. Trust me, it’s one of those fan-freaking-tastic treats that feels fancy but couldn’t be easier to whip up—perfect for when you want something impressive that’s actually hassle-free. Plus, the combination of that luscious cookie butter with crisp Lotus Biscoff cookies layered like magic is seriously addictive. Ready to dive in? I promise you won’t regret it.
Why This Recipe Works
- No baking required: Perfect for those hot days or last-minute desserts, saving you time and effort.
- Cookie butter magic: The creamy cookie butter layers bring rich, spiced sweetness that lifts every bite.
- Simple assembly: Layering cookies with cream is straightforward and stress-free, great even if you’re a kitchen newbie.
- Chill time does the work: Letting it rest overnight lets the cookies soften just enough to melt into the cream without losing their crunch.

Ingredients & Why They Work
This No-Bake Cookie Butter Icebox Cake Recipe comes alive with just the right balance of creamy, crunchy, and sweet—all from a handful of simple ingredients. Each one plays a crucial role, so choosing the right type and quality will make your cake shine. Here’s what you need and why it’s special:

- Heavy cream: Whipping this gives you the fluffy, light texture that balances the richness of the cookie butter perfectly.
- Lotus Biscoff spread: This is the star ingredient—spiced, caramelized cookie butter that adds warmth and depth with every bite.
- Mascarpone cheese: Adds luxurious creaminess and a touch of tang that cuts through the sweetness beautifully.
- Vanilla extract: A splash elevates the flavors, making everything taste richer and more rounded.
- Kosher salt: Just a pinch balances the sweetness and brightens the overall flavor.
- Confectioner’s sugar: Sweetens the cream mixture delicately without being grainy.
- Lotus Biscoff cookies: These crisp, caramel-spiced cookies soak up a bit of moisture during chilling, giving you that perfect mix of crunch and melt-in-your-mouth softness.
Make It Your Way
One of the things I love about this No-Bake Cookie Butter Icebox Cake Recipe is how flexible it is. Over the years, I’ve played with a few twists to make it truly my own and encourage you to do the same. Whether you want it more indulgent, lighter, or even dairy-free, there’s room to experiment.
- Nut-free version: I swapped mascarpone for a creamy coconut yogurt once—while it’s a bit different, my nut-allergic friend still adored it.
- Spiced up: Adding a pinch of cinnamon or nutmeg to the cream really amps up the cozy, autumn vibe.
- Extra crunch: I sometimes sprinkle crushed Biscoff cookies between layers or on top for texture contrast that my family loves.
- Mini cakes: Making individual portions in ramekins is super fun for parties and totally mess-free!
Step-by-Step: How I Make No-Bake Cookie Butter Icebox Cake Recipe
Step 1: Whip the cream to fluffy perfection
Start by pouring 2 cups of cold heavy cream into your mixer bowl fitted with a whisk attachment. Whip on medium-high speed until soft to medium peaks form—this usually takes about 3 to 5 minutes. You’ll know it’s ready when the cream holds its shape but still looks smooth. This base gives your cake that airy, melt-in-your-mouth texture, so don’t rush or overwhip past stiff peaks.
Step 2: Blend in cookie butter, mascarpone, and flavorings
Next, gently fold in ½ cup of cookie butter, ⅓ cup mascarpone cheese, 1 teaspoon vanilla extract, a pinch of kosher salt, and 2 tablespoons of confectioner’s sugar. I like to soften the cookie butter a bit before mixing by microwaving it for 30 seconds—this helps it incorporate more evenly. When mixing, be gentle so you keep the cream light and fluffy without deflating it.
Step 3: Assemble the layers in your loaf pan
Line a loaf pan with plastic wrap—it makes unmolding a breeze later. Lay down a single layer of Biscoff cookies at the bottom. Then spread a layer of the luscious cookie butter cream mixture over the cookies, aiming for about the same thickness as your cookie layer. Repeat until you’ve filled the pan, finishing with a cookie layer on top. Don’t squish too hard, just press gently to keep layers even.
Step 4: Chill your cake for at least 24 hours
This step is key! Wrap your loaf pan loosely with plastic wrap and refrigerate for a full 24 hours. This resting time lets the cookies absorb the creamy layers, softening just right while keeping a wonderful texture. I learned that less than that and the cookies stay too crunchy; more than that and they get pleasantly cake-like.
Step 5: Serve with warmed cookie butter and a crunch
When it’s time to serve, carefully unmold your cake onto a serving tray. Warm about ⅓ cup of cookie butter in the microwave until pourable and drizzle it over the top. Sprinkle some crushed Biscoff cookies for extra texture and wow factor. The warm, gooey drizzle against the chilled creamy cake? Pure bliss.
Tips from My Kitchen
- Warm cookie butter: Heating the cookie butter slightly makes folding it into the cream much easier and smoother.
- Don’t overwhip cream: Stop whipping once medium peaks form to avoid grainy texture and keep your cream light.
- Loaf pan lining: Using plastic wrap not only helps with easy removal but also keeps the cake’s edges clean and neat.
- Let it chill fully: The 24-hour fridge time ensures perfect softening that transforms the cookie layers into cake-like slices.
How to Serve No-Bake Cookie Butter Icebox Cake Recipe

Garnishes
I love topping this cake with a drizzle of warm cookie butter and a sprinkle of crushed Lotus Biscoff cookies to add that perfect crunch and enhance the caramel spice flavor. Fresh berries on the side or a dusting of powdered sugar also add a pretty contrast if you want to dress it up for guests.
Side Dishes
Since this cake is already rich and flavorful, I like to serve it alongside a light, fresh component like a citrusy fruit salad or a simple green salad with a tangy vinaigrette to balance the sweetness. A cup of good coffee or tea also pairs beautifully for that cozy vibe.
Creative Ways to Present
For special occasions, I’ve layered this cake in clear glass trifle bowls to show off the beautiful cookie and cream layers. Mini jars or individual glasses also make charming single servings for parties—plus, it’s way easier to serve and control portions this way!
Make Ahead and Storage
Storing Leftovers
When you have leftovers (and there usually are), keep the icebox cake tightly wrapped in plastic wrap or an airtight container in the fridge. This keeps it fresh for up to 3 days. I find the flavors deepen a bit after a day, so it tastes even better leftover.
Freezing
I’ve frozen slices wrapped tightly in plastic and stored in a freezer-safe container with good success. Thaw them overnight in the fridge before serving. It’s a great way to extend the life of this treat if you want to prep in advance for a big gathering.
Reheating
This dessert is best served chilled, so reheating isn’t typically needed. However, warming a little extra cookie butter sauce to drizzle over the slice can add a warm touch that’s delightful to contrast with the cold cake.
FAQs
-
Can I use other cookies instead of Lotus Biscoff for this icebox cake?
Absolutely! While Lotus Biscoff cookies add a unique spiced caramel flavor, you can substitute with ginger snaps, graham crackers, or any crisp spiced cookie that soaks up moisture well without becoming mushy. Just keep in mind the flavor will slightly change.
-
How long can I store the No-Bake Cookie Butter Icebox Cake in the fridge?
When wrapped tightly or stored in an airtight container, this cake will keep well for up to 3 days. Beyond that, the texture of the cookies may start to soften too much, affecting the ideal crunchy-soft contrast.
-
Can I prepare this icebox cake in advance for a party?
Yes! In fact, this cake benefits from making ahead since chilling for at least 24 hours helps the flavors meld beautifully. You can even prep it up to 3 days ahead and keep chilled until ready to serve.
-
Is there a dairy-free or vegan version of this recipe?
While the original recipe uses heavy cream and mascarpone, you can try using whipped coconut cream and a plant-based cream cheese alternative. The texture won’t be exactly the same but still delicious and creamy.
-
What’s the best way to unmold the icebox cake without it falling apart?
Line your loaf pan with plastic wrap with enough overhang before layering so you can gently lift the whole cake out after chilling. Loosening edges with a knife if needed helps. This technique keeps your cake intact and presents nicely.
Final Thoughts
This No-Bake Cookie Butter Icebox Cake Recipe has become one of my go-to desserts whenever I want to impress with minimal effort—perfect for both weeknight indulgences and special gatherings. It’s a sweet little slice of heaven that brings comfort food vibes without heating up the kitchen. I hope you love making and sharing it as much as I do—it’s the kind of recipe that makes everyone ask, “What’s in this?!” So grab your cookie butter and get ready to wow!
Print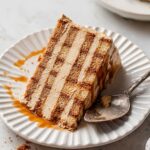
No-Bake Cookie Butter Icebox Cake Recipe
- Prep Time: 15 minutes
- Cook Time: 0 minutes
- Total Time: 1 day 15 minutes
- Yield: 8 servings
- Category: Dessert
- Method: No-Cook
- Cuisine: American
- Diet: Vegetarian
Description
A luscious No-Bake Cookie Butter Icebox Cake featuring layers of crunchy Lotus Biscoff cookies and creamy mascarpone and cookie butter filling. This delightful dessert is chilled for 24 hours to meld flavors and textures, perfect for make-ahead entertaining or a sweet treat without turning on the oven.
Ingredients
Filling
- 2 cups heavy cream
- ½ cup (150g) Lotus Biscoff spread
- ⅓ cup (80g) mascarpone cheese
- 1 tsp pure vanilla extract
- Pinch of Kosher salt
- 2 Tbsp confectioner’s sugar
Assembly
- 2 packages Lotus Biscoff cookies (32 cookies per package)
- ⅓ cup Lotus Biscoff spread, warmed for serving
Instructions
- Whip the heavy cream: Pour 2 cups of heavy cream into the bowl of a stand mixer fitted with the whisk attachment and whisk until medium peaks form to create a fluffy base.
- Add cookie butter mixture: Incorporate ½ cup (150g) Lotus Biscoff spread, ⅓ cup (80g) mascarpone cheese, 1 tsp vanilla extract, a pinch of Kosher salt, and 2 Tbsp confectioner’s sugar into the whipped cream and mix until well combined, forming a smooth, creamy filling.
- Assemble the cake layers: Line a loaf pan with plastic wrap. Place a single layer of Lotus Biscoff cookies on the bottom, then spread a layer of the Biscoff cream mixture evenly on top matching the cookie layer’s thickness. Repeat the layering process until the pan is filled, finishing with a cookie layer on top.
- Chill the cake: Loosely wrap the loaf pan with plastic wrap and refrigerate the assembled cake for 24 hours to allow the cookies to soften and flavors to meld.
- Serve: When ready, unmold the cake onto a plate. Drizzle the warmed ⅓ cup Lotus Biscoff spread over the top and sprinkle with crushed Biscoff cookies for garnish, then slice and enjoy.
Notes
- Nutrition facts estimate is based on using 45 cookies.
- Loaf pan size affects cookie count; a straight-sided pan requires about 9 cookies per layer, so approximately 1½ packages should suffice. Adjust quantities for tapered pans.
- To warm the cookie butter for drizzling, place ⅓ cup in a microwave-safe bowl and heat in 30-second increments, stirring between, until melted and warm.
- Icebox cakes benefit from advance preparation; chill for at least 24 hours or up to 3 days ahead of serving.
- Store leftovers in an airtight container or tightly wrapped in the pan for up to 3 days in the refrigerator.
- For freezing, wrap tightly in plastic and place in a freezer-safe container. Thaw overnight in the fridge before serving.
Nutrition
- Serving Size: 1 slice (1/8 cake)
- Calories: 420 kcal
- Sugar: 28 g
- Sodium: 120 mg
- Fat: 30 g
- Saturated Fat: 18 g
- Unsaturated Fat: 10 g
- Trans Fat: 0 g
- Carbohydrates: 32 g
- Fiber: 1 g
- Protein: 4 g
- Cholesterol: 110 mg


