No-Bake Cannoli Pie with Pistachio Crust Recipe
If you adore the classic flavors of cannoli but want a quick, fuss-free dessert, you’re going to flip for this No-Bake Cannoli Pie with Pistachio Crust Recipe. It’s creamy, dreamy, and the best part? No oven required — just mix, chill, and enjoy! I’ve made it countless times for family gatherings and every single time people ask for the recipe. Let me walk you through how to nail this pie with a crunchy pistachio crust and that luscious, ricotta-filled filling that’ll have you coming back for seconds.
Why This Recipe Works
- Perfect Textural Contrast: The crunchy pistachio crust balances beautifully with the smooth, creamy filling every bite.
- No-Bake Convenience: You skip the oven, making it ideal for warm days or last-minute desserts without compromising flavor.
- Traditional Flavors Made Easy: The filling features ricotta and mascarpone cheeses with just a hint of orange zest that makes your taste buds smile.
- Make-Ahead Friendly: Chill it overnight for a fuss-free dessert that’s ready when you are.

Ingredients & Why They Work
The magic of this No-Bake Cannoli Pie with Pistachio Crust Recipe comes down to the balance of textures and flavors. Each ingredient plays a role, from the buttery pistachio crust with vanilla wafers adding that subtle sweetness, to the creamy ricotta and mascarpone base with a hint of orange zest. Pro tip: quality ingredients make a huge difference here, especially fresh ricotta and mascarpone.

- Vanilla wafers: They give the crust a sweet, nostalgic crunch—look for fresh, not stale cookies for the best texture.
- Shelled, unsalted pistachios: Fresh pistachios add a nutty flavor and vibrant green flecks that really pop in the crust.
- Granulated sugar: Just enough to support the sweetness in the crust without overpowering it.
- Unsalted butter: Melts down to bind the crust crumbs, ensuring a firm and flavorful base.
- Heavy cream: Whipped to soft peaks, it adds lightness and fluffy texture to the filling.
- Mascarpone or cream cheese: Provides richness and creaminess — mascarpone is traditional, but cream cheese works in a pinch.
- Powdered sugar: Sweetens the filling smoothly and dusted on top for a delicate finish.
- Grated orange zest: Adds a bright, citrusy note, elevating the classic cannoli flavor.
- Coarse kosher salt: Just a pinch to balance the sweetness and bring depth.
- Ricotta cheese: The heart of the filling—smooth, creamy, and authentic Italian flavor.
- Mini chocolate chips: Sprinkled on top, they mirror cannoli shells’ chocolate details and add a fun bite.
Make It Your Way
One of the things I love about this No-Bake Cannoli Pie with Pistachio Crust Recipe is how easy it is to tweak. Whether you want to lighten it up, sneak in some extra nuts, or swap flavors, it’s very forgiving and super customizable. Play around and find what you love — that’s half the fun!
- Variation: I sometimes add a splash of vanilla extract or a teaspoon of almond extract to the filling for a little extra warmth—it’s subtle but so cozy.
- Dietary Swaps: For a lighter version, you can use part-skim ricotta and reduced-fat cream cheese, though the texture will be a touch less luxurious.
- Extra Crunch: Try folding in chopped pistachios into the filling itself for a delightful surprise with every bite.
- Seasonal Twist: During citrus season, swap in lemon zest instead of orange for a brighter zing.
Step-by-Step: How I Make No-Bake Cannoli Pie with Pistachio Crust Recipe
Step 1: Crafting that Crunchy Pistachio Crust
Start by pulsing the vanilla wafers, pistachios, and sugar in your food processor until the mixture looks like soft sand—you’re aiming for tiny, even crumbs to build a firm but delicate crust. Add melted butter gradually, mixing until everything feels like damp sand; when you squeeze it together, it should hold its shape but not be soggy. If you don’t have a food processor, a ziploc bag and rolling pin will work fine—just be consistent in crushing. Press this crumb mixture firmly into a 9-inch pie plate, shaping edges as you go. Pop it in the freezer while you whip up the filling to help it set nicely.
Step 2: Whipping Up the Creamy Filling
Whip the heavy cream until stiff peaks form—don’t overdo it or it’ll turn to butter! Set aside. Next, beat mascarpone (or cream cheese) with powdered sugar, orange zest, and salt until silky smooth—this usually takes about two minutes with a mixer. Fold in ricotta carefully without overmixing, then gently fold in the whipped cream in two batches to keep the mixture light and airy. If you fold too aggressively, you’ll lose that soft, fluffy texture, so take your time here.
Step 3: Assemble and Chill
Pour the lovely filling onto your chilled crust and smooth the top with a spatula. Refrigerate the pie for at least 4 hours to let it set properly; overnight chilling is even better because it helps flavors meld beautifully. Right before serving, sprinkle mini chocolate chips and a dusting of powdered sugar on top for that classic cannoli look and taste.
Tips from My Kitchen
- Crust Consistency Is Key: Don’t rush the butter addition—too much and the crust gets soggy, too little and it won’t hold.
- Orange Zest Freshness: Always zest fresh oranges; dried zest won’t give you that vibrant aroma I crave.
- Whipping Cream Alert: Stop whipping as soon as stiff peaks form to avoid turning cream into butter—it happens fast!
- Chill Time Rewarded: Patience is your friend—chilling overnight leads to better slicing and stronger flavor development.
How to Serve No-Bake Cannoli Pie with Pistachio Crust Recipe

Garnishes
I love topping this pie with mini chocolate chips because they add just the right touch of chocolate without overwhelming the cream. A light dusting of powdered sugar gives it a pretty, bakery-style finish. Sometimes, I sprinkle a few crushed pistachios on top — it not only adds color but also a little extra crunch that’s delightful.
Side Dishes
This pie is a dessert star all on its own, but if I’m serving a full meal, I like pairing it with fresh berries or a simple fruit salad that adds a refreshing contrast. A cup of strong espresso or black coffee is my personal fave to balance the creaminess and sweetness of the pie.
Creative Ways to Present
For special occasions, I’ve layered this filling in individual clear glass cups with pistachio crumbs between layers — it’s a crowd-pleaser and makes serving easier at parties. You can also garnish each slice with a thin strip of candied orange peel for a fancy, citrusy accent that impresses guests.
Make Ahead and Storage
Storing Leftovers
I keep leftovers tightly wrapped or covered with plastic wrap in the fridge, and they stay fresh and creamy for up to two days. The crust softens slightly over time but still tastes fantastic. Just slice gently when you’re ready to serve again.
Freezing
If you want to freeze the pie, wrap it really well with foil and plastic wrap to protect against freezer burn. It freezes beautifully for up to a month. When you’re ready, thaw it in the fridge overnight for best texture.
Reheating
I don’t recommend heating this pie since it’s meant to be enjoyed chilled. However, if frozen, letting it soften at room temperature for 15-30 minutes before slicing works perfectly and preserves the texture.
FAQs
-
Can I use store-bought pistachio crumbs instead of whole nuts?
While you can use store-bought pistachio crumbs, I recommend chopping whole pistachios yourself. Freshly chopped nuts offer better flavor and texture, plus you can control the chunk size to suit your preferences.
-
What if I don’t have mascarpone cheese? Can I use something else?
Absolutely! Cream cheese is a great substitute for mascarpone in this recipe. It won’t be quite as creamy, but it keeps the filling delicious and smooth. Just make sure it’s softened to avoid lumps.
-
How do I get clean slices when serving the pie?
For the neatest slices, chill the pie overnight. You can also freeze it for 30-60 minutes before cutting. Use a sharp knife dipped in hot water and wiped dry between slices to cut cleanly without smudging the filling.
-
Is this recipe suitable for kids?
Definitely! The flavors are sweet but not overwhelming, and that creamy filling is usually a big hit with kids. Just note the texture and the little bits of pistachio in the crust, which most kids enjoy but some may find new if they’re picky eaters.
Final Thoughts
This No-Bake Cannoli Pie with Pistachio Crust Recipe quickly became a staple in my dessert repertoire — it’s reliably delicious every single time. Whether you’re short on time, avoiding the oven, or just craving that classic cannoli taste in an easy-to-eat form, this pie ticks all the boxes. I’m confident you’ll love how effortlessly impressive it looks and tastes. Give it a try, and don’t be surprised if it becomes your new go-to dessert whenever you want to wow friends and family.
Print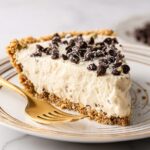
No-Bake Cannoli Pie with Pistachio Crust Recipe
- Prep Time: 25 minutes
- Cook Time: 0 minutes
- Total Time: 25 minutes
- Yield: 8 servings
- Category: Dessert
- Method: No-Cook
- Cuisine: Italian-American
- Diet: Vegetarian
Description
A creamy, no-bake cannoli pie with a crunchy vanilla wafer and pistachio crust, filled with a luscious mascarpone and ricotta cheese mixture, flavored with orange zest and topped with mini chocolate chips and powdered sugar. Perfect for an easy, elegant dessert that requires no oven time.
Ingredients
For the Crust:
- 6 ounces vanilla wafers (roughly 40 cookies or about 5-½ cups)
- ½ cup (50 grams) shelled, unsalted pistachios
- ¼ cup (50 grams) granulated sugar
- 6 tablespoons (85 grams) unsalted butter, melted, more as needed
For the Filling:
- ¾ cup (170 grams) heavy cream, cold
- 1 cup (227 grams) mascarpone or cream cheese
- ¾ cup (90 grams) powdered sugar, plus more for garnish
- ½ teaspoon grated orange zest
- Pinch coarse kosher salt
- 1 cup (227 grams) ricotta cheese
- Mini chocolate chips (for garnish)
Instructions
- Prepare Pie Crust: In a food processor, combine the vanilla wafers, pistachios, and sugar. Process until the mixture resembles sand. Transfer the crumb mixture to a bowl, add the melted butter, and mix to combine. The mixture should be damp like wet sand and hold together when squeezed. Adjust with more butter or wafer crumbs as needed. Press the crumbs into a 9-inch pie plate, forming edges first then evenly covering the bottom. Pack down firmly with a flat-bottomed cup. Place crust in the freezer while preparing the filling.
- Make the Filling: Using a hand mixer or stand mixer with a whisk attachment, whip the cold heavy cream until stiff peaks form. Set aside. In the mixer bowl, add mascarpone, powdered sugar, orange zest, and salt. Switch to paddle attachment if using stand mixer and beat on medium speed until smooth, about 2 minutes. Scrape sides and add ricotta cheese, beating on low speed until well combined, about 1 minute.
- Combine Filling Ingredients: Fold one-third of whipped cream into the cream cheese mixture gently using a rubber spatula until completely combined. Then carefully fold in remaining whipped cream without deflating it.
- Assemble Pie: Transfer the filling into the prepared crust and smooth the top. Refrigerate for at least 4 hours to set, preferably 12 hours or overnight.
- Garnish and Serve: Before serving, sprinkle mini chocolate chips and powdered sugar on top. For neat slices, optionally freeze the pie 30-60 minutes before serving and let it sit at room temperature 15-30 minutes if removing from frozen.
Notes
- The vanilla wafer cookie texture can vary by brand; adjust butter and crumbs to achieve a wet sand consistency that holds shape without sogginess.
- Serve pie well chilled. It can be made up to 2 days ahead refrigerated or frozen for up to a month, adding garnishes just before serving.
- Freezing before slicing helps with clean cuts but is not required.
- Let frozen pie sit at room temperature for 15-30 minutes before cutting to ease slicing.
- This recipe has been tested and updated regularly since its original 2020 publication for consistent results.
Nutrition
- Serving Size: 1 slice (1/8 of pie)
- Calories: 350 kcal
- Sugar: 25 g
- Sodium: 150 mg
- Fat: 24 g
- Saturated Fat: 14 g
- Unsaturated Fat: 8 g
- Trans Fat: 0 g
- Carbohydrates: 29 g
- Fiber: 1 g
- Protein: 5 g
- Cholesterol: 70 mg


