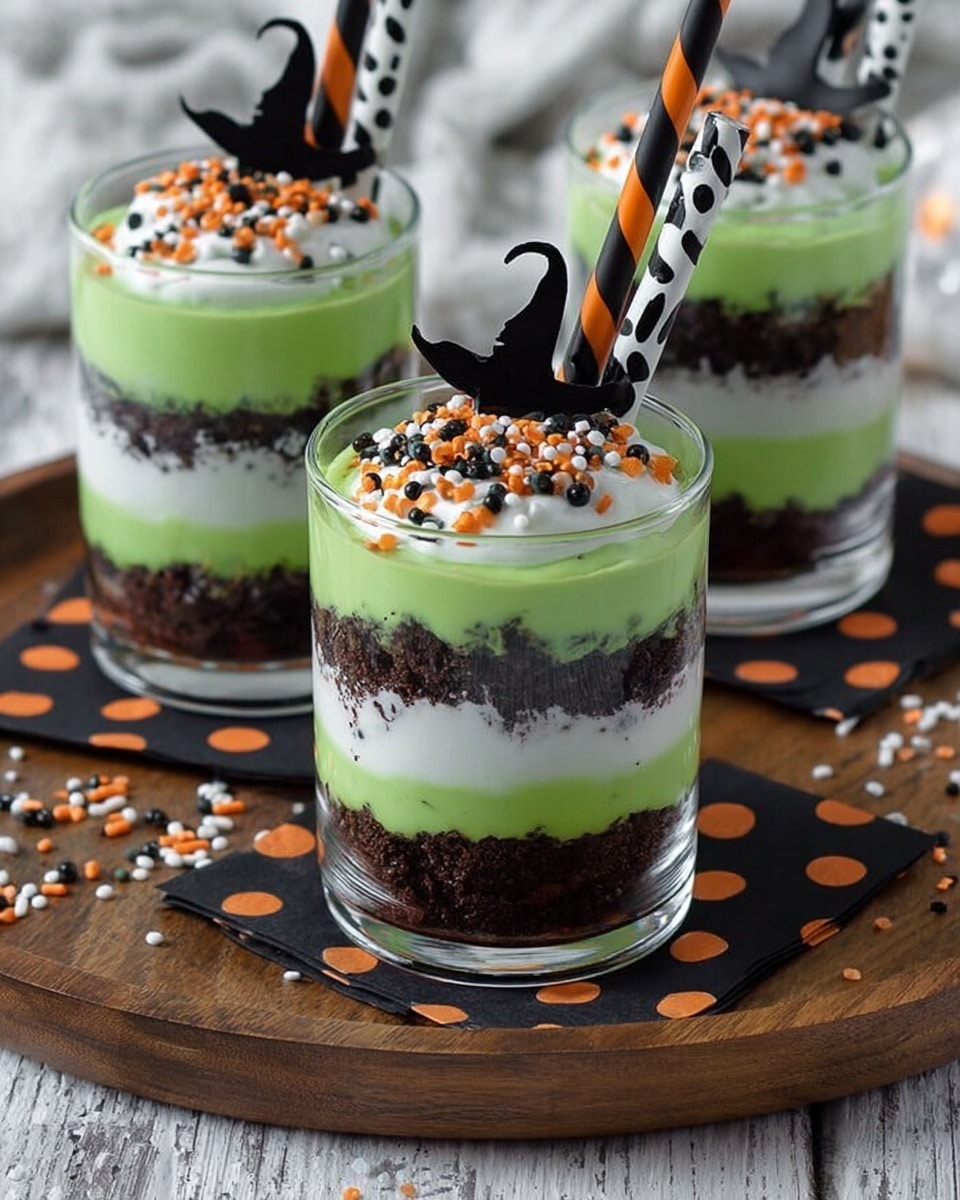
Melted Witch Pudding Parfaits Recipe
Okay, if you’re looking to wow your friends with a spooky, fun, and downright delicious dessert, you’ve got to try my Melted Witch Pudding Parfaits Recipe. It’s one of those treats that’s as much fun to make as it is to eat — super simple layers of green pudding, fudgy brownies, crushed Oreos, and fluffy whipped cream all come together with a festive Halloween twist. Trust me, these parfaits never last long at my house, and I can’t wait for you to give them a try!
Why This Recipe Works
- Easy Layering: The simple layers build visual appeal and a delightful mix of textures.
- No-Bake Dessert: No oven needed, so you can whip this up quickly and easily.
- Kid-Friendly Fun: The vibrant green pudding and Halloween sprinkles make it festive and fun for all ages.
- Customizable Components: You can swap brownies or Oreos for similar treats to fit your pantry or preferences.

Ingredients & Why They Work
The magic of these parfaits is in the balance of flavors and textures — creamy green pudding, fudgy brownie chunks, crunchy Oreos, and airy whipped cream. Each ingredient plays a role, and knowing what they bring to the table helps you make the best parfaits possible.

- Vanilla Snack Pack pudding cups: A creamy, ready-made pudding base that dyes beautifully green and adds smooth sweetness.
- Green food coloring: Playful and festive, it transforms the pudding into a “witchy” delight.
- Brownies: Adds a rich, chewy element that contrasts with the pudding’s creaminess.
- Oreos: Their crisp crunch when crushed adds texture and a touch of chocolatey bitterness.
- Whipped cream: Light and airy, it balances the denser components and adds fluffiness.
- Halloween sprinkles: Fun decorative touch that amps up the spooky vibe and excitement.
Make It Your Way
One of my favorite things about this Melted Witch Pudding Parfaits Recipe is how easy it is to tweak based on what you like or what you have on hand. I often switch up the brownies or sprinkles to match the season or dietary preferences without losing the fun.
- Gluten-Free Variation: I swapped regular brownies with gluten-free brownie bites once, and honestly, you couldn’t even tell — still super yummy.
- Dairy-Free Alternative: Try coconut whipped cream and dairy-free pudding if you’re avoiding dairy; it works surprisingly well and keeps the parfait creamy.
- Extra Crunch: Add a handful of toasted nuts or granola for a nutty crunch that contrasts nicely with the smooth pudding.
Step-by-Step: How I Make Melted Witch Pudding Parfaits Recipe
Step 1: Dyeing the Pudding Just Right
Start by adding the green food coloring to your vanilla Snack Pack pudding cups. I like to pour all the pudding into a bowl and mix thoroughly until I get that perfect spooky green shade. It helps to add the coloring gradually—you can always add more but can’t take it away! Once mixed, set it aside so you can build those layers.
Step 2: Layering the Brownies
Take your brownies and crumble them into smaller pieces. I find using slightly larger chunks than crumbs works best — you want that chewy burst in every bite. Layer these evenly at the bottom of each parfait glass. Think of this as your base, giving structure and a rich chocolate hit.
Step 3: Fluffy Whipped Cream Layer
Next up is the whipped cream layer. I usually grab a can of Reddi Wip for convenience, but fresh whipped cream whipped up with a bit of vanilla is amazing if you have extra time. Add a generous dollop over the brownies to add a light, creamy contrast.
Step 4: Sprinkle Those Oreos
Crush your Oreos to get that cookie crumb texture and sprinkle a layer over the whipped cream. Pro tip: crush them with a rolling pin inside a ziplock to keep clean and control the size of the crumbs. The Oreo layer adds crunch and a little bit of bitterness to balance the sweetness.
Step 5: Top with the Green Pudding
Finally, spoon the green pudding on top, filling the glass up nicely. I like to slightly jiggle the parfait to settle the pudding and fill any gaps, so every spoonful gets all layers perfectly combined.
Step 6: Add the Finchishing Halloween Touches
Decorate with Halloween sprinkles and top with fun additions like little candy witch legs if you have them. It takes your Melted Witch Pudding Parfaits Recipe from cute to “wow!” instantly. Just a heads up — enjoy your parfait soon after assembling to avoid sogginess!
Tips from My Kitchen
- Mix Pudding Thoroughly: Make sure the green food coloring is evenly stirred to avoid streaks and uneven color.
- Choose Dense Brownies: Fudgy brownies hold up better in the parfait than cakey ones that might get soggy.
- Crush Oreos Gently: For best texture, avoid pulverizing Oreos into dust; keep some chunkier bits.
- Serve Fresh: These parfaits taste best right after assembling since the brownie and Oreo layers soften quickly.
How to Serve Melted Witch Pudding Parfaits Recipe
Garnishes
I keep the garnishes simple and festive: Halloween-themed sprinkles for that colorful punch, and sometimes candy witch legs or gummy worms peeking out. I’ve also tossed a few mini marshmallows or edible glitter on top for extra sparkle — because hey, why not jazz up dessert for Halloween?
Side Dishes
This dessert is sweet and rich enough to stand alone, but I’ve served it alongside caramel apples or a fresh fruit platter for contrast. It’s also great to pair with simple drinks like apple cider or hot chocolate during a cozy fall gathering.
Creative Ways to Present
For parties, I like serving Melted Witch Pudding Parfaits Recipe in little mason jars or clear plastic cups so the layers show off their magic. Another favorite is a “build-your-own” parfait bar with all ingredients in separate bowls, letting guests customize their own spooky creations. It’s always a hit with both kids and adults!
Make Ahead and Storage
Storing Leftovers
If you happen to have leftovers (lucky you!), cover the parfaits tightly with plastic wrap and keep them in the fridge. I’ve noticed the brownie layer can get a bit soggy after several hours, so try to enjoy them within a day for best texture.
Freezing
I don’t recommend freezing this parfait because the pudding and whipped cream don’t freeze well and lose their creaminess. Better to assemble fresh and enjoy right away!
Reheating
Since this is a no-bake, creamy dessert, reheating doesn’t really apply. Just give any refrigerated parfait a quick stir or gentle shake before serving to mix any settled layers.
FAQs
-
Can I use homemade pudding for the Melted Witch Pudding Parfaits Recipe?
Absolutely! Homemade vanilla pudding works wonderfully and gives you control over sweetness and texture. Just be sure it’s thick enough to hold the layers without becoming runny.
-
What can I substitute for brownies if I don’t have any on hand?
You can use chocolate cake pieces, cookie crumbles, or even granola for some crunch. Just keep in mind the brownie adds a rich fudgy texture that’s a key part of the parfait’s charm.
-
How long can I keep the parfaits before they get soggy?
For best texture and flavor, enjoy the parfaits within a few hours of assembling. The brownies and Oreos will start to soften and lose their crunch after sitting too long.
-
Can kids help make this recipe?
Definitely! This recipe is perfect for little hands to assemble — layering brownies, whipped cream, and sprinkles is super fun and easy for kids to do with minimal mess.
Final Thoughts
Honestly, the Melted Witch Pudding Parfaits Recipe is one of those treats that brings out the kid in me every time I make it. The mix of colors, textures, and that just-right sweetness make it a standout dessert that’s effortless yet impressive. I can’t recommend it enough if you want a quick, no-fuss, crowd-pleasing dessert this Halloween season. So go ahead, gather your ingredients, get your hands messy layering those spooky parfaits, and enjoy the smiles that come with every spoonful!
Print
Melted Witch Pudding Parfaits Recipe
- Prep Time: 20 minutes
- Cook Time: 0 minutes
- Total Time: 20 minutes
- Yield: 6 servings
- Category: Dessert
- Method: No-Cook
- Cuisine: American
Description
Melted Witch Pudding Parfaits are a fun and festive Halloween treat featuring layers of green vanilla pudding, brownies, crushed Oreos, whipped cream, and colorful Halloween sprinkles. Easy to assemble and perfect for spooky celebrations, these parfaits combine creamy, crunchy, and chocolatey textures in a visually delightful dessert.
Ingredients
Pudding Layer
- 6 vanilla Snack Pack pudding cups
- Green food coloring, enough to tint pudding
Other Layers
- 1 cup brownies, crumbled into smaller pieces
- 1 cup Oreos, crushed
- 1 cup whipped cream (such as Reddi Wip)
- Halloween sprinkles, for garnish
Optional Decoration
- Witch’s legs toppers, for decoration
Instructions
- Dye the Pudding: Transfer the vanilla pudding cups into a bowl and add green food coloring gradually, stirring until the pudding turns a vibrant green color. Set aside.
- Layer Brownies: Evenly divide the crumbled brownie pieces and place them at the bottom of each glass or parfait cup, creating the first layer.
- Add Whipped Cream: Spoon a generous layer of whipped cream on top of the brownies, spreading evenly in each parfait glass.
- Top with Crushed Oreos: Sprinkle crushed Oreos over the whipped cream layer, adding a crunchy texture.
- Add Green Pudding: Spoon the green-tinted vanilla pudding over the Oreos, filling each glass almost to the top.
- Garnish and Serve: Decorate the top with Halloween sprinkles and optionally place witch’s legs toppers for a spooky finish. Serve the parfaits immediately for best texture and flavor.
Notes
- For easier coloring, transfer all pudding from individual cups into a bowl before mixing in the green food coloring.
- Use fresh whipped cream for the best taste and texture; store-bought can be used for convenience.
- If not serving immediately, keep the parfaits refrigerated but expect the brownies and Oreos to soften over time.
- Witch’s legs toppers can be made from candy canes or purchased Halloween-themed decorative picks.
Nutrition
- Serving Size: 1 parfait (approx. 150g)
- Calories: 320 kcal
- Sugar: 28 g
- Sodium: 150 mg
- Fat: 15 g
- Saturated Fat: 9 g
- Unsaturated Fat: 4 g
- Trans Fat: 0 g
- Carbohydrates: 42 g
- Fiber: 2 g
- Protein: 3 g
- Cholesterol: 25 mg


