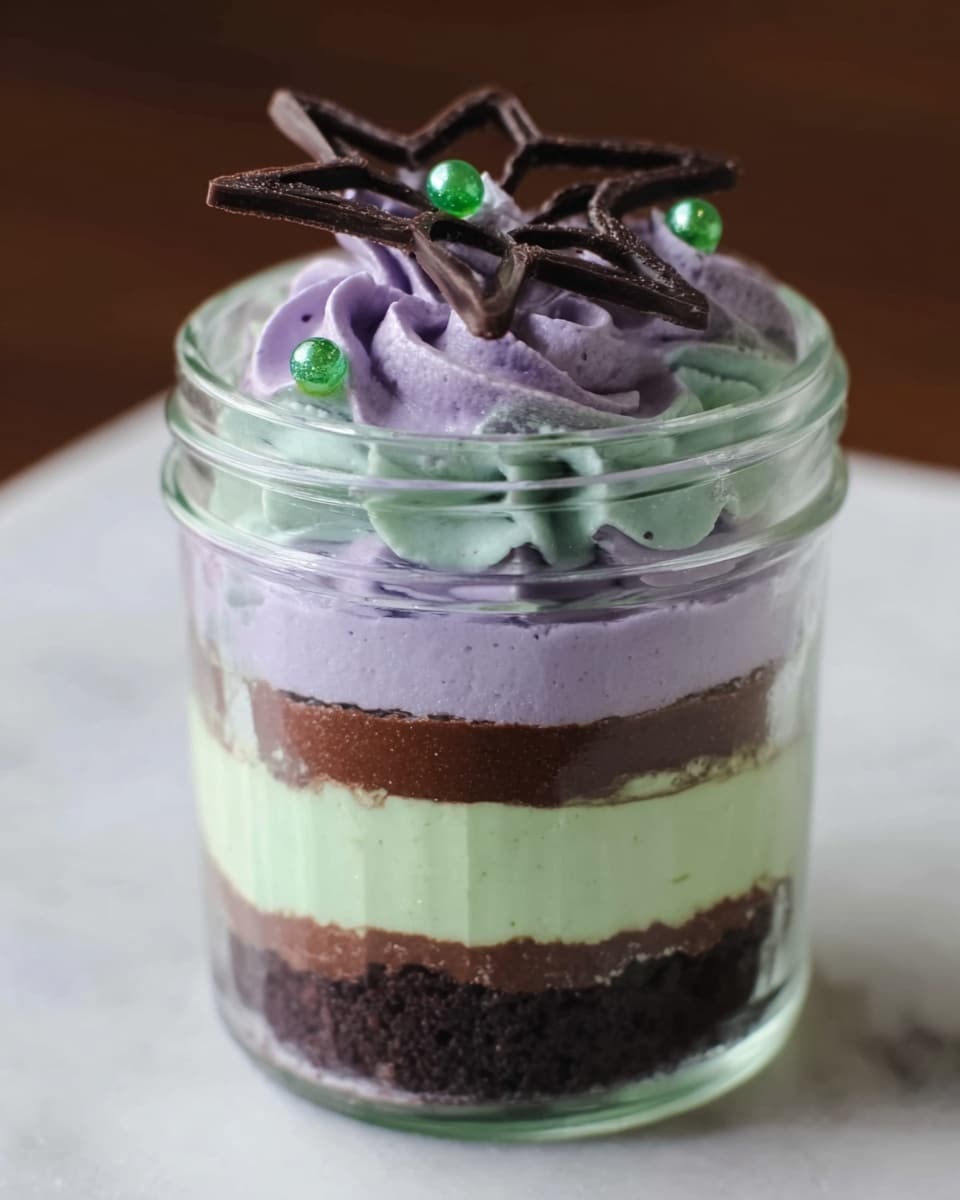
Mason Jar Cakes with Spider Web Decorations Recipe
If you’re looking for a Halloween treat that’s as fun to make as it is to eat, you’ve got to try my Mason Jar Cakes with Spider Web Decorations Recipe. These adorable little cakes are packed into mason jars, layered with fluffy purple and green frosting, and topped with cute – yet spooky – chocolate spider webs. Trust me, once you nail this recipe, you’ll have a festive showstopper that’s perfect for parties, gifts, or just treating yourself. Ready to impress with an easy, irresistible dessert? Let’s get started!
Why This Recipe Works
- Layered Goodness: Cutting the cupcakes in half and layering with colorful frosting keeps the dessert moist and visually captivating inside the jar.
- Easy Yet Impressive: Using a store-bought devil’s food cake mix means you save time but still get rich, chocolatey flavor.
- Creative Decorations: The chocolate spider webs take your mason jar cakes from cute to Halloween chic without complicated piping skills.
- Portable & Perfect Portions: Mason jars make these cakes great for parties, gifts, or kid-friendly snacks without the mess.

Ingredients & Why They Work
The ingredients in this Mason Jar Cakes with Spider Web Decorations Recipe come together to balance rich chocolate, fluffy frosting, and fun festive colors. Using a cake mix streamlines the process, while homemade marshmallow frosting elevates the texture and taste. The mason jars not only help with presentation, but also keep each cake perfectly portioned and fresh.

- Devil’s Food Chocolate Cake Mix: Provides a deep chocolate flavor and moist crumb — the perfect base.
- Vegetable Oil, Eggs, Water: Follow box instructions for an easy batter that bakes up soft and tender.
- Butter (room temperature): Creates a creamy base for the frosting, essential for smooth, fluffy texture.
- Powdered Sugar: Sweetens and thickens the frosting just right.
- Marshmallow Cream: Adds a marshmallowy fluffiness and subtle sweetness to the frosting that store-bought just can’t match.
- Vanilla Extract: Boosts all the flavors, especially in frosting.
- Food Coloring (Purple and Green): Classic Halloween colors to make your frosting pop inside the jars.
- Dark Chocolate Candy Melts: Easy to melt and perfect for precise spider web designs.
- Mason Jars (8 oz): Ideal size for layered cakes — cute, functional, and reusable!
- Ziploc or Piping Bags: Helps with neat frosting and chocolate web details.
- Sprinkles (optional): Adds fun texture and sparkle on top!
Make It Your Way
One of the things I love about this Mason Jar Cakes with Spider Web Decorations Recipe is how easy it is to customize. Whether you want to switch up the frosting colors, make it gluten-free, or try different cake flavors, it’s all possible—and trust me, the variations are just as delicious!
- Variation: I once swapped the Devil’s Food mix for a red velvet cake to make a spooky blood-red layered version. It was a hit at Halloween brunch!
- Dietary adjustments: You can use vegan cake mix and dairy-free butter to make these allergy-friendly without losing flavor.
- Seasonal twists: Try orange and black frosting for a classic Halloween vibe, or pastel colors if you want a fun harvest party look instead.
Step-by-Step: How I Make Mason Jar Cakes with Spider Web Decorations Recipe
Step 1: Bake the Cupcakes Right
First things first, preheat your oven to 350°F. I always like to line a muffin pan with paper baking cups before mixing my cake batter. Follow the instructions on your Devil’s Food cake mix box for adding vegetable oil, eggs, and water—this step ensures a moist, tender cake every time. Pour the batter into the muffin cups, filling about two-thirds full, and pop them in the oven. The baking time is usually around 18 minutes, but I highly recommend doing the trusty toothpick test—you want it to come out clean but moist. Let your cupcakes cool fully before the next step. Patience pays off here; warm cupcakes will make your frosting a mess!
Step 2: Make the Magical Marshmallow Frosting
Now for the frosting – it’s the star that takes this cake next level. Using a mixer, cream 1 cup of softened butter until smooth and fluffy. Add one 7-ounce jar of marshmallow cream—trust me, this ingredient is a total game-changer—and mix in. Slowly add 2 cups of powdered sugar along with a teaspoon of vanilla extract, mixing until everything is well combined and fluffy, about 4 minutes. The marshmallow gives the frosting this incredible light, almost cloud-like texture that’s a dream to layer inside the jars.
Step 3: Color & Layer Your Mason Jar Cakes
Divide your frosting into two bowls. Add three drops of purple food coloring to one bowl and mix well; do the same with green in the other. These colors bring the perfect Halloween vibe right inside each jar. Next, gently peel off the paper baking cups and slice each cupcake horizontally into two halves—that’s your layering magic! Place one cupcake half at the bottom of each 8 oz mason jar, then pipe on the purple frosting using a Ziploc bag with the corner cut off. Sprinkle some festive candies or sprinkles if you like. Repeat with another layer of cake and the green frosting on top. Finish off with a swirl of frosting and a sprinkle of goodies.
Step 4: Create the Chocolate Spider Webs
The fun finishing touch: spider web decorations! Find a spider web template online or draw your own on paper, then place a sheet of wax paper over it. Melt your dark chocolate candy melts in a microwave-safe Ziploc bag by heating in 30-second bursts, kneading between until smooth. Cut a tiny tip off the bag and carefully trace the webs onto the wax paper. Let the webs harden at room temperature before gently peeling off and placing on top of each jar cake. They’re lightweight and look surprisingly impressive for minimal effort!
Tips from My Kitchen
- Cool Completely: Make sure cupcakes are fully cooled before slicing and layering to avoid frosting meltdown.
- Frosting Consistency: If frosting feels too thick after adding powdered sugar, add a teaspoon of milk to soften it.
- Practice Your Webs: Try tracing webs on a spare piece of wax paper before the final attempt to get comfortable with piping.
- Storage Hack: Store spider webs in a cool place; humidity can cause them to melt or become sticky.
How to Serve Mason Jar Cakes with Spider Web Decorations Recipe
Garnishes
For garnishes, I love using mini chocolate chips or tiny black and orange Halloween sprinkles to top the frosting inside the jars. They add a fun pop of color and a little crunch. You could even add an edible glitter dust to make things sparkle if you’re feeling festive. The chocolate spider web itself is the star garnish, but a few candy eyeballs around it never hurt for that extra spooky vibe!
Side Dishes
Serve these mason jar cakes alongside a hot cup of coffee or a spooky-themed cocktail for adults. They also pair nicely with fresh fruit like raspberries or blackberries to balance the sweetness. For a party, you could line them up alongside other Halloween snacks such as caramel popcorn or candied apples to complete the spread.
Creative Ways to Present
I once crafted a “haunted dessert bar” by placing these mason jar cakes on a black lace runner with tiny battery-operated candles flickering nearby. Adding spider rings and mini pumpkins around the jars really set the mood. If you want to gift them, tie some twine or Halloween-themed ribbon around the lids and add a little tag with a fun message – guests love getting these personal goodies.
Make Ahead and Storage
Storing Leftovers
These cakes store beautifully in the refrigerator, thanks to the sealed mason jars. I keep mine covered with a lid or plastic wrap to lock in moisture. The layers and frosting hold up well for 3 to 4 days, so you can make them ahead of your event with no worries.
Freezing
Freezing mason jar cakes is totally doable but comes with a small caveat. I recommend freezing the unassembled cupcakes and frosting separately if you want the best texture. If you must freeze assembled jars, make sure the lids aren’t screwed on tight to prevent condensation, then freeze for up to 2 months. Thaw overnight in the fridge before adding your spider web decorations.
Reheating
Since these are individual cakes best enjoyed chilled, I usually skip reheating. But if you prefer a warm treat, remove the spider web topper and microwave the cake (without the jar) in 10-second bursts until just warmed through—be careful not to melt the frosting completely.
FAQs
-
Can I use homemade cake instead of a box mix for the Mason Jar Cakes with Spider Web Decorations Recipe?
Absolutely! While the box mix saves time and ensures moistness, a homemade devil’s food cake or your favorite chocolate cake recipe will work beautifully. Just make sure the cake is fully cooled and has a tender crumb for easy layering inside the jars.
-
How do I prevent the chocolate spider webs from breaking when moving them?
Let the chocolate webs harden completely at room temperature, then carefully peel them off the wax paper. Store them flat in a dry, cool spot until you’re ready to use. Transport them in a small flat container to prevent cracks or breaks.
-
Is there a way to make the frosting less sweet?
You can balance sweetness by adding a pinch of salt or a little cream cheese to your frosting, which cuts through the sugary marshmallow cream and powdered sugar. Just be mindful that the consistency remains smooth.
-
What size mason jars work best for this recipe?
8-ounce mason jars are perfect—they hold two cupcake halves plus frosting layers beautifully without being too bulky or too small.
Final Thoughts
I honestly can’t get enough of this Mason Jar Cakes with Spider Web Decorations Recipe every Halloween season. They’re simple enough to whip up on a weeknight but special enough to wow your guests or delight trick-or-treaters. The layered frosting and chocolate spider webs add that extra touch of magic that always brings smiles. So whether you’re an experienced baker or just looking for a fun project, this recipe is a no-fail winner that I’m excited for you to try. Grab your mason jars, and let’s bake some Halloween magic together!
Print
Mason Jar Cakes with Spider Web Decorations Recipe
- Prep Time: 25 minutes
- Cook Time: 18 minutes
- Total Time: 43 minutes
- Yield: 8 servings
- Category: Dessert
- Method: Baking
- Cuisine: American
Description
These Mason Jar Cakes are a fun and creative way to enjoy delicious Devil’s Food Chocolate Cupcakes layered with fluffy homemade marshmallow buttercream frosting, all beautifully presented in individual mason jars. Perfect for Halloween or any festive occasion, these cakes feature colorful frosting in purple and green, topped with sprinkles and chocolate candy webs for a spooky finish.
Ingredients
Cake
- 1 box Devil’s Food Chocolate Cake mix
- Vegetable oil, eggs, and water as directed on box instructions
Frosting
- 1 cup room temperature butter
- 2 cups powdered sugar
- 1 7 oz jar marshmallow cream
- 1 teaspoon vanilla extract
- Food coloring: purple and green
Decoration
- 1 bag dark chocolate candy melts
- Sprinkles (optional)
Tools
- 8 oz mason jars
- Ziploc or piping bags
- Regular size muffin cups with paper baking cups
- Wax paper
Instructions
- Preheat oven: Heat the oven to 350 degrees Fahrenheit to prepare for baking the cupcakes.
- Prepare cupcake liners: Place paper baking cups inside regular size muffin cups to hold the batter during baking.
- Mix cupcake batter: Prepare the cake mix as directed on the box using water, vegetable oil, and eggs.
- Bake cupcakes: Pour the batter into the paper-lined muffin cups and bake according to the box directions, approximately 18 minutes until a toothpick inserted in the center comes out clean.
- Cool cupcakes: Remove cupcakes from the muffin pan and allow to cool completely on a wire rack.
- Make frosting: In a mixer, cream the butter until smooth, then add the marshmallow cream. Gradually mix in powdered sugar and vanilla, blending for about 4 minutes until fluffy and combined.
- Color frosting: Divide frosting evenly into two bowls. Add 3 drops of purple food coloring to one bowl and mix well. Add 3 drops of green food coloring to the other bowl and mix thoroughly.
- Prepare cupcakes for layering: Remove paper baking cups from the cooled cupcakes. Cut each cupcake horizontally in half using a serrated knife.
- Assemble in jars: Place one cupcake half at the bottom of each 8 oz mason jar. Spoon purple frosting into a Ziploc or piping bag with a corner cut off, then pipe frosting over the cupcake layer. Optionally sprinkle with candies or sprinkles. Add the second cupcake half on top and repeat frosting and sprinkles layering. Finish with a top layer of frosting and decorative sprinkles.
- Create chocolate spider webs: Place a sheet of wax paper over a printed or hand-drawn spider web design. Melt chocolate candy melts in a Ziploc or piping bag in 30-second microwave intervals until smooth. Cut a small tip off the bag and carefully trace the spider web design on the wax paper. Allow the chocolate webs to harden before placing on top of the finished jars as a spooky decoration.
Notes
- Ensure cupcakes are completely cooled before frosting to prevent melting.
- Use a serrated knife for clean horizontal cuts of cupcakes.
- Food coloring can be adjusted to desired shade by adding more drops gradually.
- Chocolate spider webs can be made ahead and stored in an airtight container.
- Sprinkles and candy decorations are optional but add festive flair.
- Mason jars should be clean and dry before assembling.
Nutrition
- Serving Size: 1 jar (approximately 100 g)
- Calories: 350 kcal
- Sugar: 35 g
- Sodium: 180 mg
- Fat: 18 g
- Saturated Fat: 10 g
- Unsaturated Fat: 6 g
- Trans Fat: 0 g
- Carbohydrates: 45 g
- Fiber: 2 g
- Protein: 3 g
- Cholesterol: 45 mg


