Marshmallow Swirl Chocolate Fudge Recipe
If you’re looking for a dessert that’s rich, melt-in-your-mouth decadent, and just a little bit magical, you’re going to love this Marshmallow Swirl Chocolate Fudge Recipe. I’ve made it countless times for friends and family, and it’s always a huge hit — partly because it’s insanely easy, but mostly because the marshmallow swirls add such a fun texture and look that makes it feel special. Stick around, I’ll share all my tips to make sure your fudge turns out perfectly glossy, creamy, and swirly every time.
Why This Recipe Works
- Perfect Texture: Sweetened condensed milk creates a smooth, fudgey consistency that melts in your mouth.
- Marshmallow Delight: Adding marshmallows last lets them hold their shape for those beautiful swirls and little bursts of chewiness.
- Simple Ingredients, Stunning Results: Few pantry staples come together to create a rich and luscious treat.
- No Fuss Prep: Low heat melting prevents burning, making it easy even for fudge rookies to nail.

Ingredients & Why They Work
This Marshmallow Swirl Chocolate Fudge Recipe relies on simple, quality ingredients that bring out the best flavors while ensuring the texture is just right. When you shop, it’s worth picking semi-sweet chocolate chips you trust—don’t settle for bargain brands because the smoothness really shows here.
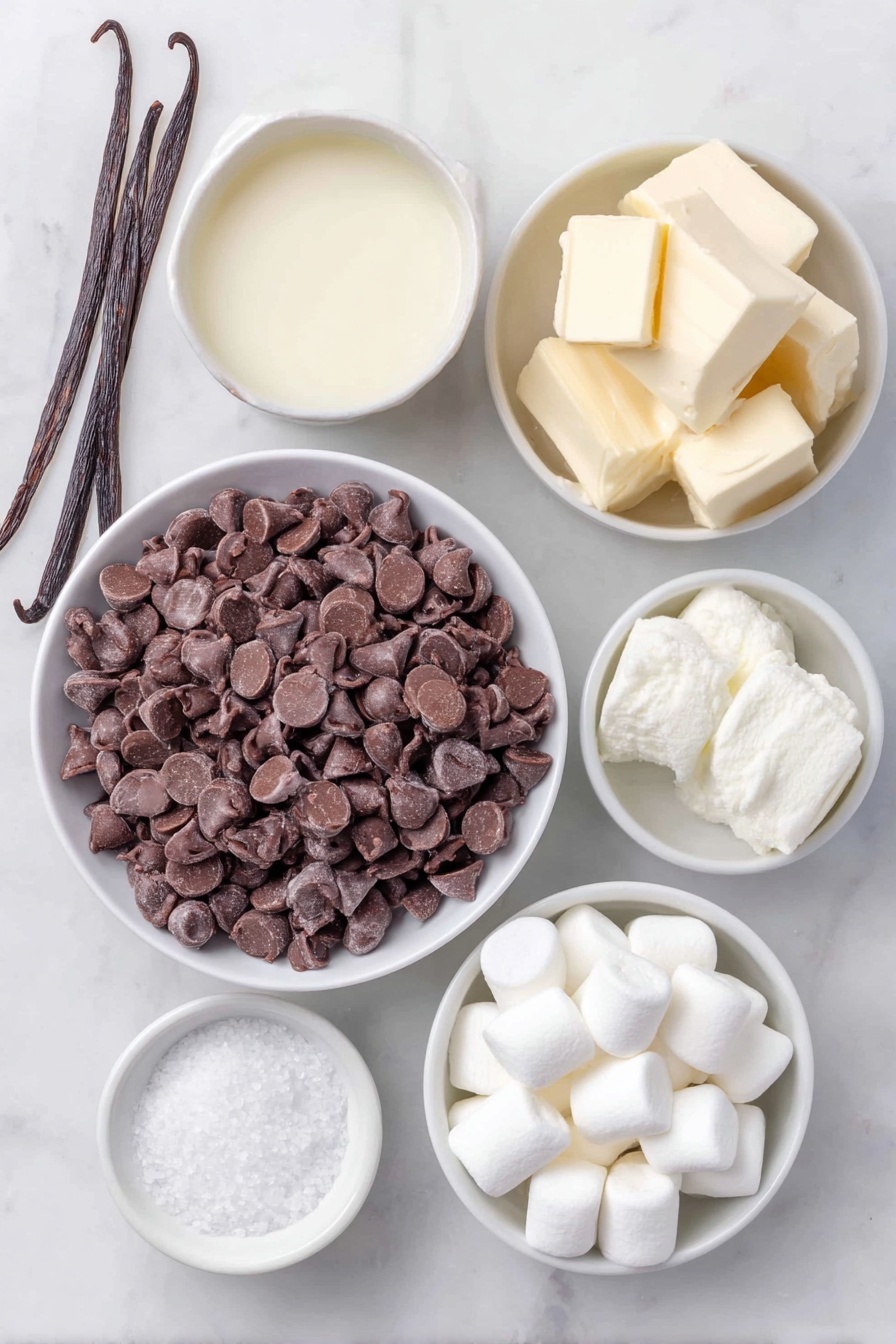
- Semi-sweet chocolate chips: Provide the rich chocolate base and set up firm yet creamy fudge once cooled.
- Sweetened condensed milk: Adds sweetness, moisture, and a silky texture that traditional cream can’t quite match.
- Unsalted butter: Enhances richness and helps achieve a smooth melt.
- Vanilla extract: Brings warmth and depth to the chocolate’s flavor.
- Salt: Balances sweetness and brightens the overall taste.
- Mini marshmallows: These create the signature swirls and add delightful gooey texture pockets.
Make It Your Way
I love experimenting with this Marshmallow Swirl Chocolate Fudge Recipe because it’s so adaptable. You can easily swap chocolates or add little extras to make it your own. I’ve tried it with peppermint pieces for winter gifts and peanut butter chips when I crave something a bit nutty—both delicious! Don’t be afraid to get creative.
- Variation: Adding chopped toasted nuts on top adds a perfect crunch contrast. I toasted pecans once and it took the fudge from rich to next-level awesome.
- Dairy-Free Option: Use vegan chocolate chips and a dairy-free sweetened condensed milk replacement—they work surprisingly well and keep that creamy texture.
- Seasonal Twist: Sprinkle crushed peppermint candies in the marshmallow swirls around Christmas for a festive touch.
Step-by-Step: How I Make Marshmallow Swirl Chocolate Fudge Recipe
Step 1: Prep Your Pan Like a Pro
Start by lining an 8×8-inch square baking pan with parchment paper, leaving the sides long enough to help you lift the fudge out later. This little setup is a game changer — it makes slicing so much cleaner and cleanup a breeze. Trust me, I’ve tried cutting fudge straight from the pan and it’s a sticky mess!
Step 2: Gently Melt and Combine the Chocolate Base
In a medium saucepan set on very low heat, combine your semi-sweet chocolate chips, sweetened condensed milk, unsalted butter, and salt. Stir this mixture constantly with a silicone spatula to avoid burning or seizing your chocolate—a mistake I’ve learned to avoid the hard way. Keep going until everything is fully melted and smooth, which should take about 5–7 minutes. Low and slow is the key here!
Step 3: Add the Vanilla
Remove your pan from the heat and stir in the vanilla extract until it’s fully combined. This little addition does wonders to lift all the chocolate flavors and balance the sweetness.
Step 4: Fold in Those Marshmallows Gently
Now, quickly but gently fold in your mini marshmallows. The idea is to swirl them in without melting them completely — you want those fluffy pockets that surprise you in every bite. Use a gentle folding motion with your spatula just enough to streak them through the fudge, but not fully mix them away.
Step 5: Pour, Swirl, and Chill
Pour your marshmallow swirled fudge into the prepared pan. Use the spatula to gently swirl the top once more so you get an inviting, pretty pattern with the marshmallows peeking out. Let it cool at room temperature for about 10 minutes, then pop it into the fridge for at least 2 hours to set completely.
Step 6: Slice and Serve Like a Champ
Once your fudge is fully set, grab the parchment overhang to lift it out of the pan. Use a buttered knife to slice into neat 16 squares — buttering the knife stops it from sticking and makes clean cuts, something I swear by after many sticky attempts. Now, all that’s left is to dig in and enjoy each little blissful square.
Tips from My Kitchen
- Low Heat Magic: I’ve learned the hard way that high heat ruins fudge texture—keep your stovetop on the lowest setting and stir nonstop.
- Marshmallow Timing: Add marshmallows off the heat to avoid melting them—they’re the stars, after all.
- Butter Your Knife: It’s a simple trick but makes slicing so much easier and less sticky every time.
- Use Parchment Paper: Always line your pan – it saves you from a fudge struggle and keeps squares perfect.
How to Serve Marshmallow Swirl Chocolate Fudge Recipe

Garnishes
I often sprinkle a tiny pinch of flaky sea salt or some crushed peppermint atop my fudge squares for a little extra zing—especially during the holidays. Sometimes a light drizzle of caramel makes the dessert feel oh-so indulgent. The marshmallow swirls themselves already add a fun visual, so I like keeping garnishes minimal but thoughtful.
Side Dishes
This fudge pairs beautifully with a hot cup of coffee or a creamy latte—the chocolate and marshmallow flavors complement the bitter notes in the coffee perfectly. For a cozy night in, I’ll serve it alongside freshly steamed milk or even a cup of peppermint tea. A cold glass of milk is the classic choice that never disappoints!
Creative Ways to Present
For parties, I love arranging these fudge squares on a slate board with a scattering of miniature marshmallows and edible glitter for sparkle. Wrapping individual squares in decorative parchment and tying with twine makes for sweet little gifts. Once, I even layered the fudge in a mason jar alternating with crushed candy canes for a rustic, festive look—everyone loved it.
Make Ahead and Storage
Storing Leftovers
I keep leftover fudge in an airtight container in the fridge, layering parchment paper between the squares if stacking. This keeps each piece fresh and prevents sticking. It tastes just like day one for up to a week, but honestly, it rarely lasts that long at my place!
Freezing
Freezing fudge works like a charm. I cut it into squares, layer with parchment paper in an airtight container or zip-top bag, and freeze for up to 3 months. When I’m ready for a treat, I thaw it overnight in the fridge, and it’s perfect—same creamy texture, no freezer burn.
Reheating
If you want to bring your fudge back to room temp, just let it sit out for 15–20 minutes before serving. I don’t recommend microwaving fudge since it can change the consistency, but if you’re in a hurry, a quick low-power zap for a few seconds can soften it slightly.
FAQs
-
Can I use milk chocolate or dark chocolate instead of semi-sweet?
Absolutely! The Marshmallow Swirl Chocolate Fudge Recipe is super flexible. Milk chocolate will make your fudge sweeter and creamier, while dark chocolate adds richer and more intense cocoa flavor. Just make sure to choose good quality chocolate chips for best melting and texture.
-
What’s the best way to prevent fudge from being grainy?
Grainy fudge usually happens if the sugar crystallizes during cooking. Since this recipe uses sweetened condensed milk instead of granulated sugar, it’s less likely to happen. Still, make sure to melt the mixture slowly on low heat and stir constantly to keep it smooth.
-
Can I add other mix-ins like nuts or candy?
Yes! Feel free to toss in chopped nuts, crushed peppermint, or even peanut butter chips when you fold in the marshmallows. Just be mindful not to overload the fudge with extras, or it might not set as well.
-
Why do my marshmallows melt completely instead of swirling?
This usually means the fudge is still too hot when you add the marshmallows or you’ve stirred too vigorously. Remove the pan from heat before adding marshmallows and gently fold them in—this preserves their shape and creates those beautiful swirls you want.
Final Thoughts
This Marshmallow Swirl Chocolate Fudge Recipe is a winner in my book—and at every gathering I bring it to! It’s simple enough for a last-minute treat but impressive enough to wow friends and family. Plus, the marshmallow swirls add that fun texture you can’t get from regular fudge. I really hope you give it a try soon — you’re going to love how creamy, chocolatey, and just plain delightful it is.
Print
Marshmallow Swirl Chocolate Fudge Recipe
- Prep Time: 10 minutes
- Cook Time: 10 minutes
- Total Time: 2 hours 20 minutes
- Yield: 16 servings
- Category: Dessert
- Method: Stovetop
- Cuisine: American
Description
This Marshmallow Swirl Fudge recipe combines creamy semi-sweet chocolate with sweetened condensed milk and marshmallow swirls for a soft, chewy, and visually appealing treat. Perfect for dessert or holiday gifting, this fudge is easy to make with simple ingredients and requires no baking, just stovetop melting and chilling.
Ingredients
Fudge Base
- 3 cups semi-sweet chocolate chips
- 1 (14 oz) can sweetened condensed milk
- 2 tbsp unsalted butter
- 1/8 tsp salt
- 1 tsp vanilla extract
Swirls
- 1 1/4 cups mini marshmallows
Instructions
- Prep Your Pan: Line an 8×8-inch square baking pan with parchment paper, leaving a little overhang on the sides to make removing the fudge easier.
- Melt Chocolate, Milk, Butter, and Salt: In a medium saucepan over low heat, combine 3 cups semi-sweet chocolate chips, 1 (14 oz) can sweetened condensed milk, 2 tablespoons unsalted butter, and 1/8 teaspoon salt. Stir constantly until the mixture is fully melted and smooth to avoid seizing the chocolate.
- Add Vanilla: Remove the saucepan from heat and stir in 1 teaspoon vanilla extract until fully combined.
- Fold in Marshmallows: Quickly add 1 1/4 cups mini marshmallows and gently fold them into the chocolate mixture with a spatula, just enough to create swirls without melting them completely.
- Transfer to Pan and Swirl: Pour the fudge mixture into the prepared baking pan. Use your spatula to gently swirl the top so some marshmallows peek through for visual appeal.
- Chill and Set: Let the pan cool at room temperature for 10 minutes, then transfer to the refrigerator for at least 2 hours until the fudge is fully set.
- Slice and Serve: Once set, lift the fudge out of the pan using the parchment overhang and slice into 16 squares with a buttered knife for clean cuts.
Notes
- Do not overheat the chocolate to prevent it from seizing; stir constantly on low heat.
- Add marshmallows last and fold gently so they do not completely melt and maintain the swirl effect.
- Use parchment paper in the pan for easy removal and cleaner cutting of fudge squares.
- A buttered knife helps to achieve neat and smooth fudge slices.
- Store fudge in an airtight container to prevent drying out, either in the fridge or freezer.
- For variations, substitute semi-sweet chips with dark or milk chocolate, or add crushed peppermint, nuts, or peanut butter chips for additional texture and flavor.
- This fudge can be made up to 5 days ahead and freezes well for up to 3 months; thaw in the fridge before serving.
Nutrition
- Serving Size: 1 square (approximately)
- Calories: 165 kcal
- Sugar: 21 g
- Sodium: 50 mg
- Fat: 7 g
- Saturated Fat: 4 g
- Unsaturated Fat: 3 g
- Trans Fat: 0 g
- Carbohydrates: 25 g
- Fiber: 1 g
- Protein: 1 g
- Cholesterol: 10 mg


