Marshmallow Ghosts: Easy Halloween Treats Recipe
If you’re looking for the perfect fun and festive treat to make this Halloween, you’ve got to try my Marshmallow Ghosts: Easy Halloween Treats Recipe. These little ghostly delights are super simple, adorable, and satisfy that sweet craving with a playful twist. Whether you’re making them with the kids or need a quick party snack that wows, these marshmallow ghosts have got your back!
Why This Recipe Works
- Easy Assembly: Minimal steps mean you’ll have these marshmallow ghosts ready in a snap without complicated prep.
- Eye-Catching Presentation: The cute fondant “ghost sheet” wrapping each marshmallow is a simple way to create spooky charm.
- Kid-Friendly Fun: Decorating with chocolate chips for eyes and mouth makes it a perfect activity even for little helpers.
- Perfect Texture Contrast: Soft marshmallows meet smooth fondant and the crunch of chocolate chips, pleasing both texture and taste buds.

Ingredients & Why They Work
Each ingredient plays a key role in delivering that ghostly charm and delightful flavor. The fondant creates the ghost “cloak,” marshmallows provide sweet softness, and the chocolate chips bring character with eyes and mouths. I’ve also learned that white chocolate is the star for keeping everything cohesive and visually delicate.
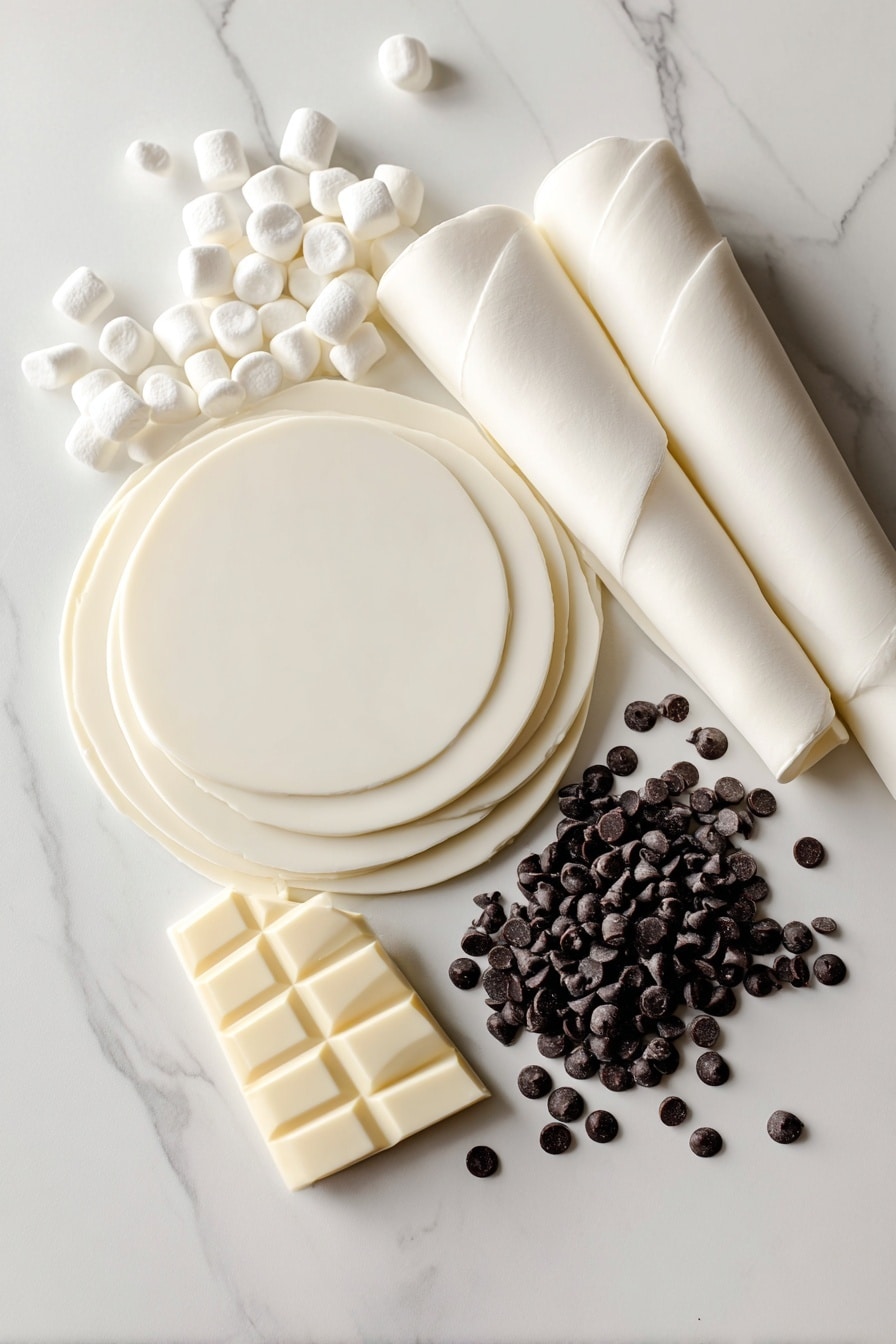
- Fondant: This pliable sugar dough is perfect for shaping and wrapping around marshmallows to create ghost bodies; if you want, you can buy pre-made or make your own for a fresher taste.
- Marshmallows: Classic and fluffy, these form the “body” of the ghost and make the whole treat delightfully soft.
- Mini Chocolate Chips: These tiny chips create the ghost’s cute eyes, adding a sweet and slightly crunchy detail.
- Standard Chocolate Chips: Used for the ghostly mouths, their larger size helps clearly define expressions.
- White Chocolate: Key for “gluing” everything together and adding detail, plus it blends beautifully with the white fondant and marshmallows.
Make It Your Way
One of the things I love about this Marshmallow Ghosts: Easy Halloween Treats Recipe is how customizable it is! You can twist it to match your flavor preferences or dietary needs without losing the charm. Feel free to add your own flair and make it truly yours.
- Variation: I sometimes swap out the white chocolate for colored candy melts when hosting a Halloween party with kids—it adds a pop of color and excitement to the spooky theme.
- Diet-Friendly Option: If you’re avoiding dairy, look for vegan white chocolate alternatives or make a simple coconut-based glaze to hold the pieces together.
- Seasonal Twist: Adding a dash of pumpkin spice to the fondant dough can turn these ghosts into fall-flavored goodies, which I tried last year and loved! It gives just the right cozy vibe.
Step-by-Step: How I Make Marshmallow Ghosts: Easy Halloween Treats Recipe
Step 1: Gather Your Ingredients and Prep
First things first, bring everything together in one spot. I like to lay out my fondant, marshmallows, chocolate chips, and white chocolate before I start. If you’re making your own fondant, now’s the time to whip that up — it really makes a difference in freshness. Melting your white chocolate gently over a pot of hot water helps keep it warm and perfectly smooth. This little setup is crucial because the white chocolate acts as your edible glue to hold these ghosts together.
Step 2: Roll and Cut Your Fondant
Roll your fondant to a thin 2mm to 3mm thickness — this is key because you want it just thick enough to cover the marshmallows without being bulky. Use a round cutter about the size of your marshmallows plus two times their height to get just the right size circle. I usually test with one marshmallow first to see if the fondant covers it nicely with gentle frills. Don’t rush this part; a good fit makes all the difference in appearance and ease of assembly.
Step 3: Assemble the Ghosts
Place a dab of melted white chocolate in the center of a fondant circle, then gently set a marshmallow right on top. Flip the whole thing over and carefully adjust the fondant edges so they envelop the marshmallow and create those classic ghostly frills. It’s a little fiddly but kind of fun to get creative with how the “sheet” drapes. Repeat this for all the marshmallows to set the stage for the faces.
Step 4: Add the Eyes and Mouth
Using a toothpick or skewer, place two tiny dots of warm white chocolate on either side of the ghost’s “face” for eyes. Quickly stick two mini chocolate chips onto those dots before the chocolate sets. Repeat the trick using the standard-sized chocolate chip to make a scary or silly mouth. Your ghosts start to come alive right here! Don’t worry if your first few look a bit quirky — mine did too, and that just gives them character.
Step 5: Let Them Set and Store
Once all your marshmallow ghosts have their faces, let them rest so the chocolate hardens and everything sticks together. Then carefully store them in an airtight container away from humidity so the fondant stays soft and the marshmallows fresh. I like to keep mine in a cool spot—not the fridge, to avoid moisture buildup.
Tips from My Kitchen
- Keep White Chocolate Warm: I swear by gently warming the white chocolate in a bowl over hot water to keep it fluid — otherwise, it stiffens too fast and makes assembly tricky.
- Choosing Your Cutter Size: I learned that matching the cutter size to marshmallow diameter plus twice the height ensures a clean fondant cover without overcrowding.
- Fondant Thickness Matters: Rolling your fondant too thick makes the ghosts heavy; too thin, and it tears — aim for that sweet spot around 2-3mm!
- Avoiding Humidity: Trust me, storing these in a dry place is a game changer — it keeps fondant soft and frees your ghosts from sticky faces.
How to Serve Marshmallow Ghosts: Easy Halloween Treats Recipe
Garnishes
I actually love serving these marshmallow ghosts with a sprinkle of edible glitter or a light dusting of powdered sugar for a frosty, spooky effect. Sometimes I add a few tiny candy pumpkins or bats on the side of the plate to make the presentation extra festive and fun for kids.
Side Dishes
Pairing these with a warm cup of pumpkin spice hot chocolate or a simple apple cider really elevates the cozy Halloween vibe. For a party, I like having bowls of candy corn and festive popcorn nearby for guests to nibble alongside the marshmallow ghosts.
Creative Ways to Present
One Halloween, I arranged these marshmallow ghosts peeking out of mini cupcake liners lined like little ghostly nests—it was such a hit! You can also skewer the ghosts on sticks and stand them in a block of foam for a fun “ghost bouquet.” Presentation really amps up the excitement, especially for kids.
Make Ahead and Storage
Storing Leftovers
I store leftover marshmallow ghosts in an airtight container at room temperature away from moisture. They remain fresh for a few days, and I find the fondant and marshmallow texture holds up really well—not sticky or hardening too fast.
Freezing
I’ve tried freezing these once, but honestly, I prefer them fresh since freezing can affect marshmallow softness and fondant texture. If you must freeze, wrap them carefully in plastic wrap and place in a sealed container; thaw them gently at room temperature.
Reheating
Since these are treats served at room temperature, reheating isn’t usually necessary. If the chocolate on the face feels a bit hard, just let the marshmallow ghosts sit at room temperature for a bit, and they’ll soften nicely without losing shape.
FAQs
-
Can I use store-bought fondant for this recipe?
Absolutely! Store-bought fondant works well and saves time. Just make sure to roll it thin and keep it pliable by warming it slightly with your hands before working with it. Homemade fondant gives a fresher texture but isn’t required.
-
What’s the best way to keep the white chocolate from hardening too fast?
Keeping the white chocolate warm over a bowl of hot water is super helpful. Replace the hot water as it cools and avoid overheating so the chocolate stays glossy and spreadable while you assemble your marshmallow ghosts.
-
Can I make these marshmallow ghosts vegan-friendly?
You can! Swap marshmallows for vegan versions (look for those without gelatin), and use vegan fondant or homemade sugar paste. For chocolate, pick dairy-free white chocolate alternatives to keep the puppets completely plant-based.
-
How long do marshmallow ghosts stay fresh?
Stored in an airtight container away from humidity, these treats stay fresh for up to 3-4 days. After that, fondant may start to dry out and marshmallows lose fluffiness, so enjoy them fresh if you can!
Final Thoughts
I love how this Marshmallow Ghosts: Easy Halloween Treats Recipe brings a little magic and sweetness to my Halloween celebrations. They’re simple enough to whip up even on a busy day but full of charm that makes any gathering feel special. I’m confident you’ll have a blast making and sharing these delightful ghosts with your friends and family — they’re a guaranteed way to put smiles on everyone’s faces. Give them a go, and watch your kitchen transform into a spooktacular sweet shop!
Print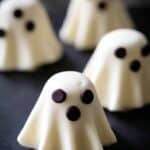
Marshmallow Ghosts: Easy Halloween Treats Recipe
- Prep Time: 1 hour
- Cook Time: 0 minutes
- Total Time: 1 hour
- Yield: 10 marshmallow ghosts
- Category: Dessert
- Method: No-Cook
- Cuisine: American
- Diet: Vegetarian
Description
Create adorable and spooky Marshmallow Ghosts using fondant, marshmallows, and white chocolate. This easy Halloween treat combines simple ingredients to craft charming ghost-shaped sweets perfect for festive celebrations.
Ingredients
Marshmallow Ghosts
- 300 g fondant
- 10 marshmallows
- 20 mini chocolate chips
- 10 standard chocolate chips
- White chocolate (amount as needed for melting)
Instructions
- Gather Ingredients: Collect all ingredients needed for the treat. If you prefer homemade fondant, prepare it beforehand following a trusted recipe.
- Melt White Chocolate: Melt white chocolate in a small bowl. Keep the bowl warm by placing it over a pot or bowl of hot water to prevent the chocolate from hardening during assembly.
- Prepare Fondant Cutouts: Roll out the fondant to about 2mm to 3mm thickness. Use a medium-sized round cutter to cut out circles matching the marshmallow size.
- Assemble Ghost Base: Apply a small amount of melted white chocolate to the center of each fondant circle. Place one marshmallow on this spot to stick it in place.
- Shape Fondant Around Marshmallow: Turn the fondant and marshmallow over carefully. Adjust and frill the edges of the fondant so it fully covers the marshmallow and creates a ghostly frilled effect.
- Add Eyes: Using a skewer or toothpick, apply two small dots of white chocolate on each marshmallow’s sides for the eyes. Quickly place two mini chocolate chips on these dots before the chocolate sets.
- Add Mouth: Repeat the process for the mouth, using the larger standard chocolate chips attached with white chocolate dots.
- Repeat Assembly: Continue the same steps for all marshmallow ghosts until complete.
- Store: Keep the finished marshmallow ghosts in an airtight container away from humidity to maintain freshness.
Notes
- Keep the white chocolate warmed during assembly by placing the bowl in hot water. Replace the water as it cools to prevent the chocolate from hardening prematurely.
- Choose white chocolate over dark or milk chocolate to maintain the aesthetic of white fondant and marshmallows, especially if fondant is rolled thinly.
- Select a cutter size that closely matches the marshmallow diameter plus twice its height to properly cover the marshmallow without excess fondant.
Nutrition
- Serving Size: 1 marshmallow ghost
- Calories: 120 kcal
- Sugar: 18 g
- Sodium: 45 mg
- Fat: 3 g
- Saturated Fat: 2 g
- Unsaturated Fat: 1 g
- Trans Fat: 0 g
- Carbohydrates: 22 g
- Fiber: 0 g
- Protein: 1 g
- Cholesterol: 0 mg


