Homemade Salted Caramel Recipe
If you’ve ever dreamed of making your own melt-in-your-mouth candies at home, you’re in for such a treat with this Homemade Salted Caramel Recipe. Trust me, once you try making these salted caramels from scratch, you’ll never want to buy the store-bought ones again—there’s just something magical about that buttery, creamy, perfectly salted bite that you control entirely. Plus, I’ll share all my personal tips to help you nail this recipe without any stress, so grab your candy thermometer and let’s dive in!
Why This Recipe Works
- Perfect Balance of Sweet and Salt: Using salted butter and finishing with sea salt flakes creates that crave-worthy sweet-savory combo.
- Simple Ingredients You Can Trust: With just butter, cream, sugar, corn syrup, and salt, this recipe avoids unnecessary additives, making each caramel rich and smooth.
- Clear Temperature Guide: Cooking the sugar to specific temperatures guarantees the ideal chewy texture every time.
- Expert Tips to Avoid Common Traps: From heating butter and cream separately to careful gradual mixing, these tricks prevent crystallization and burning.

Ingredients & Why They Work
Each ingredient in this homemade salted caramel recipe plays a key role in delivering that perfect texture and flavor. Let me break down the essentials so you feel confident picking out your supplies.

- Salted butter: I prefer salted butter here—it adds an extra layer of flavor, but if you only have unsalted, just add a pinch of fine salt yourself.
- Heavy cream: Look for cream with at least 35% butterfat because it makes these caramels ultra smooth and luscious.
- Water: Helps dissolve the sugar evenly and controls the syrup consistency.
- Light corn syrup: Essential for preventing sugar crystals, which can ruin the texture – but honey or golden syrup can work if you’re in a pinch.
- Granulated sugar: The star ingredient that cooks down into that beautiful amber caramel color.
- Flaked sea salt: Choose something like Maldon flakes for a delicate crunch and to finish the caramels with a perfect burst of saltiness.
Make It Your Way
One of my favorite things about this homemade salted caramel recipe is how easy it is to customize. Whether you want softer bites, a little extra saltiness, or even a dairy-free twist, there’s plenty of room to experiment and make it truly your own.
- Variation: I once experimented by adding a sprinkle of smoked sea salt on top for a subtle smoky kick that blew my mind—definitely worth a try if you love bold flavors.
- Dairy-Free Option: Swap heavy cream with full-fat coconut cream and use coconut oil instead of butter for a tropical twist that’s surprisingly delicious.
- Softer Caramels: Adding 2 to 4 extra tablespoons of cream after cooking makes the caramels melt-in-your-mouth soft if you prefer less chew.
- Firmer Texture: Cooking the caramel to 245°F instead of 240°F gives you a slightly firmer chew that holds up well for gift-wrapping.
Step-by-Step: How I Make Homemade Salted Caramel Recipe
Step 1: Prepare Your Pan for Success
Start by lightly oiling a 9×5-inch loaf pan and then lining it with parchment paper that hangs over the edges—this makes it so much easier to lift the caramel out once set. Give the parchment a quick oiling, too, so nothing sticks. Trust me, this simple prep step saves a ton of frustration later.
Step 2: Melt Butter and Cream Together
Cut your butter into cubes for quicker melting, then place it in a microwave-safe bowl along with the heavy cream. Heat for 1 to 2 minutes until everything is melted and hot but not boiling. Let this sit while you start your sugar syrup—it’s going to be your liquid gold in a minute!
Step 3: Craft the Sugar Syrup
Combine water and corn syrup in a small, heavy-bottomed saucepan over medium heat. When adding sugar, sprinkle it in gently—not along the edges—to avoid splattering. Once it boils, cover with a lid for 1 minute; this steam melts any sugar crystals on the side, giving you a smoother caramel.
Step 4: Watch the Temperature and Color Like a Hawk
Take off the lid and attach your candy thermometer. Now, it’s time to be patient—cook the sugar syrup until it hits 320°F (160°C). You’ll see the syrup turn a gorgeous amber color around the edges; that’s your cue that caramel flavors are developing beautifully. This step is crucial because undercooking or overcooking seriously impacts texture.
Step 5: Slowly Incorporate Butter and Cream
This is the fun but slightly nerve-wracking part: add about a sixth of your hot butter and cream mixture slowly into the boiling sugar, stirring with the candy thermometer’s base so nothing sticks. The mixture will bubble up aggressively—don’t panic! Keep adding the rest in small batches, stirring gently to combine. This gradual mix stabilizes the caramel so it’s smooth and creamy.
Step 6: Finish Cooking to the Right Temperature
After all the butter and cream are in, the temperature will drop—keep cooking and stirring until it reaches 240°F (115°C). This final temp gives you that perfect chewy texture that’s not too soft or too brittle.
Step 7: Cool and Salt
Pour your caramel into the prepared pan. Let it sit for 20 minutes, then sprinkle the flaked sea salt evenly over the top. Allow it to cool fully at room temperature for about 3 ½ hours—this patience pays off with the best chew and flavor.
Step 8: Cut and Enjoy
Once cooled, lift the caramel from the pan using the parchment overhang. If it feels too soft to cut cleanly, pop it in the fridge for 30-45 minutes to firm up. Then use a large, sharp knife to slice into bite-sized rectangles—about 1-inch by 1/2-inch works great.
Tips from My Kitchen
- Avoid Crystallization: Covering your sugar syrup with a lid briefly melts stray crystals on the pan edges—don’t skip this step!
- Use Real Candy Thermometer: Cheap thermometers can be off by several degrees; a reliable one is game-changing for getting texture right.
- Stir Gently and Slowly: Aggressive stirring can cause the caramel to seize or become gritty, so take it slow and steady when adding butter and cream.
- Patience Pays Off: Don’t rush the cooling—letting the caramel fully set makes cutting much easier and results in better texture.
How to Serve Homemade Salted Caramel Recipe

Garnishes
I love finishing these caramels with a sprinkle of flaky sea salt like Maldon for that textural pop and contrast. Sometimes, I also dust a tiny bit of cocoa powder or a pinch of cinnamon to switch things up; these little tweaks make them feel extra special when sharing with friends.
Side Dishes
Pair these salted caramels with a scoop of vanilla ice cream or alongside a rich chocolate tart to balance the buttery sweetness. They’re also gorgeous wrapped up in cellophane as a sweet treat after dinner or a thoughtful gift with coffee or dessert wines.
Creative Ways to Present
One of my favorite presentation ideas is to place cut caramels into mini cupcake liners arranged on a pretty platter—so festive for parties! I’ve also drizzled some extra homemade caramel sauce over them and sprinkled crushed nuts or toasted coconut for a decadent twist that wows every time.
Make Ahead and Storage
Storing Leftovers
Wrap each caramel individually in plastic wrap or waxed paper to keep them from sticking together. Then store them in an airtight container at room temperature for up to 2 weeks. I’ve found this keeps them perfectly chewy without drying out.
Freezing
Yes, you can freeze these beauties! Just wrap tightly and place them in a freezer-safe container or zip-top bag. They’ll keep wonderfully for up to a month. When ready to enjoy, let them thaw at room temperature—no microwaving needed.
Reheating
If your caramels get a little too firm in the fridge or freezer, I gently warm them by placing wrapped pieces in a bowl of warm water for a few minutes. This softens them slightly without melting. You could also set them on the counter ahead of time to come back to room temperature for the best chew.
FAQs
-
Can I use unsalted butter for this homemade salted caramel recipe?
Absolutely! If you only have unsalted butter, no worries—just add ¼ teaspoon of fine salt to the caramel when you add the salt at the end. I personally like salted butter as it enhances the overall flavor subtly, but the recipe works fine either way.
-
Why is corn syrup important in this recipe?
Corn syrup helps prevent the sugar from crystallizing as it cooks, which keeps your caramel smooth and silky. If you don’t have corn syrup, you can try substituting with pure honey or golden syrup, but the texture might vary slightly.
-
How do I know when the caramel is cooked to the right temperature?
Using a candy thermometer is key! For this recipe, you’ll cook the sugar syrup to 320°F before adding butter and cream, then finish cooking to 240°F for the perfect chewy texture. These temps help you avoid caramels that are too soft or too hard.
-
Can I double the recipe?
I generally don’t recommend doubling because controlling the temperature evenly becomes trickier with larger batches. If you need more, it’s better to make two separate batches unless you’re very experienced and have a large heavy-bottomed pot.
-
How do I cut the caramel without it sticking or tearing?
After the caramel sets, lift it out using the parchment. If it’s too soft, chill it in the fridge for about 30-45 minutes to firm up. Use a sharp knife (a large chef’s knife works well) and wipe it clean after each cut to get neat edges without sticking.
Final Thoughts
This Homemade Salted Caramel Recipe has become my absolute go-to when I want to treat myself or impress friends with something sweet and special. It’s surprisingly not as intimidating as it sounds once you get the hang of watching temperatures and stirring gently. Making caramels from scratch might just become your newest kitchen happy place, like it did for me. So, go ahead—grab your ingredients, take your time, and enjoy every buttery, dreamy bite. You’ll wonder how you ever lived without homemade salted caramels!
Print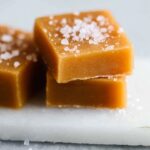
Homemade Salted Caramel Recipe
- Prep Time: 3 hours 45 minutes
- Cook Time: 20 minutes
- Total Time: 4 hours 5 minutes
- Yield: 48 pieces
- Category: Dessert
- Method: Stovetop
- Cuisine: American
Description
This recipe for Homemade Salted Caramels guides you through the process of making soft, chewy salted caramels with simple ingredients like butter, heavy cream, sugar, and corn syrup. Perfect for candy lovers, these caramels have a delightful balance of sweetness and saltiness, with tips for customization and storage.
Ingredients
Main Ingredients
- 8 tablespoons salted butter (113g)
- ½ cup heavy cream or heavy whipping cream, at least 35% butterfat (120ml)
- 3 tablespoons water (44ml)
- ¼ cup light corn syrup (60ml)
- 1 cup granulated sugar (200g)
- ½ teaspoon flaked sea salt, like Maldon
Instructions
- Prepare pan: Lightly oil a 9×5-inch loaf pan. Cut a piece of parchment paper to fit inside the pan with at least an inch overhang on the sides. Lightly oil the parchment paper, place it in the pan, and set aside.
- Heat butter and cream: Cut the butter into 8 pieces and add to a microwave-safe bowl along with the heavy cream. Heat in the microwave for 1 to 2 minutes until the butter melts and the mixture is hot. Set aside for later use.
- Make sugar syrup: In a small, heavy-bottomed saucepan, combine the water and corn syrup. Add the sugar carefully to avoid splattering on the pan sides. Place over medium heat and cook until boiling. Cover with a lid for 1 minute to create steam, which helps dissolve any sugar crystals on the sides.
- Cook to 320°F: Remove lid and attach a candy thermometer to the pan’s side. Cook the sugar syrup until it reaches 320°F (160°C) and turns amber around the edges, about 5 to 10 minutes.
- Add butter and cream: Slowly pour about one-sixth of the butter and cream mixture into the hot sugar, stirring constantly with the thermometer base to incorporate. Repeat with remaining butter and cream in small batches, stirring between additions. The mixture will bubble vigorously, so proceed cautiously to avoid overflow.
- Cook to 240°F: After incorporation, the temperature will drop. Continue cooking the mixture until it reaches 240°F (115°C), about 5 to 10 minutes.
- Cool: Carefully pour the caramel mixture into the prepared loaf pan. Let cool for 20 minutes, then sprinkle with the flaked sea salt. Allow the caramel to cool completely at room temperature for about 3 hours and 30 minutes.
- Cut into caramels: Once cooled, unmold the caramel. If too soft to handle, refrigerate for 30 to 45 minutes to firm up. Use a large, sharp knife to cut into 1-inch by 1/2-inch rectangles or desired shapes.
Notes
- Store caramels wrapped individually in plastic wrap or waxed paper. Refrigerate for up to two weeks or freeze for up to one month.
- Corn syrup can be substituted with pure honey or golden syrup, though corn syrup is most reliable.
- If using unsalted butter, add ¼ teaspoon of fine salt to the mixture.
- To make caramels softer, add 2 to 4 extra tablespoons of cream.
- For firmer caramels, cook the final mixture to 245°F (118°C) instead of 240°F (115°C).
- Avoid doubling this recipe unless experienced, as precise temperature control is critical. For larger quantities, make multiple batches.
- Use a heavy, thick-bottomed saucepan (1½ to 2-quart) for even heating and temperature control.
- The recipe is inspired by Jacques Pépin’s book, “Chez Jacques: Traditions and Rituals of a Cook.”
Nutrition
- Serving Size: 1 piece (approx. 10 g)
- Calories: 60 kcal
- Sugar: 7 g
- Sodium: 40 mg
- Fat: 3 g
- Saturated Fat: 2 g
- Unsaturated Fat: 1 g
- Trans Fat: 0 g
- Carbohydrates: 8 g
- Fiber: 0 g
- Protein: 0 g
- Cholesterol: 10 mg


