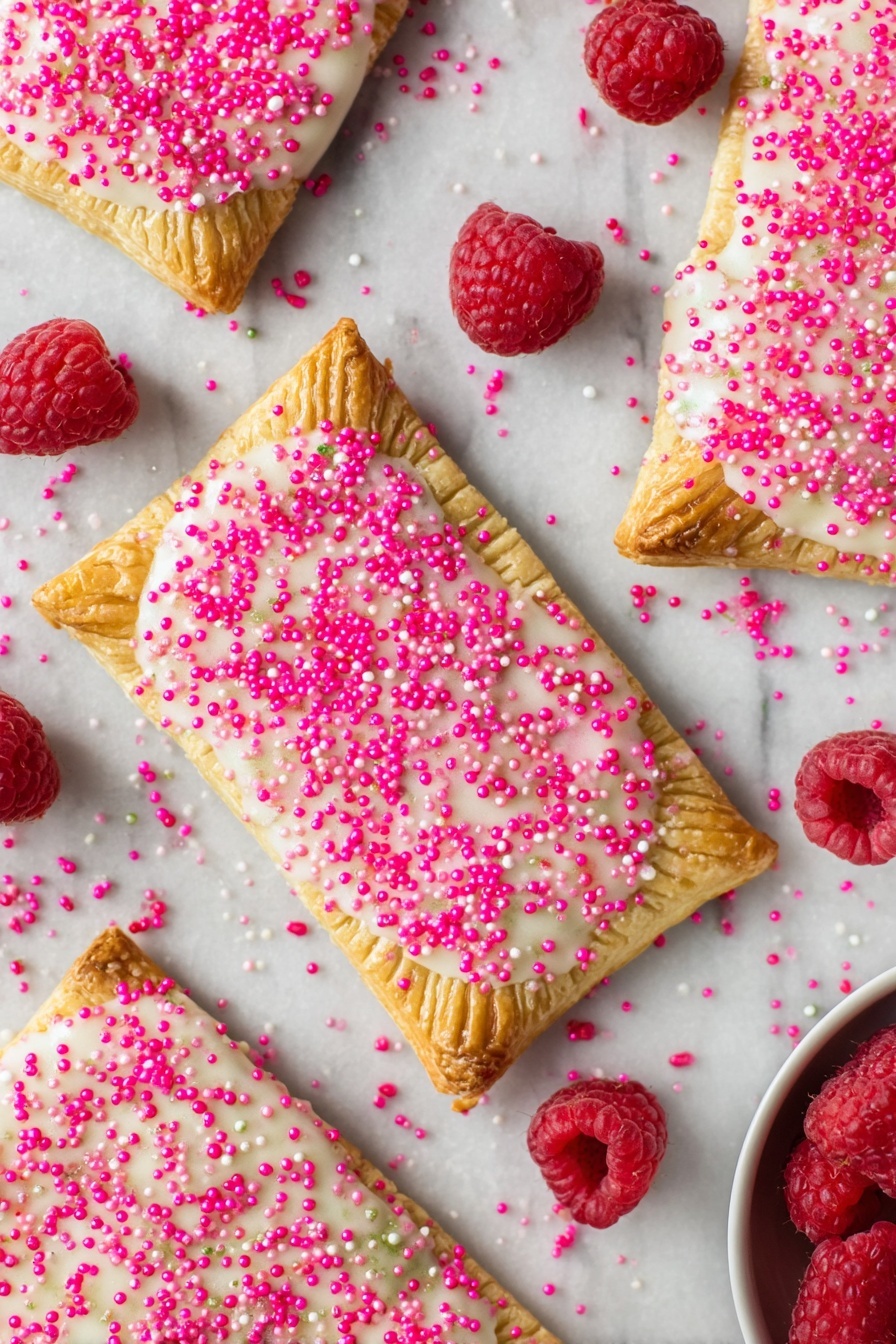
Homemade Raspberry Pop Tarts Recipe
Nothing beats that nostalgic feeling of biting into a warm, flaky pastry filled with sweet, tangy raspberry jam first thing in the morning. That’s why I’m so excited to share my Homemade Raspberry Pop Tarts Recipe with you. It’s ridiculously good, and honestly, way easier than you’d think to whip up at home. Forget store-bought—these pop tarts have buttery crusts, fresh raspberry filling, and that perfect sweet vanilla glaze that’ll have you grabbing seconds (or thirds!). Stick with me—I’ll walk you through all my tips and tricks so you can nail this like a pro in your very own kitchen.
Why This Recipe Works
- Fresh Raspberry Filling: Using fresh or frozen raspberries thickened with cornstarch makes the filling perfectly jammy without being runny.
- Flaky Pie Crust: The refrigerated pie crust gives that buttery, tender texture every homemade pop tart needs—in less time than making dough from scratch.
- Sweet Vanilla Icing: The simple icing adds just the right touch of sweetness and a lovely sheen that sets beautifully once cooled.
- Easy Assembly: Cutting the dough into neat rectangles and sealing with an egg wash makes for that classic pop tart look and ensures a no-spill filling inside.

Ingredients & Why They Work
Every ingredient in this Homemade Raspberry Pop Tarts Recipe plays a starring role. Together, they give you a balance of flaky, fruity, and sweet—plus some pantry staples that keep things straightforward. I’ll share some shopping tips and ingredient insights below that helped me get the best flavors and textures.
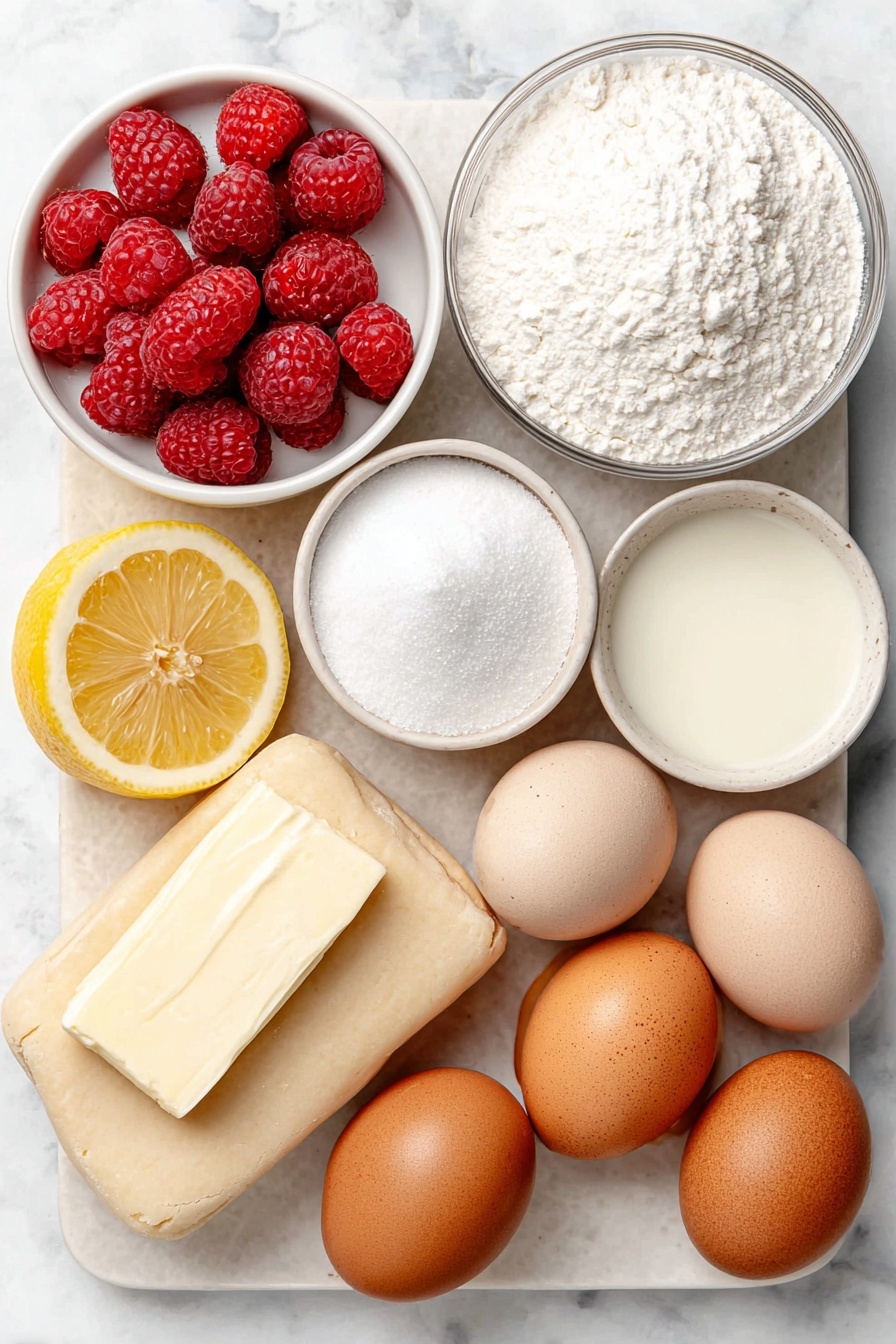
- Refrigerated Pie Crust: Using store-bought crust saves time and yields flaky, buttery results; just make sure it’s cold before rolling out.
- Raspberries: Fresh give the best flavor but frozen work well—just thaw and drain excess liquid before cooking.
- Sugar: Sweetens the filling and balances raspberry tartness.
- Cornstarch: Thickens the raspberry filling to prevent soggy pop tarts.
- Lemon Juice: Brightens the flavor and enhances the raspberries.
- Egg (for egg wash): Gives the crust that beautiful golden color and helps seal edges.
- Powdered Sugar: The base for the vanilla icing to add sweetness and smooth texture.
- Milk: Adjusts icing consistency perfectly for drizzling.
- Vanilla Extract: Adds warm depth to the icing flavor.
- Red Sprinkles: Optional, but they bring color and fun—a little party on top of your pop tarts.
Make It Your Way
What I love most about this Homemade Raspberry Pop Tarts Recipe is how easy it is to tweak. Whether you want to swap out the filling, experiment with different icings, or play with edible toppings, it’s super flexible. You can truly make these pop tarts your own.
- Variation: Once, I swapped out raspberries for strawberries and a sprinkle of cinnamon, and it added a cozy twist perfect for chilly mornings—I highly recommend trying different berries based on the season!
- Dietary Modification: Use gluten-free pie crust or make your own gluten-free dough for a friendly option if you avoid gluten.
- Vegan Version: Try a plant-based butter crust and substitute the egg wash with almond milk or a mix of maple syrup and water for brushing.
Step-by-Step: How I Make Homemade Raspberry Pop Tarts Recipe
Step 1: Cook and Cool Your Raspberry Filling
Start by combining your raspberries, sugar, cornstarch, and lemon juice in a medium saucepan over medium heat. Stir consistently with a rubber spatula—it helps keep things even and stops sticking. Once it starts to bubble and thicken, remove it from heat. This is key: pop it into a heat-safe bowl and then into the freezer to cool, stirring every 10 minutes. A cool filling means less soggy crust later. I’ve learned that rushing this step leads to watery pop tarts, so patience really pays off here.
Step 2: Cut Your Dough Into Perfect Rectangles
After your dough has properly rested and is chilled, lightly flour your surface and roll it out into a rectangle. Using a pizza cutter and ruler, slice it into 3″x4½” inch rectangles—this size gives a perfect pop tart bite. From two boxes of pie crust, you’ll end up with 12 rectangles total, perfect for 6 pop tarts (top and bottom). Keep the dough cold to avoid sticking and tough crusts.
Step 3: Assemble Your Pop Tarts Like a Pro
Lay a rectangle on a lined baking sheet, then lightly brush the edges with your egg wash—this acts like glue for sealing. Spoon 1-1½ tablespoons of your cooled raspberry filling in the center, then top with another rectangle. Seal edges by pressing down firmly with a fork. Repeat for all tarts, then put the whole tray in the freezer while you preheat your oven to 400°F. This chilling step helps the crusts hold their shape and reduces shrinking during baking.
Step 4: Bake Until Golden and Gorgeous
Before baking, poke gentle holes in the top of each tart with a toothpick or sharp knife to allow steam to escape—this keeps the crust from puffing up too much. Give each one a light egg wash brush for a golden finish. Bake for 15-20 minutes until they’re deliciously golden-brown, then let them cool completely before moving on to icing.
Step 5: Whip Up That Perfect Vanilla Icing
As your pop tarts cool, whisk powdered sugar with 2 tablespoons milk and vanilla extract, adding more milk spoon-by-spoon until you get a smooth but thick drizzling consistency. Too runny and it’ll drip off; too stiff and it won’t spread nicely. Once ready, drizzle the icing over the tarts and sprinkle your red sprinkles for that extra pop of color and fun. Let icing set before digging in.
Tips from My Kitchen
- Chill Dough Properly: Keeping the dough cold before baking helps it hold its shape and makes it flaky.
- Don’t Skip Cooling Filling: Warm filling will make your crust soggy—trust me, chilling it in the freezer is a game-changer.
- Egg Wash is Essential: It seals your edges perfectly and gives a beautiful golden color every time.
- Use a Ruler! Cutting uniform rectangles ensures even baking and a professional look that impresses every time.
How to Serve Homemade Raspberry Pop Tarts Recipe
Garnishes
I love topping these pop tarts with red sprinkles because they add such a cheerful pop of color and a slight crunch, making them feel festive—especially for weekend breakfasts or brunch. Sometimes, I dust a little powdered sugar on top too, for a classic look. If you’re feeling fancy, a tiny fresh raspberry on top after icing dries is a lovely touch.
Side Dishes
These pop tarts pair wonderfully with a simple side of creamy yogurt or a handful of fresh fruit, like sliced bananas or strawberries, for a balanced meal. I’ve also enjoyed them alongside a warm cup of coffee or chai—because what’s better than pop tarts and coffee on a lazy morning?
Creative Ways to Present
For special occasions, I like to arrange the pop tarts on a pretty plate in a fan shape and sprinkle edible flowers around for a brunch table centerpiece. Another fun idea is individually wrapping them with colorful cellophane and ribbons—perfect for gifting homemade treats to friends and family. They look so charming and feel extra thoughtful that way.
Make Ahead and Storage
Storing Leftovers
Once your pop tarts cool completely, store any leftovers in an airtight container in the fridge. They’ll keep well for about 3 days. I’ve found refrigeration keeps the icing intact and the pastry fresh without drying out too quickly. Just bring them to room temperature or warm gently before eating.
Freezing
Freeze leftover pop tarts by wrapping each individually in plastic wrap and then placing them in a freezer-safe bag. I freeze mine without icing because it can get a bit brittle. When you’re ready to eat, thaw overnight in the fridge and then add the icing fresh, or enjoy them plain and warm!
Reheating
I recommend reheating your pop tarts in a toaster oven or regular oven at 350°F for 5-7 minutes. This keeps the crust crisp and the filling warm but avoids drying out. Microwaving works in a pinch—but the crust can get soggy, so go slow and check often.
FAQs
-
Can I use homemade pie crust instead of store-bought for this Raspberry Pop Tarts recipe?
Absolutely! Homemade pie crust adds an even more buttery, flaky texture to your pop tarts. Just be sure to chill your dough for at least 40 minutes for easier handling and better results. Keep it wrapped so it doesn’t dry out before rolling and cutting.
-
Can I make the raspberry filling ahead of time?
Yes! Making the filling the night before saves time in the morning and actually helps the flavors deepen. Store it in the fridge in an airtight container, and bring it to room temperature before assembling your pop tarts.
-
How do I prevent the filling from leaking out during baking?
Using chilled dough and egg wash to seal the edges tightly is key. Also, don’t overload with filling—stick to about 1 to 1½ tablespoons per tart. Finally, poke vents on top to release steam and avoid bursting.
-
What if I don’t have cornstarch for thickening the filling?
You can substitute arrowroot powder or tapioca starch in an equal amount to thicken the raspberry filling. Just make sure to mix it well with the sugar before adding to the raspberries.
-
Can I use other fruit fillings instead of raspberry?
Definitely! This recipe works beautifully with strawberries, blueberries, or mixed berries. Just prepare the filling the same way, adjusting sugar as needed for sweetness and tartness.
Final Thoughts
Making Homemade Raspberry Pop Tarts Recipe from scratch is one of those kitchen projects that feels so rewarding and deliciously comforting. Every time I bake them, I’m reminded of weekend mornings with family, the sweet smell filling the house, and the smiles that follow bites. I hope you’ll give this recipe a go—it’s perfect for breakfast, gifting, or just whenever you need a little homemade joy. Trust me, once you make them, you might never want to buy pop tarts again!
Print
Homemade Raspberry Pop Tarts Recipe
- Prep Time: 30 minutes
- Cook Time: 20 minutes
- Total Time: 1 hour
- Yield: 6 pop tarts
- Category: Breakfast
- Method: Baking
- Cuisine: American
- Diet: Vegetarian
Description
Delight in homemade Raspberry Pop Tarts featuring a flaky pie crust filled with sweet-tart raspberry filling, topped with a smooth vanilla icing and festive red sprinkles. Perfect for a fun breakfast or snack, these pop tarts bake to golden perfection with a crisp outer layer and a luscious fruity center.
Ingredients
Pie Crust
- 1 box refrigerated pie crust (2-count)
Raspberry Filling
- 2 cups raspberries, fresh or frozen
- ½ cup sugar
- 2 tablespoons corn starch
- 2 teaspoons lemon juice
Egg Wash
- 1 large egg with a splash of water
Vanilla Icing
- 1 cup powdered sugar
- 2-3 tablespoons milk
- ½ teaspoon vanilla extract
- red sprinkles
Instructions
- Prepare Raspberry Filling: In a medium saucepan over medium heat, combine raspberries, sugar, corn starch, and lemon juice. Stir occasionally with a rubber spatula until the mixture boils and thickens. Remove from heat and transfer to a heat-safe bowl. Place in the freezer, stirring every 10 minutes until cooled.
- Roll and Cut Dough: On a lightly-floured surface, roll out pie dough into a rectangle. Use a pizza cutter and ruler to cut dough into twelve 3″x4½” rectangles.
- Assemble Pop Tarts: Place one dough rectangle on a baking sheet lined with a silicone mat or parchment paper. Lightly brush with egg wash. Spoon 1 to 1½ tablespoons of cooled raspberry filling in the center. Top with another dough rectangle. Use a fork to crimp all edges to seal. Repeat for remaining dough and filling. Freeze assembled pop tarts while preheating the oven.
- Bake: Preheat oven to 400 degrees Fahrenheit. Remove pop tarts from freezer, poke gentle holes on top with a toothpick or knife, and brush with egg wash. Bake for 20 minutes or until golden brown.
- Make Vanilla Icing: While pop tarts cool, whisk powdered sugar, 2 to 3 tablespoons milk, and vanilla extract until slightly thick but spreadable. Adjust milk in ½ tablespoon increments if needed.
- Ice and Decorate: Once pop tarts are completely cooled, drizzle vanilla icing over the centers and sprinkle with red sprinkles. Let icing harden before serving.
- Storage: Store leftovers in an airtight container in the refrigerator for up to 3 days.
Notes
- If making your own pie dough, chill it covered in plastic wrap in the refrigerator for at least 40 minutes before rolling.
- Use a pizza cutter and ruler to measure precise pop tart sizes of 3″x4½” to get 12 rectangles total.
- The raspberry filling can be prepared the night before to save time in the morning.
- Allow pop tarts to fully cool before icing to prevent melting and sliding.
- Freezing assembled pop tarts before baking helps maintain shape and prevent leakage.
Nutrition
- Serving Size: 1 pop tart
- Calories: 280 kcal
- Sugar: 20 g
- Sodium: 150 mg
- Fat: 12 g
- Saturated Fat: 4 g
- Unsaturated Fat: 7 g
- Trans Fat: 0 g
- Carbohydrates: 38 g
- Fiber: 3 g
- Protein: 3 g
- Cholesterol: 35 mg


