Halloween Red Velvet Cupcakes Recipe
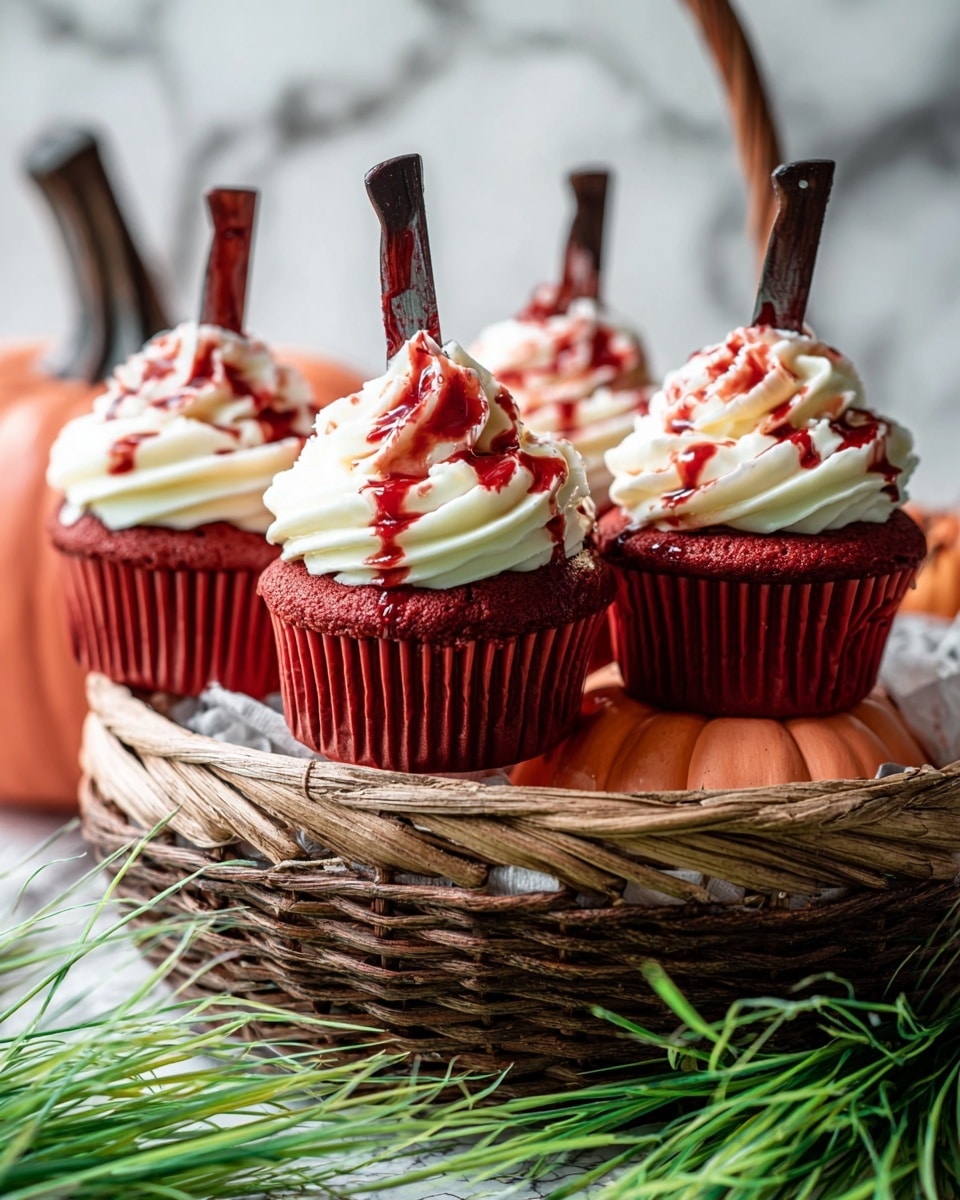
If you’re after a festive treat that nails both the spooky and the scrumptious, you’re in for a real delight with this Halloween Red Velvet Cupcakes Recipe. These cupcakes are not just any cupcakes — they’re a perfect blend of moist, rich red velvet cake topped with luscious cream cheese frosting and decorated with that eerie, blood-drip effect that’s sure to wow at any Halloween party. Trust me, once you try this recipe, you’ll want to make it your go-to every October!
Why This Recipe Works
- Balanced Texture: The mix of sour cream and butter keeps cupcakes moist yet soft, giving you that melt-in-your-mouth feel.
- Vibrant Color: Customized red food coloring lets you get the perfect spooky shade, from subtle to downright dramatic.
- Classic Cream Cheese Frosting: Cream cheese and butter create a smooth, tangy frosting that complements the cake beautifully.
- Fun & Scary Decor: The blood-like red icing drizzle and knife decorations make these cupcakes a showstopper for Halloween festivities.

Ingredients & Why They Work
The ingredients in this Halloween Red Velvet Cupcakes Recipe are classic, but their combination is what makes the cupcakes sublime: the cocoa powder adds a subtle chocolate note that balances the slight tang of the cream cheese frosting, while the sour cream helps keep the cake tender. For the best results, choose quality butter and fresh cream cheese—trust me, your cupcakes will thank you!

- All-purpose flour: Gives structure without being too heavy, so your cupcakes stay light.
- Cocoa powder (unsweetened): Adds that classic red velvet hint of chocolate.
- Baking powder: Helps your cupcakes rise and become fluffy.
- Salt: Balances the sweetness for depth of flavor.
- Butter (unsalted, softened): For richness and moisture—I always use unsalted so I can control the saltiness.
- Granulated sugar: Sweetens, but combined with brown sugar for a hint of caramel notes.
- Brown sugar (packed): Adds moisture and a bit of molasses flavor.
- Eggs: Bind everything together and provide structure.
- Vanilla extract: Enhances flavors with warm sweetness.
- Sour cream: The secret to soft, tender cupcakes with a slight tang.
- Red food coloring: The star of the show for that signature Halloween red color—start with less and build up for your desired shade.
- Cream cheese: For classic, creamy frosting with tang.
- Icing sugar: Gives the frosting that smooth, sweet finish.
- Milk: Used to thin the decorative icing drizzle for that perfect “bloody” look.
- Halloween knife icing decorations (optional): Adds fun, spooky flair that your guests will love!
Make It Your Way
One of my favorite things about this Halloween Red Velvet Cupcakes Recipe is how easy it is to personalize. Whether you want to dial up the chocolate or add your own twist on the decoration, this recipe is a fantastic canvas. I love experimenting with different food coloring brands until I hit that perfect scary red!
- Variation: I’ve tried mixing in a teaspoon of espresso powder for a subtle mocha undertone that pairs wonderfully with the cream cheese frosting—highly recommend if you like a slightly richer flavor.
- Dietary twists: For a dairy-free version, swap sour cream with full-fat coconut yogurt and use dairy-free cream cheese.
- Decoration ideas: Instead of knife decorations, I once used edible spider rings and a sprinkle of black sanding sugar to add some extra creepy crawly vibes!
Step-by-Step: How I Make Halloween Red Velvet Cupcakes Recipe
Step 1: Let’s Get Your Oven Ready and Mix the Dry Ingredients
Preheat your oven to 350℉ and line a 12-cup muffin tin with paper liners. Don’t forget to spray those liners lightly with cooking spray—this simple step helps the cupcakes pop right out without any sticking (a total game-changer). Then, whisk together the all-purpose flour, unsweetened cocoa powder, baking powder, and salt in a medium bowl. Set it aside while we work on the wet ingredients.
Step 2: Cream That Butter and Sugars Until Fluffy
In your mixer bowl, beat the softened butter with both granulated and brown sugar until it lightens in color and looks fluffy—this usually takes about 3-4 minutes. It’s one of those moments where you can tell the cupcakes will be extra tender thanks to all that air incorporated into the mix.
Step 3: Eggs, Vanilla, Sour Cream & Red Color – The Flavor Combo
Add eggs, one at a time, beating well after each addition—this ensures even mixing and prevents lumps. Then, stir in the vanilla extract and sour cream, which gives these cupcakes their moist, tender crumb. Now comes the fun part: add your red food coloring. I usually start with a teaspoon, mix it in, and keep adding little by little until I reach the perfect spooky red. Don’t be shy—using about 2 to 3 teaspoons usually works, but this depends on your brand of coloring.
Step 4: Combine the Wet and Dry & Scoop Into Your Pans
Gradually mix in the dry flour mixture to the wet ingredients on low speed—mix just enough to combine everything. Scrape down the sides of the bowl with a spatula to make sure no flour lurks at the bottom. Use an ice cream scoop to evenly portion the batter into your cupcake liners, filling each about three-quarters full. This helps avoid overflow and keeps your cupcakes perfectly shaped.
Step 5: Bake, Cool & Frost
Bake for 20 to 25 minutes, or until a toothpick inserted in the center comes out clean. Let the cupcakes cool in the pan for about 5 minutes—this little patience pays off—then transfer them to a wire rack to cool completely before frosting.
Step 6: Make the Cream Cheese Frosting and Get Decorating
Beat cream cheese and butter until smooth, then add vanilla, salt, and icing sugar gradually, whipping until fluffy and dreamy. Use a piping bag for neat swirls, or spread it with a knife if you want that rustic home-baked look. For the eerie final touch, whisk together the drizzle ingredients—the red icing sugar glaze—and dip your plastic Halloween knives (or any fun decoration) into it. Place each knife on top of a frosted cupcake and drizzle extra “blood” over for that haunting effect.
Tips from My Kitchen
- Don’t Overmix the Batter: Mixing flour too long makes cupcakes dense—stop as soon as the flour disappears.
- Adjust Food Coloring Slowly: Start with one teaspoon and add more gradually to avoid overly artificial taste and color.
- Use Room Temperature Ingredients: Butter, eggs, and cream cheese mix so much better when not cold, giving a smooth texture.
- Properly Cool Cupcakes: Frost only once cupcakes are completely cool to avoid melting your gorgeous frosting.
How to Serve Halloween Red Velvet Cupcakes Recipe
Garnishes
I always go for the bloody icing drizzle and those spooky plastic knife decorations because they amp up the Halloween vibe so perfectly. But I’ve also sprinkled crushed chocolate cookies to mimic dirt or added edible glitter for a magical touch. Your favorite Halloween-themed sprinkles or edible eyes can work wonders too!
Side Dishes
Pair these cupcakes with classic fall drinks like hot apple cider, pumpkin spice lattes, or even a rich, dark coffee. If you’re having a party, a bowl of candied popcorn or pumpkin seeds adds a nice salty crunch alongside the sweet cupcakes.
Creative Ways to Present
One fun idea I tried was serving the cupcakes on a tiered spooky cake stand draped in faux cobwebs and mini LED pumpkins. You can place the cupcakes inside little “cauldrons” made of black paper cups or surround them with Halloween confetti for that festive flair. Presentation can make these treats even more memorable!
Make Ahead and Storage
Storing Leftovers
I store leftover cupcakes in an airtight container in the fridge—they keep well for up to 5 days this way. Just make sure you bring them to room temperature before serving because cold cream cheese frosting can be a bit firm.
Freezing
If you want to prep ahead or save extras, these cupcakes freeze beautifully. Wrap each cupcake securely in plastic wrap to lock in moisture, then place them in an airtight container or freezer bag. They’ll stay good for up to a year! When you’re ready to indulge, just thaw at room temperature completely before frosting and decorating.
Reheating
I typically don’t reheat cupcakes themselves—just let them come to room temp so that the crumb and frosting regain their softness. If you must warm them a little, a few seconds in the microwave (about 10 seconds) works but watch closely to avoid drying out the cupcake.
FAQs
-
Can I use gel food coloring instead of liquid for the Halloween Red Velvet Cupcakes Recipe?
Absolutely! Gel food coloring is actually a great choice because it tends to give a richer color without watering down the batter. Just make sure to add it gradually since it’s more concentrated.
-
Why do my red velvet cupcakes sometimes turn out dry?
Dry cupcakes usually mean overbaking or using too much flour. Using sour cream in this recipe helps with moisture, but also be careful not to overmix or bake past the recommended time. A toothpick should come out clean but not dry.
-
Can I make the cream cheese frosting a day ahead?
Yes! You can prepare the frosting a day ahead and keep it covered in the refrigerator. Before using, let it come to room temperature and give it a good stir or quick whip to restore its creamy texture.
-
What if I don’t have sour cream? Can I substitute it?
You can substitute sour cream with Greek yogurt or buttermilk, but the texture might be slightly different. I prefer sour cream for its perfect tang and moisture balance in red velvet cupcakes.
Final Thoughts
This Halloween Red Velvet Cupcakes Recipe is truly a little slice of festive magic — every bite is moist, flavorful, and topped with that iconic cream cheese frosting that just feels like a warm hug. Adding the creepy decoration and “bloody” drizzle really makes these cupcakes stand out at any gathering. I honestly love making this recipe year after year because it brings that perfect mix of spooky fun and delicious comfort food to the table. You’re going to love sharing these with friends and family — don’t wait, get baking and make your Halloween extra sweet (and a little spooky) this year!
Print
Halloween Red Velvet Cupcakes Recipe
- Prep Time: 20 minutes
- Cook Time: 25 minutes
- Total Time: 45 minutes
- Yield: 12 servings
- Category: Dessert
- Method: Baking
- Cuisine: American
Description
These Halloween Red Velvet Cupcakes are a festive and delicious treat featuring moist red velvet cupcakes topped with smooth cream cheese frosting and decorated with spooky red icing drizzles and knife-shaped icing decorations for a perfect Halloween presentation.
Ingredients
For Red Velvet Cupcakes
- 1 ¼ cups all-purpose flour
- 1 tablespoon cocoa powder (unsweetened)
- ¾ teaspoon baking powder
- ¼ teaspoon salt
- ¾ cup unsalted butter (softened)
- ½ cup granulated sugar
- ½ cup brown sugar (packed)
- 3 eggs
- 2 teaspoon vanilla extract
- ½ cup sour cream
- 2-3 teaspoon red food color
For Cream Cheese Frosting
- 8 ounce cream cheese
- 4 tablespoon unsalted butter (softened)
- 2 teaspoon vanilla extract
- ⅛ teaspoon salt
- 2 cups icing sugar
For Decorations
- 12 Halloween Knife Icing Decorations (optional)
- ¼ cup icing sugar
- 3 tablespoon milk (or more)
- 2 teaspoon red food color
Instructions
- Preheat Oven and Prepare Tin: Preheat your oven to 350℉. Line a 12-cup standard muffin tin with paper liners and spray them with cooking spray to prevent sticking.
- Mix Dry Ingredients: In a medium bowl, combine the flour, unsweetened cocoa powder, baking powder, and salt. Set aside.
- Cream Butter and Sugars: In another bowl or mixer, beat butter, granulated sugar, and brown sugar together until well combined and lightened in color.
- Add Eggs and Vanilla: Beat in eggs one at a time, mixing well after each addition. Stir in vanilla extract and sour cream.
- Add Food Coloring: Gradually add red food color starting with 1 teaspoon and increase until the desired vibrant red color is achieved, typically about 3 teaspoons.
- Incorporate Dry Ingredients: Add the flour mixture to the wet ingredients and mix on low speed until just combined, scraping the bowl as needed.
- Fill Muffin Tin: Using an ice cream scoop, fill each paper liner about ¾ full with batter.
- Bake Cupcakes: Bake for 25 minutes or until a toothpick inserted in the center comes out clean. Let cupcakes cool in the pan for 5 minutes, then transfer to a wire rack to cool completely.
- Make Cream Cheese Frosting: Beat cream cheese and butter until smooth. Add vanilla extract, salt, and icing sugar and continue mixing until frosting is smooth and fluffy.
- Frost Cupcakes: Fill a piping bag with the frosting and frost cooled cupcakes.
- Prepare Red Icing Drizzle: Whisk together icing sugar, milk, and red food color in a small bowl until thin and blood-like in consistency.
- Decorate Cupcakes: Dip knife blades into red icing and place on top of frosted cupcakes. Drizzle additional red icing over cupcakes for a spooky bloody effect. Add optional Halloween knife icing decorations.
Notes
- Do not use a star piping tip for the frosting as it is a bit too thin; a knife or plain piping bag works best.
- Store cupcakes in an airtight container in the fridge for up to 5 days.
- These cupcakes can be frozen for up to one year; wrap securely with plastic wrap before placing in an airtight container and thaw at room temperature before frosting.
Nutrition
- Serving Size: 1 cupcake
- Calories: 320 kcal
- Sugar: 28 g
- Sodium: 210 mg
- Fat: 20 g
- Saturated Fat: 12 g
- Unsaturated Fat: 6 g
- Trans Fat: 0.5 g
- Carbohydrates: thirty five g
- Fiber: 1 g
- Protein: 4 g
- Cholesterol: 70 mg


