Halloween Jack Skellington Ricotta Olive Tarts Recipe
If you’re looking for a spooktacular appetizer that’s as adorable as it is delicious, you’re going to love this Halloween Jack Skellington Ricotta Olive Tarts Recipe. These little tarts are a perfect blend of creamy ricotta, savory olives, and a flaky gluten-free crust that’s surprisingly easy to make. Trust me, once you taste these charming, Jack Skellington-inspired tarts, they’ll become an instant hit at your Halloween party or any cozy autumn gathering. Stick with me here—I’ll walk you through every step so your tarts come out perfect and beautiful, just like my own favorites from many kitchen experiments.
Why This Recipe Works
- Gluten-Free but Flaky: Using a mix of gluten-free flours with cold butter ensures a tender, flaky crust without the gluten.
- Balanced Savory Flavors: The ricotta’s creaminess contrasts beautifully with the briny olives and tangy sun-dried tomatoes.
- Fun and Festive Presentation: The Jack Skellington design adds a whimsical Halloween vibe that guests adore.
- Versatile and Make-Ahead Friendly: You can prep the crust and filling ahead, saving stress on party day.

Ingredients & Why They Work
The magic of this Halloween Jack Skellington Ricotta Olive Tarts Recipe comes down to combining simple, well-selected ingredients that enhance each other flavor-wise and texture-wise. I always recommend using the freshest ricotta you can find, and if you’re gluten-free like me or catering to a crowd who is, this crust formula hits the spot perfectly without compromising taste.
- Sweet Rice Flour: Provides a subtle sweetness and binds nicely in gluten-free baking.
- Millet Flour: Adds a delicate crumb and helps with the dough’s texture.
- Gluten-Free Oat Flour: I love making my own by grinding oats; it adds a mild, nutty flavor and a great body.
- Tapioca Flour: Keeps the crust chewy yet light, balancing the other flours.
- Unsalted Butter: The cold butter creates those coveted flaky layers in the crust.
- Ice Water: Essential for bringing the dough together without melting the butter.
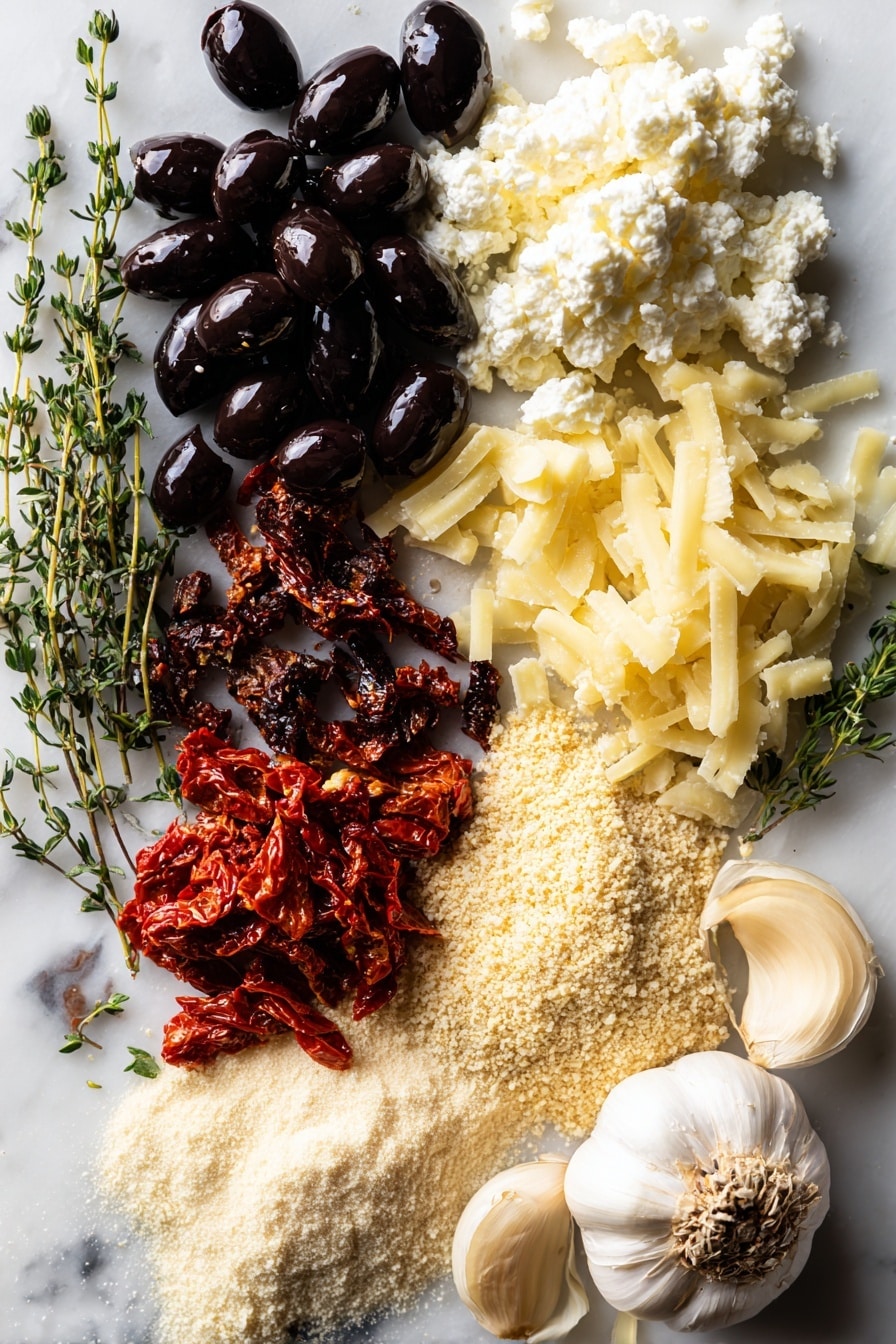
- Black Olives: These form the iconic facial features and add a savory punch.
- Sun-Dried Tomatoes: Their sweet-tart flavor pairs beautifully with the olives and ricotta.
- Fresh Thyme: Adds a herbaceous note that brightens the filling.
- Parmesan Cheese: Gives a salty, nutty depth that complements the creamy filling.
- Ricotta Cheese: The star of the filling – creamy, mild, and sets wonderfully when baked.
- Greek Yogurt: Makes the ricotta filling smooth and slightly tangy.
- Egg Whites: Bind the filling so it firms up without heaviness.
- Garlic: Just enough to add flavor without overpowering the tart.
- Kosher Salt: Enhances all the ingredients and balances the sweetness.
Make It Your Way
While I adore the classic Jack Skellington look and flavor combo in these tarts, I encourage you to get creative! This recipe is a fantastic canvas, and small tweaks can make it even more personalized and festive for your table.
- Variation: Once, I swapped fresh thyme for rosemary to bring a woodsy aroma that was unexpected but delicious.
- Dietary Tweaks: If you’re vegan, try replacing butter with plant-based margarine and use a flax egg instead of egg whites to still get a firm filling.
- Seasonal Twist: Add roasted pumpkin seeds or a pinch of smoked paprika for an autumnal edge.
- Difficulty Level: For a simpler version, you can use store-bought gluten-free pie crust, but the homemade gluten-free crust here is so worth it.
Step-by-Step: How I Make Halloween Jack Skellington Ricotta Olive Tarts Recipe
Step 1: The Perfect Gluten-Free Crust
Begin by whisking together all the gluten-free flours, tapioca starch, and salt in a big mixing bowl. Here’s a tip from my kitchen—make sure your butter is really cold before you add it. I like to cut it into tablespoon pieces and then use my hands to rub it into the dry mix until the largest pieces are about pea-sized. Don’t overwork it; you want little chunks of butter to create flakiness. Then, drizzle in ice water one tablespoon at a time, mixing gently until the dough just holds together when you pinch it. Divide and chill the dough in discs wrapped in plastic for at least 30 minutes. This helps relax the dough and makes rolling easier.
Step 2: Rolling and Shaping Each Mini Tart
Preheat your oven to 400ºF. Roll out each chilled dough disc between two sheets of parchment or wax paper dusted lightly with millet flour—this is my secret to preventing stickiness and tears. Roll until the circle is about an inch larger than your mini tart pan. Then peel off one paper and flip the dough into the tart pan with the parchment still on top. Remove the top parchment and gently press the dough into every nook and cranny. I work in batches if my pans hold four tarts like mine. Until now, your hands should remain cool to avoid melting the butter.
Step 3: Crafting the Jack Skellington Face
Time for the fun artistic part! Thinly slice 6 black olives lengthwise for the mouth—the slices should be paper-thin so they bend nicely. Then cut 12-14 small olive ovals for the nose using a sharp paring knife. Set these aside carefully; you’ll use them later to decorate. Chop a handful of olives and sprinkle some into the tart bases along with 3 to 5 strips of julienned sun-dried tomatoes. Toss fresh thyme leaves and parmesan cheese over the top, then bake the crusts for about 12 minutes until they’re just starting to brown.
Step 4: Mixing the Ricotta Filling and Final Bake
While the crusts bake, mix ricotta, Greek yogurt, egg whites, minced garlic, and salt in a bowl until smooth. When crusts come out of the oven, spoon the ricotta filling generously into each tart. Now carefully place the two whole olives for eyes, two small olive ovals for the nose, and delicately arrange the olive strips to create Jack Skellington’s signature stitched mouth. I find chopsticks super helpful to maneuver these tiny pieces without messing up the design. Bake for another 20-25 minutes, checking around 15 minutes if your mini pans are smaller, until the filling has set but still looks creamy. Serve them warm and watch your guests smile!
Tips from My Kitchen
- Keep Ingredients Cold: It really makes a difference in the crust—warm butter won’t give you flare and texture.
- Use Chopsticks for Detailing: I swear by them for precisely placing your olive “face” pieces without damaging the filling.
- Watch the Bake Time Closely: Different ovens and tart pan sizes can affect baking; start checking earlier to prevent overbaking the ricotta filling.
- Don’t Skip the Sun-Dried Tomatoes: They add a subtle sweetness that balances the savory olives perfectly—trust me, your tastebuds will thank you.
How to Serve Halloween Jack Skellington Ricotta Olive Tarts Recipe

Garnishes
I like sprinkling a little extra fresh thyme or finely chopped fresh parsley over the tarts just before serving to add a pop of green and fresh aroma. Sometimes, a drizzle of high-quality olive oil adds richness and complements the olive flavors nicely. These finishing touches aren’t just pretty—they brighten each bite.
Side Dishes
These tarts pair beautifully with a crisp green salad dressed simply with lemon vinaigrette or with roasted autumn veggies like Brussels sprouts or butternut squash. They’re also great alongside a creamy soup—think pumpkin or roasted tomato—for a cozy fall meal.
Creative Ways to Present
For Halloween parties, I love arranging these tarts on a black platter dusted lightly with edible silver glitter or surrounding them with miniature pumpkins and autumn leaves for a festive touch. You can even place tiny plastic skeleton hands to “hold” the tarts for whimsical fun! Presentation makes the experience, and these little details get everyone smiling before the first bite.
Make Ahead and Storage
Storing Leftovers
I store any leftover tarts in an airtight container in the fridge and they stay fresh and creamy for up to 2 days. Just make sure they’re completely cool before refrigerating to avoid soggy crusts.
Freezing
These tarts freeze pretty well if you wrap each one tightly in plastic wrap and place them in a freezer-safe container. To thaw, I leave them in the fridge overnight, then reheat gently to preserve texture and flavor.
Reheating
My go-to method to reheat Halloween Jack Skellington Ricotta Olive Tarts Recipe leftovers is to pop them in a preheated 400°F oven for about 7 minutes. This crisps up the crust again while warming the creamy filling perfectly. Avoid microwaving if you can; it tends to make the crust soggy.
FAQs
-
Can I make the crust ahead of time for the Halloween Jack Skellington Ricotta Olive Tarts Recipe?
Absolutely! The crust dough can be made up to two days in advance and stored in the fridge wrapped tightly in plastic. Just bring it back to a cool temperature if it gets too soft before rolling out.
-
What can I substitute for ricotta in this recipe?
You could use cottage cheese blended smooth or even mascarpone for a richer filling, but ricotta gives that perfect light texture and mild flavor that balances the olives.
-
Are these tarts suitable for gluten-free diets?
Yes, the crust is made from a blend of gluten-free flours, making the entire tart gluten-free as long as you double-check all ingredients, especially any flours or processed olives.
-
How do I ensure the Jack Skellington faces come out clearly?
Using a sharp paring knife and thinly slicing the olives helps create precise shapes. Tools like chopsticks or toothpicks make placement easier without disturbing the ricotta filling.
Final Thoughts
This Halloween Jack Skellington Ricotta Olive Tarts Recipe is one of those rare dishes that’s as joyful to make as it is to eat. It brings a little magic and fun to your table with that recognizable spooky face, while also delighting your palate with creamy, savory flavors. I’ve made these countless times for friends and family, always with rave reviews, and I bet once you try them, you’ll agree they’re a Halloween staple worth keeping. So grab your rolling pin and olives, and let’s make some merry little tarts together—your Halloween party deserves it!
Print
Halloween Jack Skellington Ricotta Olive Tarts Recipe
- Prep Time: 40 minutes
- Cook Time: 37 minutes
- Total Time: 1 hour 17 minutes
- Yield: 6 servings
- Category: Appetizer
- Method: Baking
- Cuisine: American
- Diet: Gluten Free
Description
These Halloween Jack Skellington Ricotta Olive Tarts are delightful gluten-free mini tartlets perfect for a spooky-themed party. Featuring a crisp tart crust made with a blend of gluten-free flours and filled with a creamy ricotta and Greek yogurt filling, accented by savory black olives, sun-dried tomatoes, fresh thyme, and parmesan. The tarts are decorated to resemble Jack Skellington’s iconic face, making them both festive and delicious for Halloween.
Ingredients
Gluten-Free Tart Crust
- ½ cup sweet rice flour
- ¼ cup millet flour
- ⅓ cup gluten-free oat flour
- 3 tablespoons tapioca flour or corn starch
- ¼ teaspoon kosher salt
- 8 tablespoons cold, unsalted butter, cut into tablespoon-sized pieces
- 5-7 tablespoons ice water
Filling
- 1 can black olives
- 3-4 tablespoons julienned sun-dried tomatoes packed in oil
- 2-3 teaspoons fresh thyme leaves
- 3 tablespoons freshly grated parmesan cheese
- 1½ cups ricotta cheese
- ¼ cup + 2 tablespoons Greek yogurt
- 3 egg whites
- 3 cloves garlic, minced
- ½ teaspoon kosher salt
Instructions
- Prepare the crust dough: Whisk together the sweet rice flour, millet flour, oat flour, tapioca flour, and kosher salt in a large bowl. Add the cold butter pieces and mix with your hands, breaking up the butter until the largest pieces are about pea-sized.
- Add ice water: Gradually dribble in ice water one tablespoon at a time, mixing after each addition until the dough holds together when pinched.
- Form and chill dough: Divide the dough into 6-8 pieces depending on tart size. Shape each into a ball and flatten into a disc. Wrap in plastic and refrigerate for 30 minutes.
- Preheat and roll out: Preheat the oven to 400ºF. Roll each chilled dough disc between two pieces of parchment or wax paper dusted with millet flour into circles 1 inch larger than your mini tart pans.
- Place dough in tart pans: Peel off one parchment, flip dough into tart pan with parchment side up, then remove the second parchment. Use your fingers to press dough into pan. Repeat for remaining tart pans.
- Prepare toppings for decoration: Thinly slice 6 black olives lengthwise into paper-thin strips for the mouth. Cut 12-14 olive ovals for the nose and set aside.
- Assemble initial filling base: Chop 3-4 tablespoons of black olives and evenly distribute among tart shells. Top each with 3-5 julienned sun-dried tomato strips, sprinkle about ¼ teaspoon thyme leaves, and divide parmesan cheese among tarts.
- Bake crust base: Bake tarts at 400ºF for 12 minutes until crust is lightly cooked.
- Make ricotta filling: While crust bakes, whisk together ricotta cheese, Greek yogurt, egg whites, minced garlic, and kosher salt until smooth.
- Add ricotta filling: Remove tarts from oven and fill each tart to the top with ricotta mixture.
- Decorate tarts: Place 2 whole black olives for eyes, 2 small olive ovals for the nose, and create a criss-cross mouth pattern using thin olive strips. Using chopsticks can help with placing olives delicately.
- Bake filled tarts: Return tarts to oven and bake for 25 minutes or until ricotta filling is set. Begin checking for doneness around 15 minutes depending on tart pan size.
- Serve and reheat: Serve warm. To reheat, bake at 400ºF for 7 minutes.
Notes
- If you do not have gluten-free oat flour, grind whole oats in a food processor to make your own.
- Adjust ice water quantity as needed; dough should hold together but not be sticky.
- Using millet flour to dust the rolling surface prevents sticking and adds to the gluten-free crust texture.
- Chilled dough is easier to roll and handle, so do not skip refrigeration.
- For a stronger olive flavor, you can add more chopped olives to the filling base.
- Use chopsticks or a small tweezer to place olive decorations neatly on the tarts.
- Check ricotta filling for firmness a few minutes before baking time ends to avoid overbaking and drying out the tarts.
- These tarts are best served warm but can be reheated as instructed for convenience.
Nutrition
- Serving Size: 1 tart
- Calories: 180 kcal
- Sugar: 2 g
- Sodium: 350 mg
- Fat: 12 g
- Saturated Fat: 6 g
- Unsaturated Fat: 5 g
- Trans Fat: 0 g
- Carbohydrates: 12 g
- Fiber: 1.5 g
- Protein: 6 g
- Cholesterol: 40 mg


