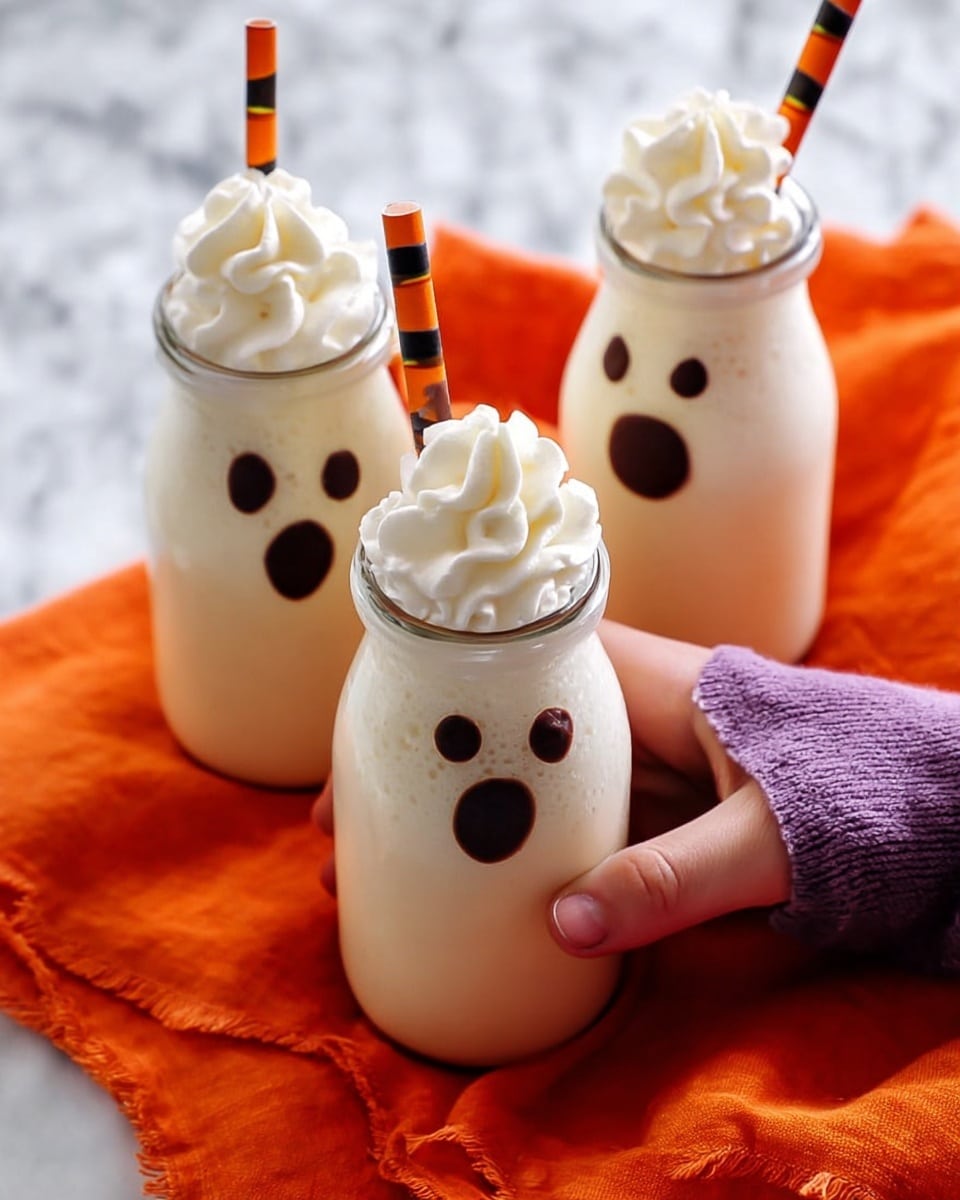
Halloween Ghost Milkshakes Recipe
If you’re looking to wow your guests this spooky season, you have to try my Halloween Ghost Milkshakes Recipe. These milkshakes are not only deliciously creamy and perfect for a chill treat, but they also come with the cutest ghost faces that make them an absolute hit at any Halloween party. Trust me, once you try this recipe, you’ll be craving it every October (or honestly, any time you want a fun dessert)!
Why This Recipe Works
- Simple Ingredients: Uses classic vanilla ice cream and milk, making it easy to find and customize.
- Adorable Presentation: The melted chocolate ghost faces add a playful touch that’s sure to delight kids and adults alike.
- Customizable Texture: You can easily adjust thickness by changing the amount of milk or ice cream, perfect for your preference.
- Quick and Fun: While the decoration takes a little patience, the actual blending part is super fast and straightforward.

Ingredients & Why They Work
The magic of this Halloween Ghost Milkshakes Recipe is in its simple but effective ingredients. Each one plays an important role to create that smooth, creamy shake with just the right balance of sweetness and texture — plus the decorations make it extra special.

- Vanilla Ice Cream: Pick a creamy, high-quality vanilla for the richest flavor and smoothest texture.
- Milk: Whole milk adds creaminess, but you can swap it with any milk or milk alternative to suit your dietary needs.
- Semisweet Chocolate Chips: Perfect for melting into decorations because they soften smoothly without seizing up.
- Whipped Cream: Adds that fluffy, light finish on top — I love using Reddi Whip for convenience and taste.
Make It Your Way
I love making this Halloween Ghost Milkshakes Recipe my own by tweaking the flavors or decorations depending on the mood or who I’m making it for. It’s fun to play around with and really makes it feel like a festive treat tailored just for you.
- Variation: I sometimes add a little pumpkin spice or cinnamon to the milkshake during fall for a cozy twist — it’s surprisingly delicious!
- Dairy-Free Version: Swap the milk and ice cream for coconut or almond milk-based alternatives and use dairy-free whipped cream.
- Extra Boo-tiful: Use mini marshmallows to decorate the rim of the glass along with the ghost faces for a fun texture contrast.
Step-by-Step: How I Make Halloween Ghost Milkshakes Recipe
Step 1: Create the Ghost Faces
Start by melting the chocolate chips in a microwave-safe dish. I usually heat them on high for 30 seconds, then give them a good stir. If it’s not quite smooth yet, I heat in additional 15-second bursts, stirring each time until it’s creamy and ready to use. Use the handle end of a spoon dipped in the melted chocolate to delicately draw eyes, nose, and mouth on the inside of your milkshake glasses. Remember, a little chocolate goes a long way! Then, pop the glasses in the fridge for about 30 minutes so the faces set up nicely.
Step 2: Blend Your Milkshake
Once the ghost faces are chilling and setting, toss the vanilla ice cream and milk into your blender. Blend until everything is smooth and combined. If you like it thinner, add a splash more milk, or if you want it richer and thicker, toss in a few extra scoops of ice cream. It’s all about what feels right to you!
Step 3: Assemble and Serve
Pour the milkshake carefully into the decorated glasses, leaving about an inch at the top. Then, crown your creation with a generous swirl of whipped cream. Serve immediately to keep that frosty goodness perfectly chilled. Trust me, those smiles as everyone spots the little ghost faces are priceless!
Tips from My Kitchen
- Melting Chocolate Just Right: Don’t rush melting the chocolate chips in the microwave; go slow with short bursts so it doesn’t burn or seize.
- Milkshake Thickness: I always blend first and then decide if it needs more milk — easier to thin down than fix an overly runny shake.
- Chill Glasses: Keeping the decorated glasses in the fridge helps the chocolate stick and seals those adorable ghost faces.
- Whipped Cream Finish: Apply whipped cream right before serving, so it stays fresh and fluffy instead of melting too soon.
How to Serve Halloween Ghost Milkshakes Recipe
Garnishes
I usually keep the garnishes simple — a dollop of whipped cream is all it really needs for a classic look. But when I want to get fancy, a sprinkle of mini chocolate chips or even a few candy eyes on top amp up the spooky vibe. It’s all about what makes you smile!
Side Dishes
This milkshake pairs wonderfully with soft Halloween sugar cookies or even a small slice of pumpkin bread. I love how the creamy shakes balance out the spices or sweetness in those treats — it’s like a little party on your plate and in your glass.
Creative Ways to Present
For a Halloween bash, I like to serve these milkshakes in spooky-themed glasses or mason jars decorated with candy corn or black and orange striped straws. Adding a little cobweb made from spun sugar on the rim (if you’re feeling crafty) always gets oohs and aahs from guests.
Make Ahead and Storage
Storing Leftovers
If you happen to have leftover milkshake (which is rare in my house!), you can store it in a sealed container in the fridge for up to a day. Just know the texture might separate a bit, so give it a good stir before serving again.
Freezing
I haven’t frozen the milkshakes themselves since the texture isn’t quite the same once thawed. But you can definitely freeze any extra ice cream ahead of time for future batches — just make sure it’s well-wrapped to prevent freezer burn.
Reheating
Since this is a cold treat, reheating isn’t really part of the plan! If leftovers get too thick from chilling, just let them sit at room temperature for a few minutes, then stir to soften before enjoying.
FAQs
-
Can I make the ghost faces without chocolate chips?
While semisweet chocolate chips melt easily for decorating, you can substitute with any good-quality melting chocolate or candy melts in white or dark chocolate. The key is to get a smooth consistency so you can easily draw the faces.
-
How long can I prepare the glasses with ghost faces in advance?
You can decorate the glasses up to a day ahead and keep them refrigerated. Just make sure they’re covered so dust or fridge odors don’t affect the chocolate faces.
-
Can I use a different flavor of ice cream?
Definitely! I’ve tried this with chocolate or pumpkin ice cream, and it still works beautifully — just the flavor changes. Vanilla is classic, but feel free to get creative!
-
What else can I use instead of Reddi Whip for whipped cream?
Any store-bought whipped cream or homemade version works fine. I prefer Reddi Whip for convenience, but fresh whipped cream with a touch of vanilla adds a lovely homemade touch.
Final Thoughts
This Halloween Ghost Milkshakes Recipe holds a special place in my heart because it brings such joy and wonder every time I make it. It’s simple enough to whip up on a busy day but feels festive and fun, like a little celebration in every sip. If you want to add a magical touch to your Halloween (or just a cozy fall evening), I highly recommend giving this recipe a go—you’ll be greeted with happy faces and full bellies!
Print
Halloween Ghost Milkshakes Recipe
- Prep Time: 30 minutes
- Cook Time: 0 minutes
- Total Time: 1 hour
- Yield: 4 servings
- Category: Beverage
- Method: Blending
- Cuisine: American
Description
This Halloween Ghost Milkshakes recipe combines creamy vanilla ice cream and milk blended into a smooth milkshake, served in spooky decorated glasses with melted chocolate ghost faces and topped with whipped cream. Perfect for a fun and festive Halloween treat!
Ingredients
Milkshake
- 3 cups vanilla ice cream
- 1 ¾ cups milk
Ghost Face Decoration
- ¼ cup semisweet chocolate chips
Topping
- whipped cream (we use Reddi Whip)
Instructions
- Prepare the ghost faces: Place the semisweet chocolate chips in a microwave-safe dish and heat on high for 30 seconds. Stir well, then continue heating in 15-second increments, stirring after each, until the chocolate is smooth and creamy.
- Decorate the glasses: Using the end of a spoon handle, dip into the melted chocolate and carefully create small eyes, nose, and mouth shapes on the inside of each glass. Use just a small amount to form the ghost faces.
- Set the chocolate: Place the decorated glasses in the refrigerator and let the chocolate set for about 30 minutes.
- Make the milkshake: Add the vanilla ice cream and milk to a blender and blend until fully combined and smooth.
- Assemble the milkshake: Pour the blended milkshake into the decorated glasses, leaving about one inch from the top for whipped cream.
- Add whipped cream: Top each milkshake with a generous amount of whipped cream.
- Serve immediately: Enjoy your spooky Halloween ghost milkshakes right away for the best taste and texture.
Notes
- If you prefer a thinner milkshake, gradually add more milk until you reach the desired consistency.
- For a thicker milkshake, add more ice cream little by little until thick enough.
- This recipe yields about 4 ½ cups total; the number of servings depends on the size of the glasses you use.
- Use only a small amount of melted chocolate when decorating the ghost faces to avoid dripping or smudging.
- Nutrition information is approximate and should be used only as a general guide.
Nutrition
- Serving Size: 1 cup
- Calories: 300 kcal
- Sugar: 30 g
- Sodium: 120 mg
- Fat: 12 g
- Saturated Fat: 7 g
- Unsaturated Fat: 4 g
- Trans Fat: 0 g
- Carbohydrates: 40 g
- Fiber: 1 g
- Protein: 6 g
- Cholesterol: 40 mg


