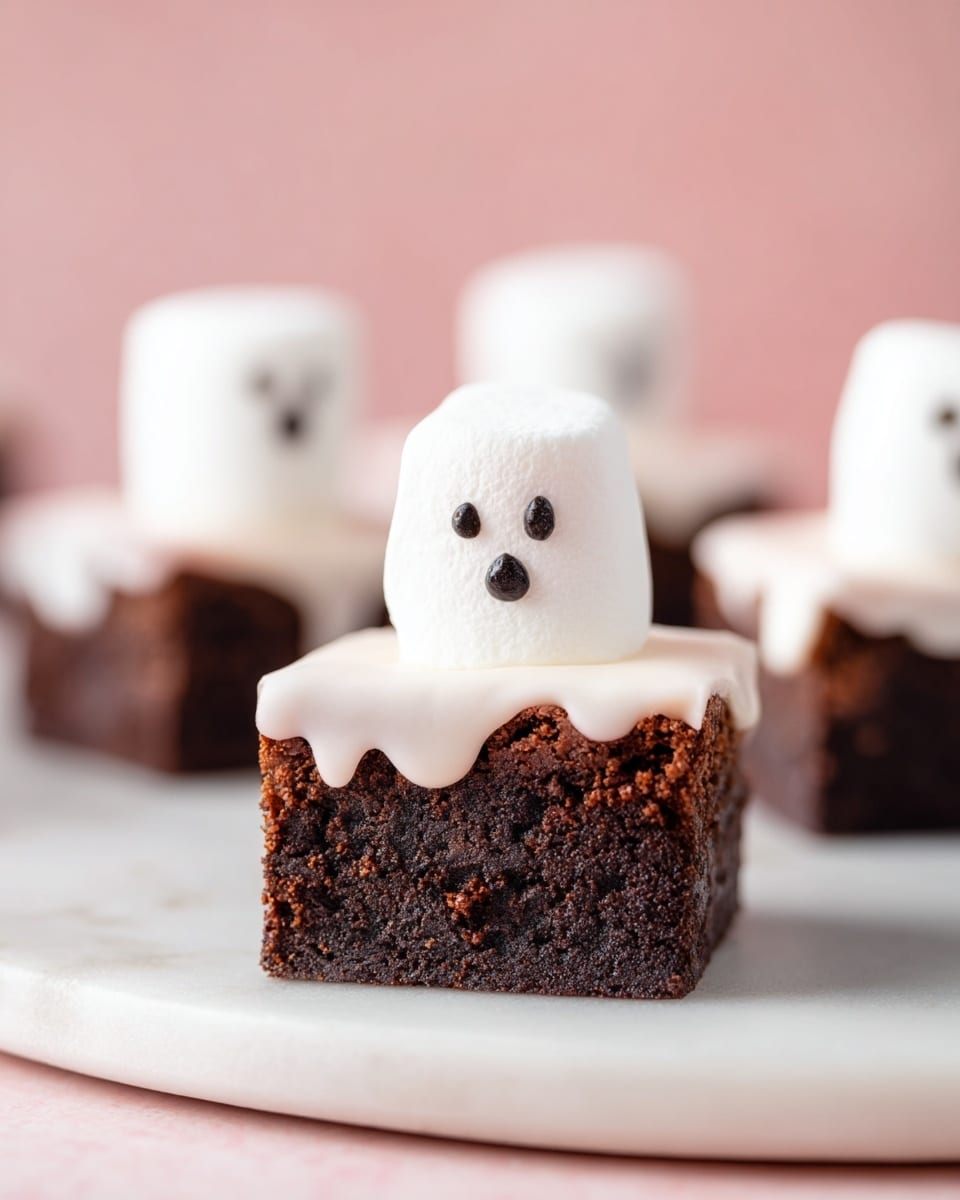
Halloween Ghost Brownies Recipe
If you’re looking to up your Halloween game this year with something fun, festive, and downright delicious, then you’re going to adore this Halloween Ghost Brownies Recipe. Imagine rich, fudgy brownies topped with fluffy marshmallow ghosts, draped in silky white chocolate, and finished with spooky little faces — it’s an easy bake that feels like a party every time you bite into it. Trust me, once you try these, they’ll become a seasonal favorite in your house just like they are in mine.
Why This Recipe Works
- Speedy and Simple: Using a brownie mix makes this recipe both approachable and fast, perfect for last-minute Halloween fun.
- Fun Decoration: The marshmallow ghosts covered in white chocolate bring a playful, spooky touch everyone loves.
- Customizable Faces: You can easily swap candy eyes for mini chocolate chips or black icing based on what you have.
- Kid-Friendly: The process is easy enough to invite little helpers, making it a perfect family activity.

Ingredients & Why They Work
This Halloween Ghost Brownies Recipe balances rich chocolatey goodness with marshmallow sweetness. Each ingredient plays its part, giving you a tender brownie base and those ghostly marshmallow toppings that stay fluffy under a smooth white chocolate coat.

- Brownie mix: Choosing a reliable box mix simplifies the baking, while still delivering moist, fudgy brownies every time.
- Eggs: Bind the brownie batter together and add structure; make sure they’re at room temperature for smooth mixing.
- Avocado oil: A mild, healthy fat that keeps the brownies rich without overpowering the chocolate flavor.
- Water: Helps activate the mix and keep the brownie batter just right—don’t skip it!
- Large marshmallows: Perfect for those plump ghost shapes; mini marshmallows won’t create the same effect.
- White chocolate chips or white candy melts: Melt smoothly to coat the marshmallow ghosts and create that ethereal glow.
- Black candy melts, candy eyes, or mini chocolate chips: These are your ghost faces — pick whichever you have on hand to add personality.
Make It Your Way
One of my favorite things about this Halloween Ghost Brownies Recipe is how easy it is to tweak for your own style or pantry stash. Whether you love your brownies extra fudgy or want to add a dash of cinnamon for warmth, go for it! Don’t hesitate to swap out ingredients if you’re gluten-free or dairy-free either — this recipe is very adaptable.
- Variation: When I tried this with homemade gluten-free brownies, the texture was just as satisfying, and my family didn’t even notice the difference. You can easily sub in a dairy-free white chocolate alternative for the coating as well.
- Seasonal twist: Around fall, I sometimes sprinkle orange zest into the brownie batter for a subtle citrus hint that feels perfectly autumnal.
- Difficulty: New to decorating? Use mini chocolate chips for the faces instead of piping with melted melts — it’s foolproof and looks cute.
Step-by-Step: How I Make Halloween Ghost Brownies Recipe
Step 1: Baking Your Base Brownies
First things first, prepare your brownies according to the package directions. I like to grease my 9×9-inch pan well to avoid any sticky situations later. Once baked, let them cool completely — seriously, don’t rush this part, or your marshmallows and chocolate won’t set properly!
Step 2: Adding the Marshmallow Ghosts
Next, cut your cooled brownies into squares. For each square, press one large marshmallow right in the center. Don’t worry if it leans a little; we’ll fix its shape with the chocolate coating. This step is fun to do with kids — they love playing with the marshmallows like little ghost hats!
Step 3: Melting and Dipping with White Chocolate
Melt your white chocolate chips or candy melts in a microwave-safe bowl, heating in 30-second bursts and stirring between each to get that silky smooth consistency. Spoon this white chocolate over each marshmallow, letting it drip and create the ghostly flowing shape. This is where your brownies turn from delicious to delightfully spooky.
Step 4: Crafting the Perfect Ghost Faces
While the white chocolate is still warm, melt your black candy melts. Using a toothpick or the tip of a small spoon, gently dot eyes and a mouth on each ghost. Alternatively, if you have candy eyes or mini chocolate chips, press those gently into the white chocolate before it sets. This is such a satisfying step — like bringing your little ghosts to life!
Step 5: Setting and Serving
Allow your masterpieces to set for 20 to 30 minutes at room temperature, or for quicker results, pop your pan into the fridge for 10-15 minutes. Then, slice if needed, and voila — your Halloween Ghost Brownies are ready to wow friends and family.
Tips from My Kitchen
- Cool Completely: Always let your brownies cool fully before adding marshmallows or chocolate — rushing here leads to sliding toppings.
- Thin White Chocolate Trick: If your white chocolate feels too thick, stirring in a teaspoon of coconut oil makes it silky and easier to drizzle.
- Neat Cuts: Dip your knife in warm water and dry it between cuts for cleaner brownie squares — it saves you from crumbly edges.
- Fast Setting: Pop your decorated brownies in the fridge for a quick set if you want to serve them sooner.
How to Serve Halloween Ghost Brownies Recipe
Garnishes
I love dusting these brownies lightly with a sprinkle of edible glitter or a pinch of orange sanding sugar to give a little sparkle and extra festive flair before serving. Sometimes, a tiny mint leaf or an orange peel twist beside a ghost adds unexpected color and freshness to the plate.
Side Dishes
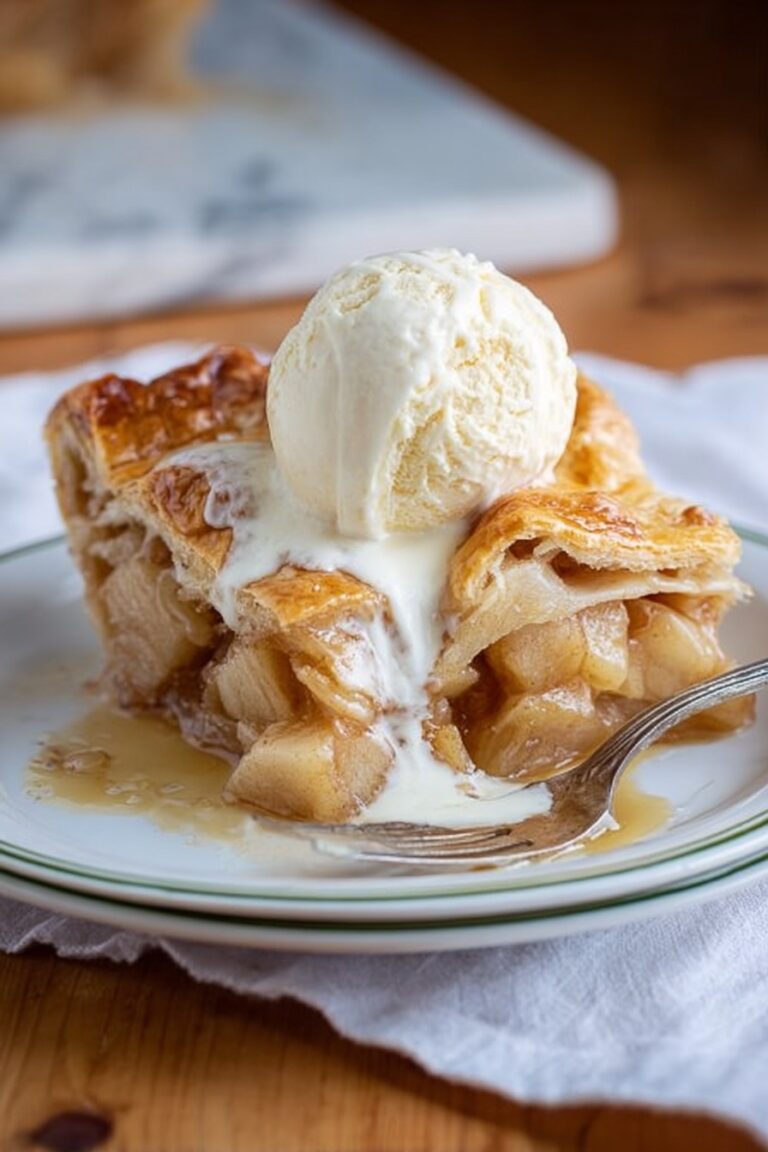
These brownies pair splendidly with a scoop of vanilla bean ice cream or a cup of hot apple cider — perfect for chilly Halloween nights. For a party, I often set up a spooky hot chocolate bar alongside, letting guests customize their drinks while nibbling on these sweet treats.
Creative Ways to Present
Try arranging the brownies on a black or silver platter lined with parchment paper printed with cobweb designs for that extra spooky vibe. When I made these for my niece’s Halloween party, I added small plastic spiders around the plate — it still got rave reviews despite the creepy crawlies!
Make Ahead and Storage
Storing Leftovers
Storing these decorated brownies at room temperature in an airtight container works well for up to three days — no fridge required. This keeps the marshmallow soft and the chocolate coating intact. If your kitchen is warm, though, the fridge is your friend to avoid melting.
Freezing
I’ve frozen undecorated brownies successfully, wrapped tightly in plastic wrap and foil. When ready to eat, thaw completely, then add the marshmallows and chocolate coating fresh — that way, your ghosts stay perfectly fluffy and not soggy.
Reheating
Since these brownies are best enjoyed at room temp, I usually pull leftovers out from the fridge about 30 minutes before serving. If you want warm brownies, reheat gently in the microwave for 10–15 seconds, but skip reheating once decorated so the chocolate doesn’t melt messily.
FAQs
-
Can I use homemade brownies for this Halloween Ghost Brownies Recipe?
Absolutely! While I used a box mix here for convenience, homemade brownies work just as well. Just make sure they’re fully cooled so the marshmallow and chocolate toppings stay put without sliding off.
-
What if I don’t have candy melts for the faces?
No worries — mini chocolate chips, black icing pens, or even small dots of melted chocolate work beautifully to create ghost eyes and mouths. Be creative and use what you have on hand!
-
How do I prevent the marshmallow ghosts from sliding off?
The key is making sure the brownies are completely cooled before adding the marshmallows. If your brownies are still warm or even slightly warm, the marshmallows won’t stick properly and can slide around when coated.
-
Can I make these gluten-free or dairy-free?
Yes! For gluten-free, use a gluten-free brownie mix or homemade gluten-free brownies. For dairy-free, pick dairy-free white chocolate or candy melts, and make sure your brownie ingredients are dairy-free as well.
Final Thoughts
This Halloween Ghost Brownies Recipe has become one of my go-to festive treats because it’s fun, simple, and always impresses with minimal effort. I love how it brings together the rich chocolate you crave and the delightfully spooky marshmallow ghost decorations. You’ll have a blast making them, especially with kids, and they’re guaranteed to disappear fast at any party (or just when you’re craving something sweet). I truly think once you try these, you’ll find yourself making them year after year — and I can’t wait to hear how they turn out in your kitchen!
Print
Halloween Ghost Brownies Recipe
- Prep Time: 20 minutes
- Cook Time: 35 minutes
- Total Time: 1 hour 30 minutes
- Yield: 16 servings
- Category: Dessert
- Method: Baking
- Cuisine: American
Description
These Halloween Brownies are a fun and festive treat featuring rich, fudgy brownies topped with ghostly marshmallows coated in white chocolate and decorated with spooky faces. Perfect for Halloween parties, they combine the ease of a boxed brownie mix with creative decoration for an impressive yet simple dessert.
Ingredients
Brownie Base
- 1 box brownie mix
- 2 eggs at room temperature
- ½ cup avocado oil
- 3 tablespoons water
Ghost Toppings
- 16 large marshmallows
- 1 cup white chocolate chips or white candy melts
- 1 tablespoon black candy melts or candy eyes or mini chocolate chips
Instructions
- Prepare Brownies: Preheat your oven and prepare the brownie batter according to the package directions using the eggs, avocado oil, and water. Grease a 9×9-inch pan, pour in the batter, and bake as directed. Let the brownies cool completely before cutting into squares.
- Add Marshmallows: Place one large marshmallow in the center of each brownie square, ensuring they are evenly spaced for decoration.
- Melt White Chocolate: In a microwave-safe bowl, melt the white chocolate chips or candy melts in 30-second intervals, stirring in between until smooth and pourable.
- Coat Marshmallows: Spoon the melted white chocolate over each marshmallow, allowing the chocolate to drip down the sides to create a ghostly shape.
- Decorate Faces: While the white chocolate is still warm, melt the black candy melts in a microwave-safe bowl. Use a toothpick to create eyes and mouths on each ghost. Alternatively, press candy eyes or mini chocolate chips onto the white chocolate coating to make ghost faces.
- Set Chocolate: Allow the decorated brownies to set for 20 to 30 minutes at room temperature or place them in the fridge for 10 to 15 minutes to speed up hardening before serving.
Notes
- Using a boxed brownie mix makes this recipe quick and reliable, but you can substitute with your favorite homemade brownie recipe.
- Ensure the brownies are fully cooled before adding marshmallows and chocolate to prevent sliding and melting.
- Use standard large marshmallows instead of mini ones for best results.
- If the melted white chocolate is too thick, stir in 1 teaspoon of coconut oil or vegetable shortening to thin it out.
- For decorating eyes, mini chocolate chips, black icing, or dots of melted chocolate can be used as alternatives to candy eyes.
- Use a sharp knife dipped in warm water and wiped dry between cuts for clean brownie squares.
- Chilling the decorated brownies in the refrigerator for 10 to 15 minutes helps the chocolate set faster.
- Store brownies in an airtight container at room temperature for up to 3 days or in the refrigerator for up to 5 days.
Nutrition
- Serving Size: 1 brownie
- Calories: 220 kcal
- Sugar: 20 g
- Sodium: 150 mg
- Fat: 12 g
- Saturated Fat: 6 g
- Unsaturated Fat: 5 g
- Trans Fat: 0 g
- Carbohydrates: 28 g
- Fiber: 1 g
- Protein: 2 g
- Cholesterol: 30 mg


