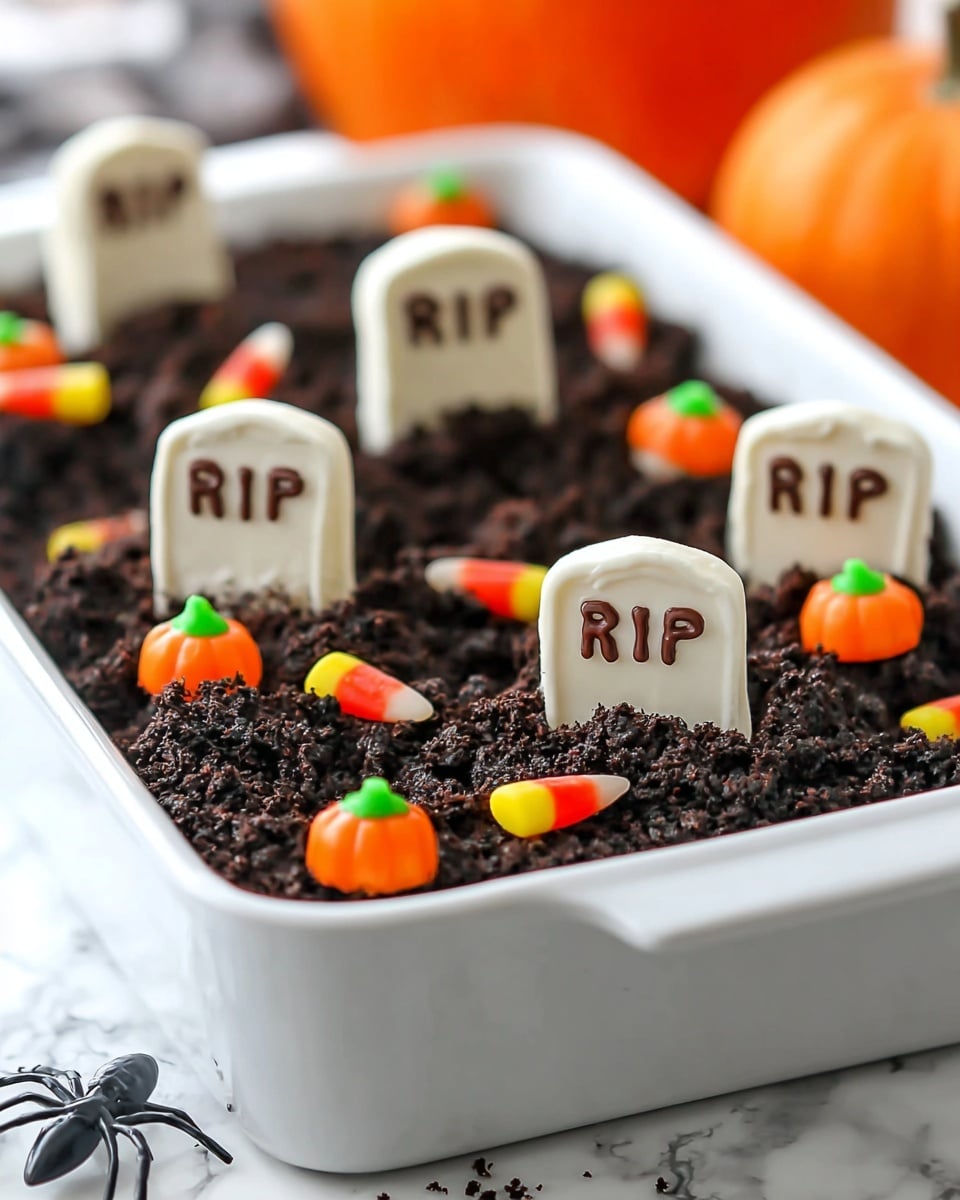
Halloween Dirt Cake Recipe
Alright, if you’re on the hunt for a dessert that’s as fun to make as it is to eat, I’ve got you covered with this super easy and downright delicious Halloween Dirt Cake Recipe. Imagine creamy pudding layered with crushed Oreos that look just like dirt, sweet whipped topping, and those spooky cookie tombstones—this treat is spectacular for parties or any occasion that calls for a little Halloween magic. Stick around because I’m going to walk you through every step to make sure yours turns out just as amazing as mine every time!
Why This Recipe Works
- No-Bake Simplicity: This cake comes together without ever turning on the oven, giving you more time for the fun stuff.
- Perfect Texture Contrast: Creamy pudding and smooth cream cheese meet crunchy Oreo crumbs for a delightful mix every bite.
- Festive and Fun: The addition of homemade cookie tombstones and gummy worms makes it a Halloween centerpiece that kids and adults adore.
- Make-Ahead Friendly: Prep it in advance and let those flavors meld overnight, which means less stress on party day.

Ingredients & Why They Work
Each ingredient in this Halloween Dirt Cake Recipe plays its part in creating that perfect balance of indulgence and spooky charm. From the smooth cream cheese base to the crushed Oreos mimicking dirt, each item has its role—and I’ll share my tips on picking and preparing them too.

- Cream Cheese: Use full-fat cream cheese and let it soften at room temp; this helps achieve that silky smooth base without lumps.
- Butter: Softened, so it blends seamlessly with the cream cheese, adding richness and moisture.
- Powdered Sugar: Easily dissolves for even sweetness and smooth texture.
- Frozen Whipped Topping: Thawed fully for fluffiness and lightness—don’t substitute with fresh whipped cream as it won’t hold up as well.
- Instant Chocolate Pudding Mix: Use instant, not cook-and-serve, for that no-fuss preparation and velvety chocolate flavor.
- Milk: The liquid to bring the pudding mix to life; whole milk works best for creaminess.
- Oreo Cookies: Regular Oreos provide that iconic chocolate-cookie crunch and sweetness—the “dirt” of this cake!
- Nutter Butter Cookies: These make the perfect tombstones thanks to their shape and sturdy texture for decorating.
- White Candy Melts: These coat the cookie tombstones beautifully, creating a slick Halloween vibe.
- Chocolate Chips: Melted for writing “RIP” on tombstones—go slow for the neatest lettering.
- Gummy Worms: The ultimate creepy-crawly touch that kids love crawling through the “dirt.”
Make It Your Way
I love playing around with the decorations on this Halloween Dirt Cake Recipe. It’s a great base for you to get creative, whether it’s swapping gummy worms for candy spiders or using different cookie “tombstones.” Feel free to customize to match your Halloween vibe or even tweak some ingredients if you prefer something lighter or extra decadent.
- Variation: Once, I added a layer of crushed peanut butter cups mixed in with the Oreo crumbs for an extra peanut butter kick—and it was a crowd-pleaser!
- Dietary Modifications: For a gluten-free version, use gluten-free Oreos or a similar cookie crumble, and check candy ingredients.
- Seasonal Twist: Swap the chocolate pudding for vanilla or pumpkin spice pudding close to fall, for a seasonal spin.
Step-by-Step: How I Make Halloween Dirt Cake Recipe
Step 1: Cream Cheese Base Magic
Start by blending your softened cream cheese with a mixer until it’s completely smooth—no lumps here! Next, add your softened butter and combine thoroughly. Then, slowly mix in powdered sugar and the thawed whipped topping at a low speed to avoid splattering. This creamy mixture sets the rich, fluffy foundation for your cake, so take your time blending it well. I usually pause halfway and scrape the bowl to make sure everything comes together perfectly.
Step 2: Whip Up the Pudding
Prepare the pudding using your milk and instant chocolate pudding mix per the package instructions—usually just whisk and wait for it to thicken. Then, gently fold the cream cheese mixture into your pudding with a spatula. Folding keeps the fluff intact so your filling stays light and creamy.
Step 3: Oreos Become Dirt
This is the most fun part! Toss your Oreos (cookie and filling) into a food processor and pulse until you have a fine crumb that looks like dirt. No food processor? No worries! Just pop the Oreos into a big ziplock bag and crush them with a rolling pin or kitchen mallet until they reach that crumbly texture. I’ve done both ways plenty of times—both work great but the food processor is just faster.
Step 4: Layer and Chill
Press half of the crushed Oreos firmly into the bottom of a 9×13 pan to build your crust layer. Using the bottom of a measuring cup works like a charm to pack it in evenly. Next, spread your pudding and cream cheese mixture evenly over the crust. Finally, sprinkle the rest of the crushed Oreos on top to create that classic “dirt” finish. Pop it into the fridge and let it firm up for at least 2 hours or overnight for the best flavor melding.
Step 5: Craft the Tombstones
While your cake chills, melt the white candy melts in the microwave in short bursts to avoid burning. Dip each Nutter Butter cookie and set them on parchment paper to dry. Once dry, melt your chocolate chips and pour them into a small plastic bag with the corner snipped off—then, write “RIP” on each cookie with steady hands. These tombstones add that perfect spooky flair. Once your cake is set, press the “tombstones” gently into the top. Scatter gummy worms around to finish.
Tips from My Kitchen
- Room Temperature Is Key: Always soften your cream cheese and whipped topping; it saves a lot of frustration and ensures smooth mixing.
- Even Oreo Crumble: For the best texture, pulse in the food processor in small batches to get uniform “dirt” crumbs.
- Write “RIP” Slowly: For neat lettering, pipe the melted chocolate on popping the bag corner bit by bit and steady your wrist on your workspace.
- Press, Don’t Smash: When pressing crumbs or tombstones, gently compress so you don’t break the base or crack cookies.
How to Serve Halloween Dirt Cake Recipe
Garnishes
I always keep it simple by topping with gummy worms for that creepy crawly fun and the custom Nutter Butter tombstones because they’re the perfect shape and texture. Sometimes, I add candy eyeballs or edible dirt made from crushed chocolate graham crackers for extra Halloween drama. It’s fun to get creative here depending on what you have around and your crowd’s favorite candies!
Side Dishes
This dessert pairs wonderfully with lighter sides like fresh fruit slices or a simple green salad to balance the richness. At Halloween parties, I’ve also served it alongside pumpkin soup and savory finger foods like deviled eggs to round out the spooky spread.
Creative Ways to Present
One year, I served the Halloween Dirt Cake Recipe in mini mason jars for individual portions, layered with extra gummy worms and tombstones on top—super cute and mess-free for kids. You can also make it in a clear trifle bowl, so everyone can see the layers, which always gets excited “oohs” and “ahhs!” Another fun idea is to scatter edible glitter or use Halloween-themed cookie cutters on top to create shapes in the dirt layer.
Make Ahead and Storage
Storing Leftovers
Leftovers of this Halloween Dirt Cake Recipe keep nicely covered in plastic wrap or an airtight container in the fridge for up to 5 days. I usually store it with the tombstones separate if possible to avoid sogginess, then add just before serving again.
Freezing
While I haven’t personally frozen this dirt cake—because it disappears too fast—it should freeze okay in an airtight container for up to a month. Just thaw it overnight in the fridge. The texture might change a bit, especially with the whipped topping, so I recommend making it fresh if possible.
Reheating
This cake is best served cold straight from the fridge. If leftovers have been out too long, just give them time to chill again rather than reheating since heat would alter the textures unfavorably.
FAQs
-
Can I make the Halloween Dirt Cake Recipe dairy-free?
Yes! To make this dairy-free, swap the cream cheese and butter for dairy-free alternatives like vegan cream cheese and margarine. Use coconut milk or almond milk for the pudding, and select a non-dairy whipped topping. Be sure to check the pudding mix and cookies for dairy ingredients or look for vegan-friendly options.
-
What’s the best way to crush Oreos without a food processor?
If you don’t have a food processor, place your Oreos in a large resealable plastic bag, remove the air, and use a rolling pin or kitchen mallet to crush them into fine crumbs. Just make sure to crush evenly and avoid smashing the bag too hard to prevent tears.
-
How long can I prepare this cake ahead of time?
This Halloween Dirt Cake Recipe actually improves when chilled overnight, so you can make it a day ahead. Just wait to add the cookie tombstones and gummy worms until right before serving to keep them looking fresh.
-
Can kids help make this dessert?
Absolutely! Kids will love crushing the Oreos (with supervision) and placing the gummy worms on top. Decorating the “dirt” with tombstones can be an especially fun activity for little hands.
-
What pudding flavors can I use for this cake?
While chocolate is classic, vanilla or pumpkin spice pudding are great alternatives for seasonal or flavor variety. Just be sure to use instant pudding mixes for the no-bake convenience.
Final Thoughts
This Halloween Dirt Cake Recipe is one of those treasures that’s easy enough to whip up on a busy day but impressive enough to wow your guests. Every year, I look forward to pulling it out at Halloween gatherings—it brings smiles, laughter, and a little bit of spooky fun. If you’re looking to create a dessert that’s playful, crowd-pleasing, and downright tasty, give this a try. I promise, the layers of creamy, crunchy, chocolaty goodness will have everyone coming back for more. Happy baking (and boo-ing)!
Print
Halloween Dirt Cake Recipe
- Prep Time: 20 minutes
- Cook Time: 0 minutes
- Total Time: 2 hours 20 minutes
- Yield: 20 servings
- Category: Dessert
- Method: No-Cook
- Cuisine: American
Description
This Halloween Dirt Cake is a fun and festive no-bake dessert featuring creamy layers of chocolate pudding, cream cheese mixture, and crushed Oreo cookies to create a dirt-like appearance. Decorated with Nutter Butter tombstones and gummy worms, it’s perfect for a spooky celebration.
Ingredients
Cream Cheese Mixture
- 8 ounces cream cheese (1 package room temperature)
- ½ cup butter (softened)
- 1 cup powdered sugar
- 8 ounce container frozen whipped topping (thawed)
Pudding Layer
- 2 3.4 ounce boxes Instant Chocolate pudding
- 3 cups milk (to make the pudding)
Crust and Topping
- 1 15.5 ounce package Oreo Cookies (a regular size bag)
Tombstone Graveyard Decorations
- 8-10 Nutter Butter Cookies
- 6 ounces White Candy Melts
- ¼ cup chocolate chips (melted for writing RIP on cookies)
- 8-9 gummy worms (or other Halloween candy)
Instructions
- Prepare Cream Cheese Mixture: Blend the softened cream cheese with a stand or hand mixer until smooth. Add the softened butter and mix until combined. Slowly add the powdered sugar and thawed whipped topping, mixing at slow speed until incorporated. Set aside.
- Make Pudding: Prepare the instant chocolate pudding with milk in a large bowl according to package directions. Fold in the cream cheese mixture gently with a spatula. Set aside.
- Crush Oreos: Add Oreo cookies, including the filling, to a food processor and pulse until finely crushed. You may need to do this in two batches.
- Create Crust: Firmly press about half of the crushed Oreo crumbs into the bottom of a 9 x 13 inch pan using your hands or the bottom of a measuring cup to make an even crust layer.
- Add Pudding Layer: Spread the pudding and cream cheese mixture evenly over the Oreo crust.
- Add Topping Layer: Sprinkle the remaining crushed Oreos evenly on top of the pudding layer. Refrigerate the cake for at least 2 hours or overnight to allow it to set firmly.
- Make Tombstone Decorations: While the cake is chilling, melt white candy melts in the microwave. Dip each Nutter Butter cookie in the melted candy coating and place on parchment paper to dry.
- Write RIP on Tombstones: Melt chocolate chips in the microwave, pour into a small plastic bag, cut a tiny corner off, and pipe ‘RIP’ on each coated Nutter Butter cookie. Allow to dry completely.
- Assemble Decorations: Once the cake is set, press the decorated Nutter Butter tombstones into the top of the cake. Add gummy worms and additional Halloween candies as desired for finishing touches.
- Serve: Serve immediately or keep the cake refrigerated until ready to enjoy.
Notes
- Use instant pudding mix, NOT cook-and-serve, for this no-bake dessert.
- Soften cream cheese and whipped topping by leaving at room temperature for about 30 minutes to make mixing easier.
- If you don’t have a food processor to crush Oreos, put them in a large ziplock bag and crush with a kitchen mallet or rolling pin until crumbs form.
- Store leftover cake covered in plastic wrap in the refrigerator for up to 5 days.
- Nutritional information is approximate and may vary based on brand and methods used.
Nutrition
- Serving Size: 1 serving
- Calories: 270 kcal
- Sugar: 25 g
- Sodium: 180 mg
- Fat: 15 g
- Saturated Fat: 8 g
- Unsaturated Fat: 6 g
- Trans Fat: 0 g
- Carbohydrates: 30 g
- Fiber: 1 g
- Protein: 3 g
- Cholesterol: 40 mg


