Halloween Cake Pops Recipe
If you’re looking for a fun, festive treat that everyone will love this season, you’ve got to try my Halloween Cake Pops Recipe. These adorable little bites are bursting with color, cute decorations, and just the right amount of sweetness — perfect for parties, school events, or a spooky snack at home. I promise, once you make them, you’ll be hooked and ready to get creative with all your favorite Halloween themes!
Why This Recipe Works
- Simple Ingredients: Uses basic kitchen staples like candy melts and mini donuts, making it perfect for a quick festive treat.
- Kid-Friendly Assembly: The dipping and decorating steps are fun and easy, so kids love getting involved.
- Customizable Designs: Lots of room for creative decorating with candy eyes, sprinkles, and gels.
- Mess-Free & Portable: Cake pops hold well on sticks, so they’re easy to serve and enjoy without the mess of a cake slice.

Ingredients & Why They Work
The magic of this Halloween Cake Pops Recipe really comes down to using the right ingredients that balance taste and convenience. I always recommend grabbing good-quality candy melts for a snappy coating, and mini donuts that are fresh but firm enough to hold their shape on the stick.
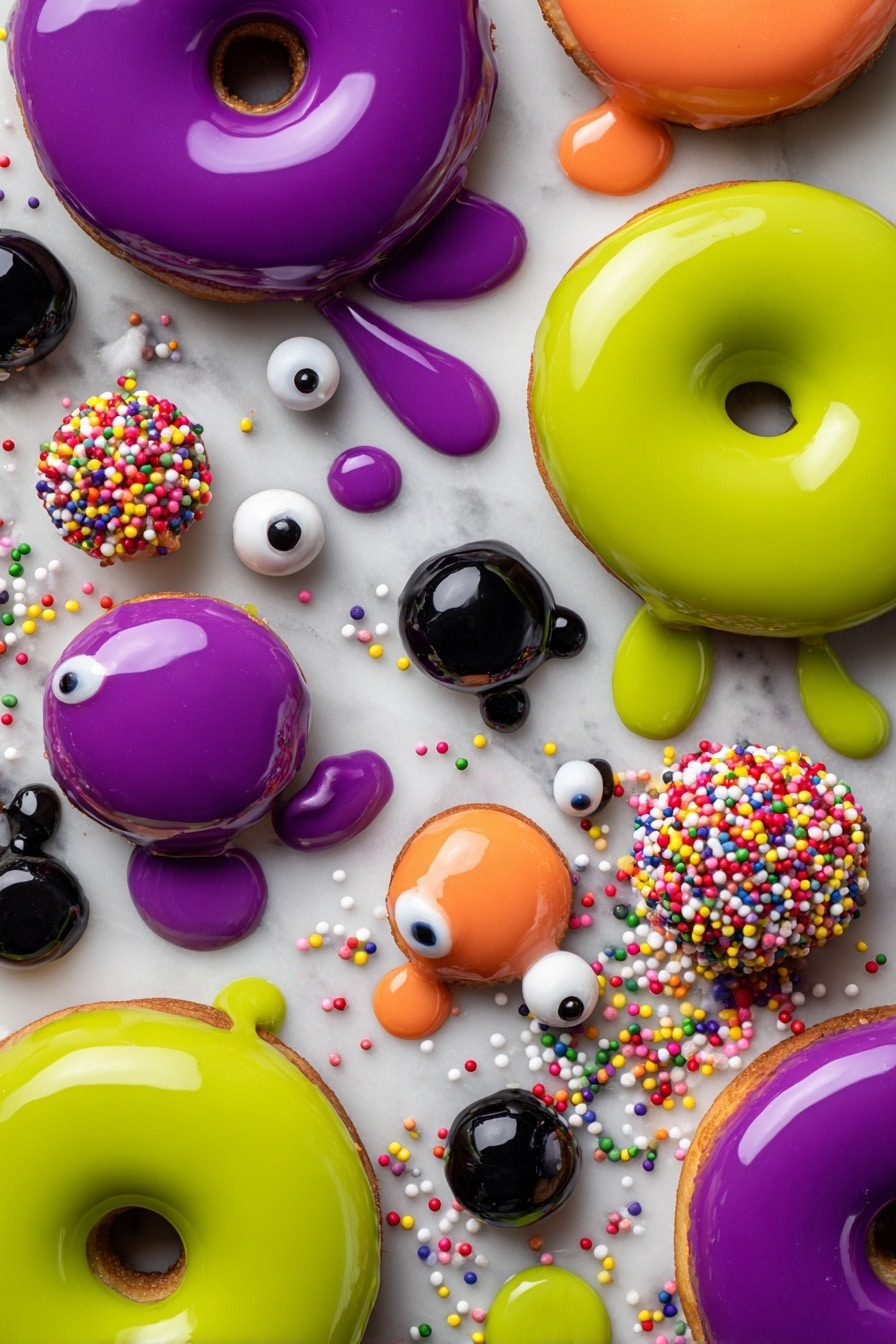
- Candy melts: Choose vibrant Halloween colors like green, purple, or orange for the perfect spooky look; melts easily for smooth coating.
- Lollipop sticks: 6- to 7-inch sticks are ideal — long enough to secure the cake pops comfortably.
- Mini donuts or donut holes: Fresh yet firm donuts keep the pops stable and delicious without crumbling.
- Candy eyeballs: Adds instantly adorable character—plus, kids love them!
- Assorted sprinkles: Provides fun texture and mess-free flair to your decoration.
- Black decorating gel: Perfect for drawing spooky faces or monster details with precision.
Make It Your Way
I love how flexible this Halloween Cake Pops Recipe is. You can make them cute, creepy, or downright silly—depending on your mood or your audience. I usually switch up the colors and decorations each year to keep things fresh and exciting, and it’s always a hit whether for kids or adults.
- Variation: One year, I went full monster mode with neon green melts and googly eyes — it was a blast to decorate, and the kids thought they were hilarious!
- Dietary tweaks: You can try gluten-free mini donuts if needed, or swap candy melts for dark chocolate if you prefer a richer flavor.
- Seasonal twist: Try swapping sprinkles for edible glitter or themed sugar shapes for other holidays.
Step-by-Step: How I Make Halloween Cake Pops Recipe
Step 1: Melt the Candy Magic
Start by melting the candy melts according to the package directions. I like to do this gently in short bursts in the microwave, stirring in between — this keeps the melts smooth and shiny, plus avoids burning. The key is patience here so your coating turns out silky and not clumpy.
Step 2: Stick It Good
Dip each lollipop stick about ¼ to ½ inch into the melted candy melts, then immediately push it into the hole of a mini donut. Place the dipped donuts upside down (sticks pointing up), on wax paper to dry. This little “glue” step helps secure the stick firmly, so the donuts don’t fall off during decoration.
Step 3: Double Dip for Deliciousness
Once the sticks are set, dip each donut fully into the candy melt and rotate to coat every inch. Then place back on wax paper to set completely. Don’t rush this — it’s tempting, but a proper hardening time helps your pops keep their perfect look and snap when you bite in.
Step 4: Get Decorative
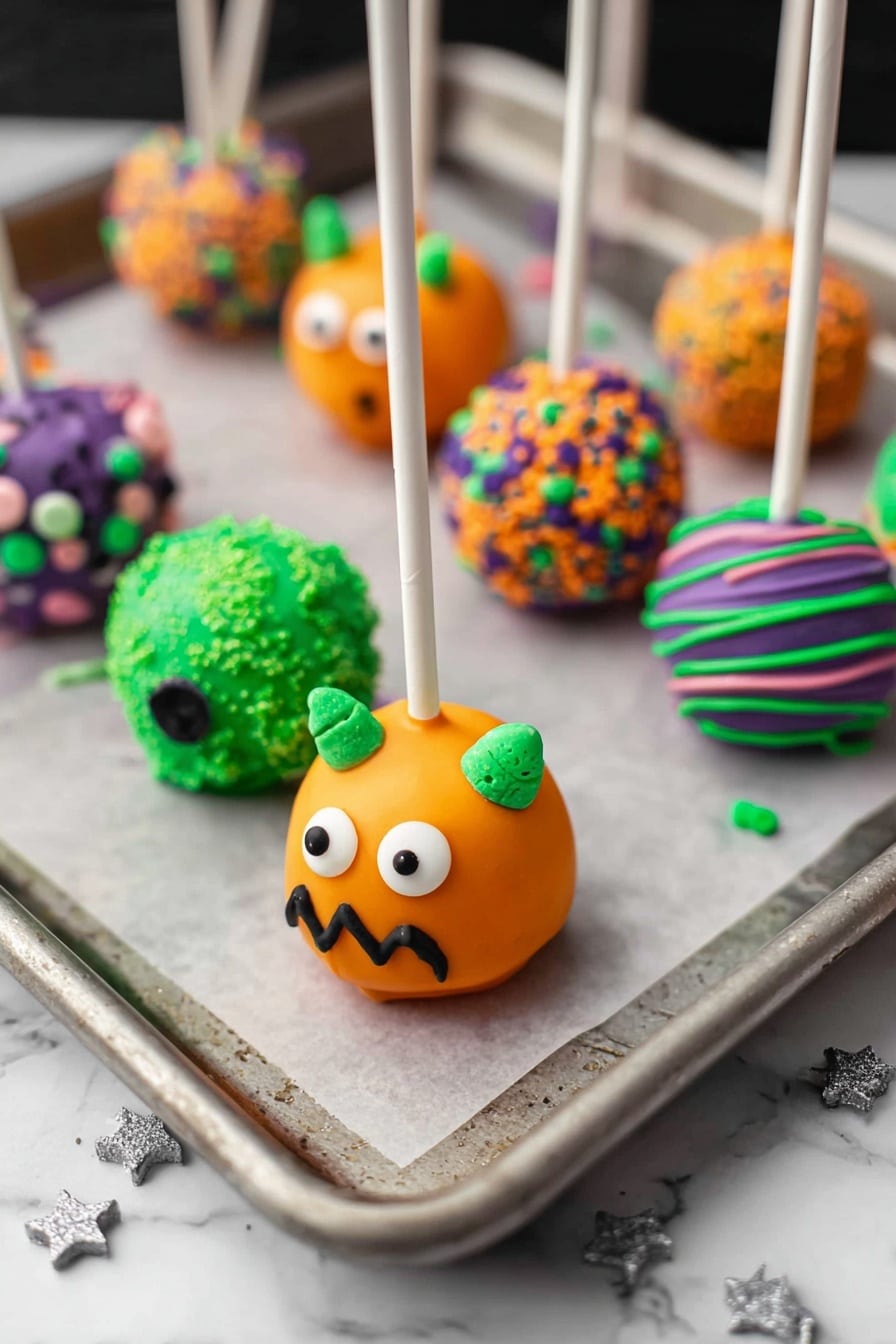
Here’s where you get to play! Use candy eyeballs, sprinkles, and black decorating gel to bring your Halloween pops to life — think monsters, pumpkins, or spooky ghosts. Remember, decorating gels take time to dry, so give them a little space before stacking or serving.
Tips from My Kitchen
- Candy Melt Heat Control: Don’t overheat your candy melts or they’ll seize up; medium power and stirring often is your best friend.
- Setting Pops Upside Down: Always let your pops dry upside down on wax paper to keep the candy smooth and avoid drips.
- Decorating Gel Patience: Let the decorating gel dry completely before you move or stack the pops—makes all the difference.
- Don’t Refrigerate: Storing cake pops in the fridge can cause sweating and cracks, so keep them cool and dry at room temperature.
How to Serve Halloween Cake Pops Recipe
Garnishes
I love topping mine with candy eyeballs and a mix of Halloween-themed sprinkles — they instantly jazz up the pops and add just the right spooky vibe. For the finishing touch, I use black decorating gel to draw little mouths, fangs, or stitches. Trust me, these details make your pops look professionally done, but they’re so easy to create!
Side Dishes
Pairing with a spooky drink like a dark blackberry punch or a pumpkin spice latte makes the whole celebration complete. I’ve also loved serving these alongside some simple popcorn sprinkled with edible glitter or confetti for a festive crunch contrast.
Creative Ways to Present
One of my favorite presentation tricks is to stick the finished cake pops into a Halloween-themed foam block covered with colored tissue paper or moss for a “pop-up” effect. It’s perfect for a party centerpiece and keeps pops upright and ready for grabbing. You could also arrange them in little treat bags for party favors—your guests will adore that personal touch!
Make Ahead and Storage
Storing Leftovers
I usually store leftover cake pops in an airtight container at room temperature — no refrigeration! Refrigerating can cause the candy coating to sweat and crack, which messes up the finish and texture. If you’re making them a day ahead, just keep them somewhere cool and dry.
Freezing
Freezing cake pops isn’t my go-to because the moisture can affect the candy coating’s texture. However, if you do freeze them, wrap each pop individually in plastic wrap and place in an airtight container. When thawing, let them come to room temperature before unwrapping to help the candy melts avoid condensation.
Reheating
No need to reheat cake pops—they’re best enjoyed at room temperature. If the coating feels slightly soft, just let them rest on the counter for a little while. Trust me, these cake pops taste just as good the next day, as long as you store them right.
FAQs
-
Can I use regular cake instead of mini donuts for the Halloween Cake Pops Recipe?
Absolutely! Regular cake crumbled and mixed with frosting can work well, but it’s messier and requires forming the balls yourself before dipping. Mini donuts save time and hold together better on sticks, which is why I prefer them for a fuss-free Halloween treat.
-
What’s the best way to prevent candy melts from cracking?
To avoid cracking, don’t chill your cake pops in the fridge. Keep them at room temperature and properly dry the coating upside down after dipping. This steady setting process keeps your candy shells smooth and flexible rather than brittle.
-
Can I make these cake pops a day in advance?
You can! Just keep them stored in an airtight container at room temperature. Avoid refrigeration to prevent moisture damage to the candy coating. They taste freshest made the same day but hold up nicely overnight.
-
How do I make monster horns for the cake pops?
Melt some candy melts and pipe horn shapes on wax paper, then let them harden completely. Use melted candy to stick the horns onto your monster pops. For extra stability, placing a sprinkle behind the horn works wonders to keep them in place.
Final Thoughts
This Halloween Cake Pops Recipe really holds a special place in my heart because it turns a simple snack into a creative project that anyone can enjoy. From the messy dipping to the decorating chaos, it’s a joy to share in the kitchen with family or friends. Give it a try—you’ll love how festive, fun, and downright delicious these pops turn out. Plus, they always disappear FAST at parties, so be ready to make a double batch!
Print
Halloween Cake Pops Recipe
- Prep Time: 30 minutes
- Cook Time: 10 minutes
- Total Time: 40 minutes
- Yield: 24 servings
- Category: Dessert
- Method: No-Cook
- Cuisine: American
- Diet: Vegetarian
Description
Delightfully spooky Halloween Cake Pops featuring colorful candy melts-coated mini donuts decorated with candy eyeballs, sprinkles, and black decorating gel. Perfect for festive parties, these easy-to-make treats combine fun decoration with a simple dipping technique to create eye-catching and delicious desserts.
Ingredients
Main Ingredients
- 1 cup candy melts (green, purple and/or orange)
- 24 plain mini donuts and/or donut holes
- 24 6- to 7-inch lollipop sticks
Decorations
- Candy eyeballs
- Assorted sprinkles
- Black decorating gel
Instructions
- Melt Candy Melts: Melt the candy melts according to the package directions, ensuring a smooth and even consistency ideal for dipping.
- Insert Sticks: Carefully dip each lollipop stick about 1/4- to 1/2-inch into the melted candy melts, then insert the stick into each mini donut. Place the donuts upside down on a wax paper-covered surface with the sticks pointing upward and allow the candy melt to harden for a few minutes.
- Coat Donuts: Dip each donut into the melted candy melts, rotating it until fully coated. Place the coated donuts upside down again on wax paper and allow them to completely harden.
- Decorate Cake Pops: Use candy eyeballs, assorted sprinkles, and black decorating gel to decorate the cake pops as desired. Follow decoration tips in the notes for best results.
- Serve and Store: Serve the cake pops once the candy melts have fully set. They are best enjoyed the day they are made but can be stored at room temperature in an airtight container for up to 24 hours without refrigeration.
Notes
- For sprinkle-topped pops, allow the first candy melt layer to set for about 3 minutes before dipping the tops in sprinkles for better adhesion.
- For drizzled pops, wait until the first layer is nearly completely set before drizzling additional candy melt for a neat effect.
- For monster pops, let the first candy melt layer dry completely before attaching candy eyeballs with extra melted candy melt and decorating with sprinkles and black decorating gel as desired.
- To make monster horns, pipe candy melt into horn shapes on wax paper, let set, then attach to cake pops using melted candy melt. Reinforce large horns by placing a sprinkle inside for additional support.
Nutrition
- Serving Size: 1 cake pop
- Calories: 150 kcal
- Sugar: 18 g
- Sodium: 120 mg
- Fat: 6 g
- Saturated Fat: 4 g
- Unsaturated Fat: 2 g
- Trans Fat: 0 g
- Carbohydrates: 23 g
- Fiber: 1 g
- Protein: 1 g
- Cholesterol: 5 mg


