Green Christmas Meringue Trees Recipe
If you’re looking for a festive, eye-catching treat that’s surprisingly simple to make, you’re in the right place. This Green Christmas Meringue Trees Recipe is honestly one of my favorite holiday projects. Not only do these little trees look adorable on any dessert table, but they’re crisp, light, and just sweet enough to make everyone smile. Plus, they’re perfect for gifting or just indulging yourself with a cozy cup of cocoa. Stick with me, and I’ll walk you through exactly how to get those perfect piped green meringue trees that will wow your friends and family!
Why This Recipe Works
- Simple Ingredients: Uses basic pantry staples, so you don’t need special trips to the store.
- Beautiful Presentation: The green color and tree shape make a stunning and festive dessert that’s all hand-piped, so it feels homemade and special.
- Long Shelf Life: Once baked properly, these meringue trees keep crisp for days in an airtight container, perfect for holiday prepping.
- Kid-Friendly Fun: Piping the trees and decorating with sprinkles makes this a joyful activity to share with kids or guests.

Ingredients & Why They Work
Making the perfect Green Christmas Meringue Trees Recipe is all about using fresh eggs and precise technique. Each ingredient has a special role to help your meringues gain height, hold shape, and look irresistibly festive. Here’s the lowdown on the essentials.

- Egg Whites: Make sure they’re cold and completely free of yolk — even a tiny bit of fat will stop them from whipping properly.
- Granulated Sugar: The sugar stabilizes and sweetens your meringue while helping achieve that glossy finish.
- Cream of Tartar: A little magic powder that acts as a stabilizer, preventing the meringue from collapsing during baking.
- Pure Vanilla Extract: Adds warmth and depth without overpowering the delicate sweetness.
- Green Food Coloring or Gel: Use gel for a richer hue that won’t thin out your meringue batter.
- Sprinkles: Adds a festive touch and a little crunch — make it colorful or keep it traditional with red and white.
Make It Your Way
I love how the Green Christmas Meringue Trees Recipe invites you to get creative while still sticking to a pretty foolproof base. Whether you want more vibrant colors, fun shapes, or dietary tweaks, there are simple ways to make this recipe totally your own.
- Variation: One of my favorite twists is adding a tiny pinch of peppermint extract in place of vanilla for a refreshing holiday vibe—just a little goes a long way!
- Dietary Modifications: These meringues are already gluten-free and dairy-free, which makes them great for most guests without changing anything.
- Seasonal Change: Try red or gold food coloring instead, and pipe the meringue as stars or candy canes to switch up the theme.
Step-by-Step: How I Make Green Christmas Meringue Trees Recipe
Step 1: Prep Your Kitchen and Ingredients
First things first — clean your equipment thoroughly. I learned the hard way how even a tiny bit of grease can ruin the entire batch. I like to wipe my mixing bowl and beaters with white vinegar and rinse well before starting. Preheat your oven to 200°F (or 175°F if yours runs hot). Line two sheet pans with parchment paper or silicone baking mats — this helps the meringues release easily once baked.
Step 2: Whip Up Those Egg Whites
Separate your egg whites carefully from cold eggs — cold whites whip better and hold more air. Beat them on medium-high speed until they’re light and foamy (about 2 minutes). Then, while mixing on low, slowly add the sugar and cream of tartar. Increase speed to high and whip for around 5 more minutes until you get glossy stiff peaks that hold their shape upside down. This is the step where patience is key — don’t rush the sugar addition.
Step 3: Color and Flavor Your Green Christmas Meringue Trees
Gently fold in the vanilla and green food coloring using medium speed to avoid deflating your meringue. I usually start with a teaspoon of food gel and add more until I reach a cheerful Christmas-green shade. Remember, gel food coloring is best here because it won’t make the meringue too runny.
Step 4: Pipe Your Tree Shapes
Fit a pastry bag with a large round tip, or simply trim a corner off a sturdy zip-top bag if you don’t have one. Pipe your meringue trees directly onto your prepared sheets, making each base about the size of a quarter — this gives them a stable bottom. Make little wavy layers upward to mimic pine tree branches. Top each with festive sprinkles to add that holiday sparkle.
Step 5: Slow and Steady Baking
Bake for 2 to 2 ½ hours, rotating the pans halfway through for even crisping. You’re aiming for dry, crisp trees that lift off the parchment without sticking. If you notice any browning before they’re fully dry, lower your oven to 175°F — meringues should stay pale and light. If you’re unsure, testing one out is always a good idea.
Tips from My Kitchen
- Bowl Cleanliness Matters: Always make sure your mixing bowl and beaters are spotless and grease-free for stiff peaks every time.
- Add Sugar Slowly: Pouring sugar in too fast deflates the egg whites and leads to grainy meringue—take your time.
- Use Gel Coloring: Gel colors create vibrant meringue without risking watery batter consistency.
- Low and Slow Baking: Patience in baking fixes and keeps that perfect crunch without browning.
How to Serve Green Christmas Meringue Trees Recipe

Garnishes
I like topping these meringue trees with colorful holiday sprinkles—tiny red and white balls or edible glitter adds just the right festive twinkle. Sometimes I sneak on a little crushed candy cane for a peppermint crunch. Plus, they’re pretty without adding extra calories, which is always a bonus!
Side Dishes
These meringue trees pair beautifully with rich hot chocolate or a creamy spiced chai latte—perfect for sitting by the fire. I also love adding them to a dessert platter with brownies, fudge, and seasonal fruits like cranberries for a beautiful Christmas spread.
Creative Ways to Present
One holiday, I arranged the Green Christmas Meringue Trees Recipe on a mirror tray surrounded by pine cones and fresh rosemary sprigs to amp up the woodsy, winter vibe. You can even pipe mini meringues onto skewers and display them like edible Christmas trees for a whimsical touch that delights kids and adults alike!
Make Ahead and Storage
Storing Leftovers
Leftover meringue trees store really well in an airtight container at room temperature. I usually keep mine in the pantry away from humidity, and they maintain their crispness nicely for up to 5 days. Just be sure to keep moisture away, or they’ll soften.
Freezing
Freezing meringues can be a bit tricky because of the moisture, but I’ve had good luck wrapping them tightly in plastic wrap, then placing them in an airtight container before freezing. Thaw them completely in the container at room temperature before serving—this way, they stay crunchy and don’t get soggy.
Reheating
Since these meringue trees are best enjoyed crisp, I don’t recommend reheating with warmth. Instead, if they soften a bit, you can pop them into a cool oven (turned off) for 10-15 minutes to dry them out again—just watch closely to avoid melting.
FAQs
-
Can I use pasteurized egg whites for this Green Christmas Meringue Trees Recipe?
Yes, you can use pasteurized egg whites from a carton, which makes the process even easier. Just make sure they’re at room temperature before whipping for best volume.
-
What causes meringues to weep or get sticky after baking?
Meringues can get sticky if they’re baked in a humid environment or underbaked. Make sure your oven is dry, don’t open the door too often, and bake until completely crisp. Proper storage away from humidity is key.
-
Can I make these meringue trees without food coloring?
Absolutely! They’ll still taste amazing, just classic white meringue instead of festive green. You could also dust them with edible shimmer powders or powdered sugar for a snowy look.
-
How do I know when my meringues are done baking?
The trees should lift easily from the parchment and feel completely dry and crisp. If any softness remains or they stick, bake a little longer, lowering the temperature if necessary to avoid browning.
Final Thoughts
This Green Christmas Meringue Trees Recipe is one that brings a lot of joy to my holiday kitchen. The rewarding little crunch combined with their festive look makes me feel like I’m giving a tiny edible Christmas gift to myself every time I bake them. I promise, once you try piping and nibbling these charming meringue trees, you’ll want to make them year after year. So go on, gather your ingredients, and let’s get baking – I can’t wait for you to see how lovely they turn out!
Print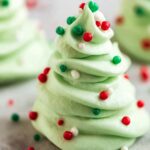
Green Christmas Meringue Trees Recipe
- Prep Time: 20 minutes
- Cook Time: 2 hours 30 minutes
- Total Time: 2 hours 50 minutes
- Yield: 48 cookies
- Category: Dessert
- Method: Baking
- Cuisine: American
- Diet: Vegetarian
Description
Delightfully crisp and festive Christmas Meringues shaped like trees, flavored with vanilla and tinted green, perfect for holiday celebrations and gifting.
Ingredients
Meringue
- 4 egg whites, cold
- 1 cup granulated sugar (200 grams)
- 1/8 teaspoon cream of tartar
- 2 teaspoons pure vanilla extract
- Green food coloring or green food gel
- Sprinkles
Instructions
- Prepare Equipment: Ensure your mixing bowl and beaters are very clean, free from any oil or butter. If unsure, rub them with white vinegar and rinse thoroughly. Preheat the oven to 200 degrees F and line two sheet pans with parchment paper or silicon baking mats.
- Prepare Piping Bag: Fit a pastry bag with a large plain or round tip. Alternatively, use a large zip-top bag with one corner cut off to pipe the meringue.
- Separate Egg Whites: Carefully crack eggs and separate the whites from the yolks, ensuring no yolk gets mixed in to ensure proper whipping.
- Beat Egg Whites: In a standing mixer bowl or with a hand mixer, beat the egg whites on medium-high speed until light and foamy, about 2 minutes. Then reduce speed and slowly add sugar while mixing. Add cream of tartar.
- Whip to Stiff Peaks: Increase mixer speed to high and continue mixing until egg whites are smooth, glossy, and form stiff peaks that hold shape when the beater is inverted, approximately 5 minutes more.
- Add Flavor and Color: Mix in vanilla extract and green food coloring or gel on medium speed until the meringue reaches your desired shade of green.
- Pipe Meringue Trees: Transfer the meringue to the piping bag and pipe tree shapes onto the prepared baking sheets, making bases about the size of a quarter. Top each tree with sprinkles.
- Bake: Place trays in the oven and bake for 2 to 2 1/2 hours, rotating pans halfway through baking. The meringues are done when they are dry, crisp, release easily from the parchment, and show no golden brown signs. If browning appears before crispness, reduce oven temperature to 175 degrees F.
- Cool and Store: Allow meringues to cool completely before storing in an airtight container at room temperature. They stay fresh for 3 to 5 days.
Notes
- Do not skip cream of tartar as it stabilizes egg whites and helps meringues hold shape during baking.
- Ensure all equipment is free of grease to achieve proper egg white whipping.
- Use fresh cream of tartar for best results.
- If you don’t have a pastry bag, a zip-top bag with a snipped corner works well for piping shapes.
- Reduce oven temperature if meringues start browning before they dry out to avoid discoloration.
- Store meringues in an airtight container to maintain crispness and prevent moisture absorption.
Nutrition
- Serving Size: 1 cookie
- Calories: 20 kcal
- Sugar: 5 g
- Sodium: 5 mg
- Fat: 0 g
- Saturated Fat: 0 g
- Unsaturated Fat: 0 g
- Trans Fat: 0 g
- Carbohydrates: 5 g
- Fiber: 0 g
- Protein: 0.3 g
- Cholesterol: 0 mg


