Graveyard Cupcakes Recipe
If you’re hunting for a treat that’s delightfully spooky but irresistibly delicious, you’ve got to try this Graveyard Cupcakes Recipe. Perfect for Halloween gatherings, themed parties, or just a fun baking project, these cupcakes combine rich chocolate, creamy frosting, and a secret ganache surprise that’ll have everyone asking for more. Trust me, making these cupcakes is as fun as eating them — and I can’t wait to walk you through every step so your Graveyard Cupcakes come out perfect every time!
Why This Recipe Works
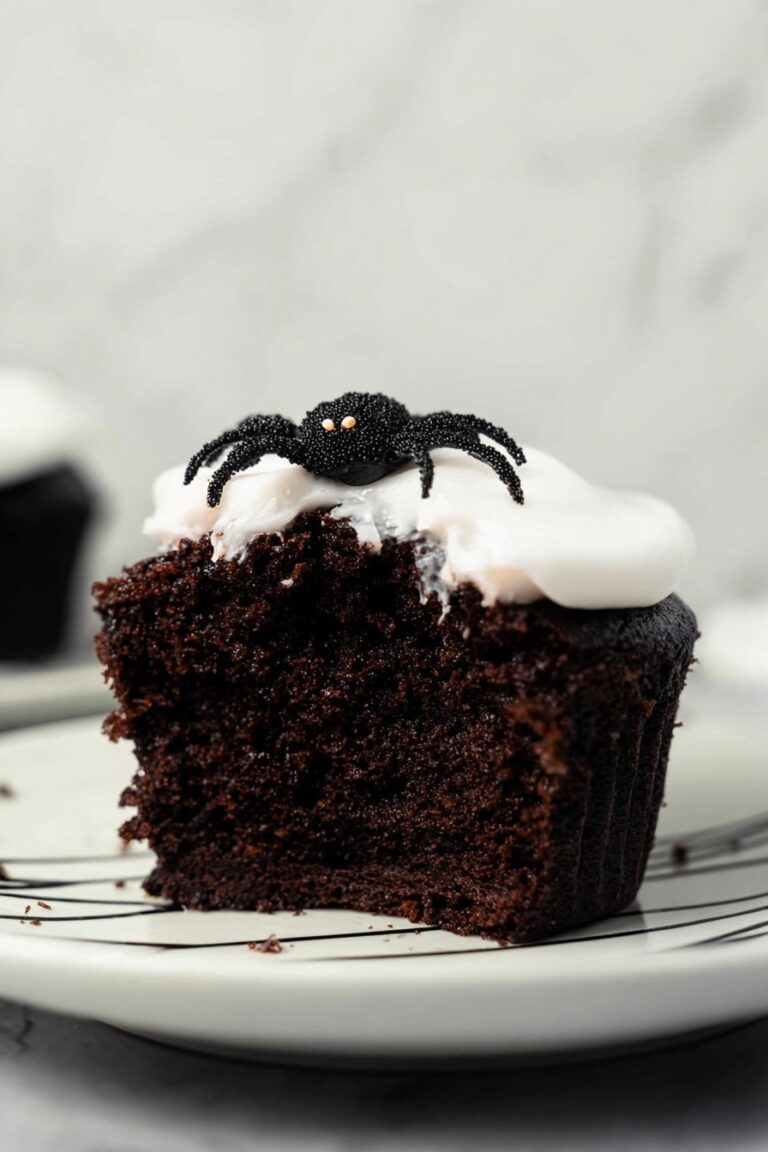
- Moist Chocolate Cupcakes: The blend of cocoa and melted butter-chocolate base makes these cupcakes incredibly tender and full-flavored.
- Surprise Ganache Filling: Adding that luscious, gooey chocolate center gives these cupcakes a fun twist that keeps guests intrigued and coming back.
- Creamy Cocoa Frosting: The frosting is fluffy and rich, balancing the denser cupcake while keeping everything perfectly chocolatey.
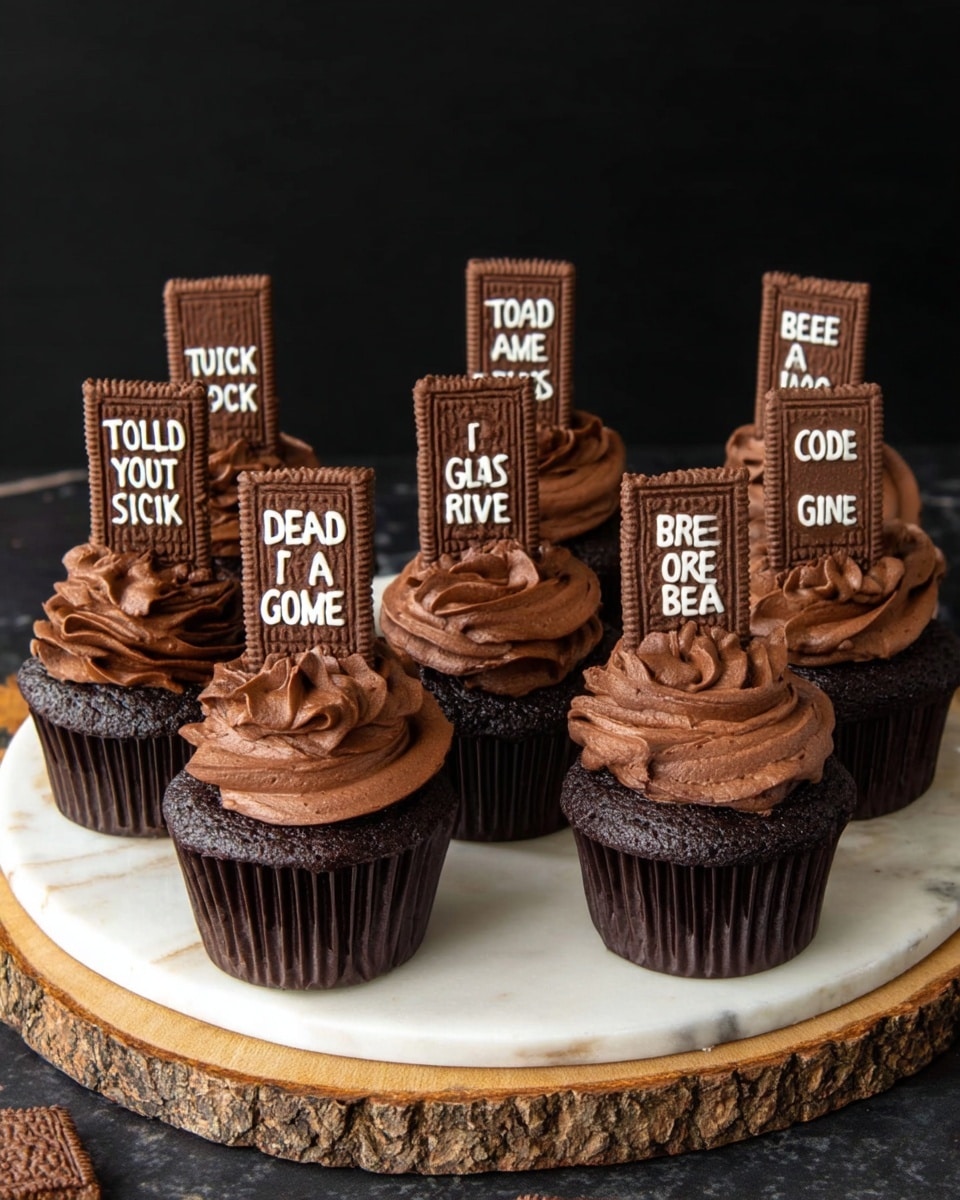
- Whimsical Tombstone Toppers: The white chocolate “written” graham crackers add personality and the perfect spooky vibe to finish these treats off.

Ingredients & Why They Work
Every ingredient in this Graveyard Cupcakes Recipe plays a key role—from the fluffiness of the cupcakes to the rich ganache filling and creamy frosting. I always recommend using high-quality chocolate and fresh buttermilk, as these really elevate the flavor and texture.

- All-purpose flour: Provides structure, but balanced with cocoa powder for tenderness.
- Unsweetened cocoa powder: Key for deep chocolate flavor—don’t swap for Dutch-processed unless you adjust leavening.
- Baking powder & baking soda: Work together to give the cupcakes a nice rise and soft crumb.
- Kosher salt: Enhances the chocolate flavor, so don’t skip it!
- Unsalted butter: Room temp for smooth mixing; gives a rich texture.
- Semisweet chocolate chips: Melted into the batter for an intense chocolate base and also in the ganache.
- Brown sugar: Adds moisture and subtle caramel notes, making the cupcakes extra tender.
- Large eggs: Bind the ingredients and add richness; be sure they’re room temp for even mixing.
- Pure vanilla extract: Rounds out and brightens the chocolate flavors.
- Buttermilk: Reacts with leavening and adds tanginess, resulting in moist, tender cupcakes.
- Heavy cream: Used in ganache for that silky, luxuriously smooth filling.
- Corn syrup: Keeps ganache shiny and pliable, perfect for filling.
- Powdered sugar: For the frosting, to give it that light, airy sweetness.
- White chocolate: Melts easily for writing the tombstone sayings.
- Chocolate-coated graham crackers: Ideal for creating sturdy yet tasty “tombstones.”
Make It Your Way
I love how versatile this Graveyard Cupcakes Recipe is, and you can easily tweak it to fit your style or dietary needs. I often swap in dairy-free butter or use alternative sweeteners when I want a different twist. Don’t hesitate to get creative with your tombstone messages or even add edible glitter for some Halloween sparkle!
- Variation: Try swapping the cocoa powder for a dark Dutch-processed variety and adjust baking powder accordingly for a richer taste and darker color.
- Dietary Mods: Use dairy-free butter and coconut cream to make a vegan-friendly version—just make sure to adjust baking time slightly.
- Seasonal Change: Switch out the ganache for a pumpkin spice filling in fall or raspberry jam for a fruity surprise.
- Difficulty Levels: Want an easier approach? Skip the ganache filling and just focus on frosting and tombstone decorations — still delicious and spooky!
Step-by-Step: How I Make Graveyard Cupcakes Recipe
Step 1: Prepare Your Dry Ingredients
Start by whisking together your flour, unsweetened cocoa powder, baking powder, baking soda, and kosher salt in a medium bowl. Setting this aside early gives you a smooth workflow and ensures even distribution of your leavening agents. I always double-check for lumps in the cocoa to avoid clumps in the batter—this little step saved me from dry spots in the past!
Step 2: Melt Butter and Chocolate Together
In a large microwave-safe bowl, combine the butter and semisweet chocolate chips. Heat in the microwave on high for one minute, then stir well. If it’s not fully melted, heat in 30-second bursts, stirring each time. The key here is to get it melted but not hot—too hot and you risk cooking the eggs in the next step. I like using a wooden spoon to stir; it feels more controlled and helps prevent overheating.
Step 3: Mix in Sugar, Eggs, and Vanilla
Once your chocolate-butter mixture is smooth and slightly cooled, stir in the brown sugar until combined. Next, whisk in the eggs and vanilla extract. Don’t rush this—be gentle but thorough to keep the mixture silky. The eggs help bind everything and add richness, so make sure your eggs are at room temperature to prevent seizing.
Step 4: Combine Dry Ingredients and Buttermilk
Now pour half of your dry ingredients into the wet mixture and stir JUST until combined—overmixing can make your cupcakes tough. Then pour in the buttermilk, stirring again gently. Finish by adding the remaining dry ingredients until the batter looks homogenous with no streaks of flour. This layering method helps achieve the perfect soft crumb. When I first started, I made the mistake of stirring too aggressively—don’t do that!
Step 5: Bake the Cupcakes
Fill your cupcake liners halfway with batter—this recipe makes about twenty cupcakes, so you need 20 liners (two per each of your 12-count pans). Overfilling will cause cupcakes to spill over or not rise as well, so trust me, half full is perfect. Bake at 350°F for 15-16 minutes, then test with a toothpick. When it comes out clean, they’re done! Don’t forget to remove them from the pan immediately to a wire rack to avoid overcooking. I learned that the hard way once, ending with too-dry cupcakes!
Step 6: Make That Luscious Ganache
While your cupcakes cool, heat your heavy cream in the microwave until very hot (about 1½ minutes). Pour it over the chocolate chips and let it sit for 5 minutes without stirring. This rest period is essential—it lets the chocolate melt evenly. After, stir gently until silky and glossy, then add the corn syrup for shine and flexibility. Pop this into the fridge for 30 minutes to thicken for easy filling.
Step 7: Whip Up the Cocoa Frosting
Using a stand mixer, beat the powdered sugar, softened butter, cocoa powder, and vanilla on high for about 2 minutes until fluffy and light. The gentle melting of the butter ahead helps create a smooth texture without lumps. I find using the paddle attachment works best to avoid air pockets and ensures a consistent, spreadable frosting that holds its shape nicely.
Step 8: Decorate with Bloody Good Tombstones
Melt your white chocolate carefully in the microwave (start with 30 seconds), stirring until just melted. Transfer to a small piping bag or a plastic sandwich bag with a tiny cut corner, and “write” your funny or spooky sayings on the chocolate-coated graham cracker tombstones like RIP, Game Over, or Dead End. Freeze these for 5-10 minutes so the chocolate hardens quickly, making them easier to handle.
Step 9: Fill, Frost, and Assemble
Using a small knife, carve a little well into the top of each cupcake, scoop about a teaspoon of chilled ganache in, then replace the circle you cut out right back on top to seal the surprise filling inside. Then pipe on a generous swirl of frosting and finish by sticking a tombstone cookie in the center. You’ll have everyone ooohing and ahhing over these fun, tasty treats!
Tips from My Kitchen
- Don’t Overmix: Stir your batter only until just combined to keep those cupcakes tender and moist.
- Room Temp Everything: I always bring butter, eggs, and buttermilk to room temperature first — it makes mixing smoother and baking more even.
- Cool Cupcakes Completely: Frosting warm cupcakes can make the frosting melt — patience pays off here.
- Freeze Tombstones: Freezing the decorated graham crackers solidifies the white chocolate so it doesn’t smudge when you assemble.
How to Serve Graveyard Cupcakes Recipe
Garnishes
Besides the classic tombstone cookies, I like to sprinkle on crushed chocolate cookie “dirt” around the cupcakes for a graveyard effect. A little edible glitter or orange sprinkles can add a festive Halloween touch if you’re going all out.
Side Dishes
I often serve these Graveyard Cupcakes with a cold glass of milk or maybe a hot cup of spiced pumpkin latte or rich coffee. They also pair well with light fruit salads to balance the richness.
Creative Ways to Present
For a Halloween party, set these Graveyard Cupcakes on a tray dusted with crushed Oreos for “mud,” add fake spider webs, and scatter little plastic skeletons around. You can also display them in thematic cupcake stands or arrange them in a circle to resemble a spooky cemetery.
Make Ahead and Storage
Storing Leftovers
Once frosted and decorated, these cupcakes keep well in an airtight container at room temperature for 1-2 days. For longer freshness, store them in the fridge—just let them come to room temp before serving for the best taste and texture.
Freezing
I’ve frozen these cupcakes (without frosting) in a sealed container for up to three months. When ready, thaw overnight in the fridge and then frost fresh. To freeze the filled cupcakes, make sure your ganache is firm and well chilled before wrapping.
Reheating
If you want to gently warm the cupcakes before serving, pop them in the microwave for about 10-15 seconds. This softens the ganache filling and makes the frosting a little more luscious—but be careful not to overheat or the frosting texture may change.
FAQs
-
Can I make Graveyard Cupcakes Recipe ahead of time?
Absolutely! You can bake the cupcakes up to two days in advance and store them in an airtight container. Prepare the ganache and frosting ahead as well, assemble the day of for freshest presentation.
-
What if I don’t have buttermilk? Can I substitute it?
Yep! You can make a buttermilk substitute by mixing 1/2 cup milk with 1/2 tablespoon lemon juice or white vinegar. Let it sit for 5 minutes before using. It’s a handy trick I often use when I’m short on buttermilk.
-
Can I make these Graveyard Cupcakes vegan?
With some ingredient swaps like dairy-free butter, coconut cream, and egg replacers, you can definitely make a vegan version. Just keep in mind texture and baking times may vary slightly.
-
What’s the best way to keep the “tombstone” decorations from breaking?
Freezing the decorated graham crackers before adding them to the cupcakes helps harden the chocolate and reduce breakage when handling. Store them carefully in a flat container.
-
Can I make the ganache filling ahead and store it separately?
Yes! Ganache can be chilled in the fridge for up to 3 days. Just give it a gentle stir or warm it slightly before filling cupcakes to get the right consistency.
Final Thoughts
This Graveyard Cupcakes Recipe holds a special place in my kitchen, especially around spooky season when friends and family gather. There’s a kind of magic in surprising someone with a rich, gooey-filled cupcake topped with cheeky little tombstone cookies. I hope you’ll try making these soon — they’re fun to bake, fun to decorate, and even more fun to share (and eat!). If you’re ready for a deliciously eerie treat that’s sure to impress, dive into this recipe and enjoy every sweet, chocolatey bite.
Print
Graveyard Cupcakes Recipe
- Prep Time: 45 minutes
- Cook Time: 16 minutes
- Total Time: 1 hour 36 minutes
- Yield: 20 cupcakes
- Category: Dessert
- Method: Baking
- Cuisine: American
Description
Graveyard Cupcakes are spooky, chocolatey treats perfect for Halloween or themed parties. These moist cupcakes are filled with rich chocolate ganache, frosted with creamy cocoa buttercream, and topped with fun, decorated chocolate-coated graham cracker tombstones for a playful and delicious dessert experience.
Ingredients
Cupcakes
- 1½ cups all-purpose flour (210 grams)
- ¼ cup unsweetened cocoa powder (25 grams)
- 1 teaspoon baking powder (4 grams)
- ½ teaspoon baking soda (3 grams)
- ¼ teaspoon kosher salt
- 1 cup unsalted butter, room temperature (226 grams, 2 sticks)
- 1 cup semisweet chocolate chips (170 grams)
- 1 cup brown sugar (200 grams)
- 2 large eggs, room temperature (100 grams)
- 1 teaspoon pure vanilla extract (4 grams)
- ½ cup buttermilk, room temperature (114 grams)
Chocolate Ganache
- 1 cup 33% fat heavy cream, room temperature (227 grams)
- 1 cup semisweet chocolate chips (170 grams)
- 1 tablespoon corn syrup (20 grams)
Frosting
- 3 cups powdered sugar (360 grams)
- 1 cup unsalted butter, slightly melted (226 grams, 2 sticks)
- ½ cup unsweetened cocoa powder (50 grams)
- 1 teaspoon pure vanilla extract (4 grams)
Decorating
- 1 ounce Baker’s white chocolate (28 grams)
- 20 chocolate-coated graham crackers such as Keebler Deluxe Grahams
Instructions
- Preheat and prepare cupcakes: Preheat your oven to 350°F and line a 12-count cupcake tin with 20 cupcake liners.
- Mix dry ingredients: In a medium bowl, whisk together the flour, cocoa powder, baking powder, baking soda, and salt; set aside.
- Melt butter and chocolate: In a large microwave-safe bowl, heat the butter and chocolate chips on high for 1 minute, stirring well. Continue heating in 30-second intervals, stirring until melted but not hot.
- Add sugar and eggs: Stir the brown sugar into the melted mixture, then whisk in eggs and vanilla extract until combined.
- Combine dry and wet ingredients: Pour half of the dry ingredients into the wet mix and stir gently until just combined. Then stir in all the buttermilk until mixed. Add the remaining dry ingredients and stir just until no flour remains; avoid overmixing.
- Fill liners and bake: Fill the cupcake liners halfway with batter (making 20 cupcakes). Bake for 16 minutes or until a toothpick comes out clean. Remove immediately from the tin to a wire rack to cool completely.
- Make ganache: Heat heavy cream in a microwave-safe bowl for about 1½ minutes until hot. Pour chocolate chips into the cream and let sit for 5 minutes. Stir until smooth, then mix in corn syrup. Refrigerate for 30 minutes until chilled.
- Prepare frosting: In a stand mixer bowl with paddle attachment, beat powdered sugar, slightly melted butter, cocoa powder, and vanilla extract on high speed for 2 minutes until light and fluffy. Fill a piping bag with or without a tip with the frosting and set aside.
- Decorate tombstone cookies: Melt white chocolate in the microwave for about 30 seconds; stir until just melted. Place melted chocolate in a small piping bag, cut a small hole, and write fun sayings on the chocolate-coated graham crackers. Freeze for 5-10 minutes to harden the writing.
- Fill cupcakes with ganache: Use a small knife to cut a hole in the top of each cupcake. Spoon about a teaspoon of chilled ganache into each hole and replace the cupcake top piece to cover the filling.
- Frost and top cupcakes: Pipe frosting on top of each filled cupcake and place a decorated tombstone cookie on top to complete the look.
Notes
- Removing cupcakes from the hot tin immediately prevents over-baking and dryness.
- Use room temperature eggs and buttermilk for better batter consistency.
- Don’t overmix the batter to maintain a soft cupcake texture.
- If you don’t have buttermilk, substitute with milk plus 1 tablespoon lemon juice or vinegar, let sit for 5 minutes.
- Freeze decorated tombstone cookies to quickly harden white chocolate writing before decorating cupcakes.
- The frosting can stay at room temperature for easy piping; if too soft, chill briefly.
Nutrition
- Serving Size: 1 cupcake
- Calories: 380 kcal
- Sugar: 32 g
- Sodium: 150 mg
- Fat: 25 g
- Saturated Fat: 15 g
- Unsaturated Fat: 8 g
- Trans Fat: 0.5 g
- Carbohydrates: 35 g
- Fiber: 3 g
- Protein: 5 g
- Cholesterol: 70 mg


