Gooey Cookie Butter S’mores Blondies Recipe
If you’re craving something that’s part cookie, part s’mores, and absolutely bursting with gooey, melty goodness, then you’re in for a treat with this Gooey Cookie Butter S’mores Blondies Recipe. Imagine a buttery blondie base, swirled with dreamy cookie butter, layers of melty chocolate, and topped with fluffy marshmallow fluff—sounds like campfire magic without the campfire, right? Stick around because I’m sharing all the tips and tricks to nail this fan-freaking-tastic dessert that always brings the wow factor.
Why This Recipe Works
- Perfect Texture Balance: The combination of graham cracker crumbs and flour creates blondies that are chewy yet tender, making every bite delightful.
- Layered Flavors: Swirling cookie butter and layering chocolate and marshmallow fluff adds gooey richness and that nostalgic s’mores vibe.
- Simple Ingredients, Stunning Results: Uses everyday pantry staples with an easy technique, so you don’t have to be a pro baker.
- Built-In Crowning Touch: The marshmallow fluff topping caramelizes slightly and keeps the blondies irresistibly sticky on top.

Ingredients & Why They Work
Every ingredient in the Gooey Cookie Butter S’mores Blondies Recipe has a role, whether it’s texture, flavor, or that irresistible goo factor. Choosing quality basics will make your blondies shine, so let me break down what’s going on with each one.
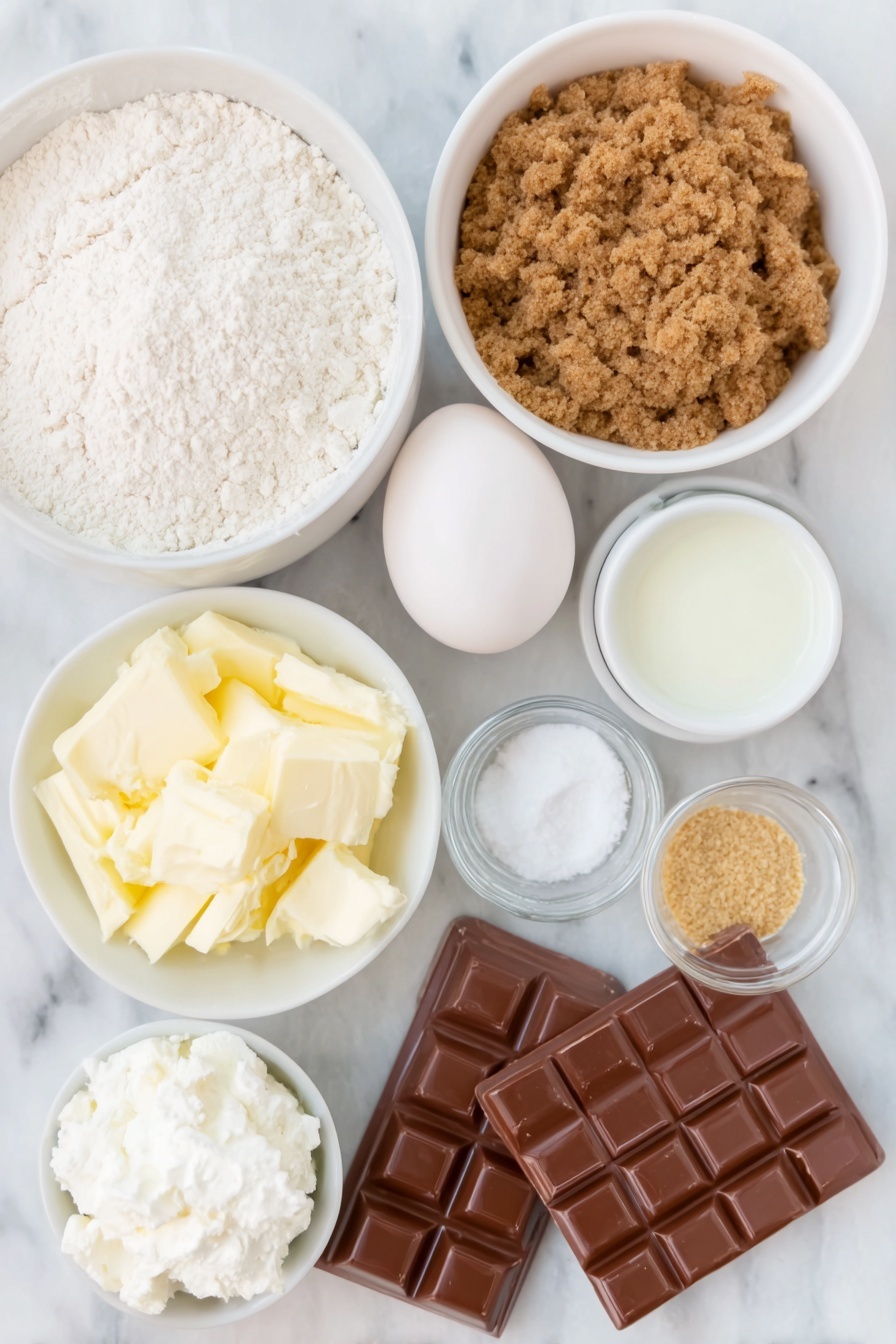
- Unsalted Butter: Melting it lets you incorporate every crumb with a luscious, moist crumb—plus, you control the salt level.
- Brown Sugar: Adds deep caramel notes and keeps the blondies soft and chewy.
- Large Egg: Binds everything together and adds richness; make sure it’s room temperature for best mixing!
- Vanilla Extract: Enhances all the buttery and sweet flavors, giving the blondies that warm, comforting aroma.
- All-Purpose Flour: The backbone of the blondie structure—don’t overmix to keep them tender.
- Graham Cracker Crumbs: Adds subtle crunch and that iconic s’mores flavor without breaking up the texture.
- Baking Soda: Just enough to give a slight lift without ruining the dense, chewy texture.
- Salt: A tiny bit amps up all the sweetness and balances flavors.
- Chocolate Bars: I prefer Cadbury’s Dairy Milk because it melts beautifully and pairs perfectly with the cookie butter.
- Cookie Butter: The star swirl! It melts into ribbons of spiced, caramelized goodness.
- Marshmallow Fluff: Keeps the top gooey and gives that classic s’mores sticky, sweet finish.
Make It Your Way
I love to switch things up here depending on who I’m sharing these blondies with or what I have on hand. The Gooey Cookie Butter S’mores Blondies Recipe is surprisingly flexible, so feel free to play around with add-ins and toppings to suit your mood.
- Variation: One time, I swapped out the chocolate bars for peanut butter cups—oh man, it added a salty-sweet surprise everyone adored.
- Dietary Tweaks: For a dairy-free version, coconut oil in place of butter works well, plus dairy-free chocolate chips.
- Seasonal Twist: In the fall, I mix in a pinch of cinnamon and nutmeg into the batter for a cozy, autumnal vibe.
Step-by-Step: How I Make Gooey Cookie Butter S’mores Blondies Recipe
Step 1: Prep and Mix the Batter
First off, preheat your oven to 350°F (180°C). Line a 9″x9″ pan with parchment or foil that hangs over the edges—this makes pulling out the blondies later a total breeze. Then, whisk together melted butter and brown sugar in a large bowl until silky smooth. I like to add the egg and vanilla next, mixing gently so everything combines without overworking. After that, toss in your flour, graham cracker crumbs, baking soda, and salt, stirring only until everything comes together. That light touch keeps the blondies tender, so resist the urge to overmix here!
Step 2: Layer the Love
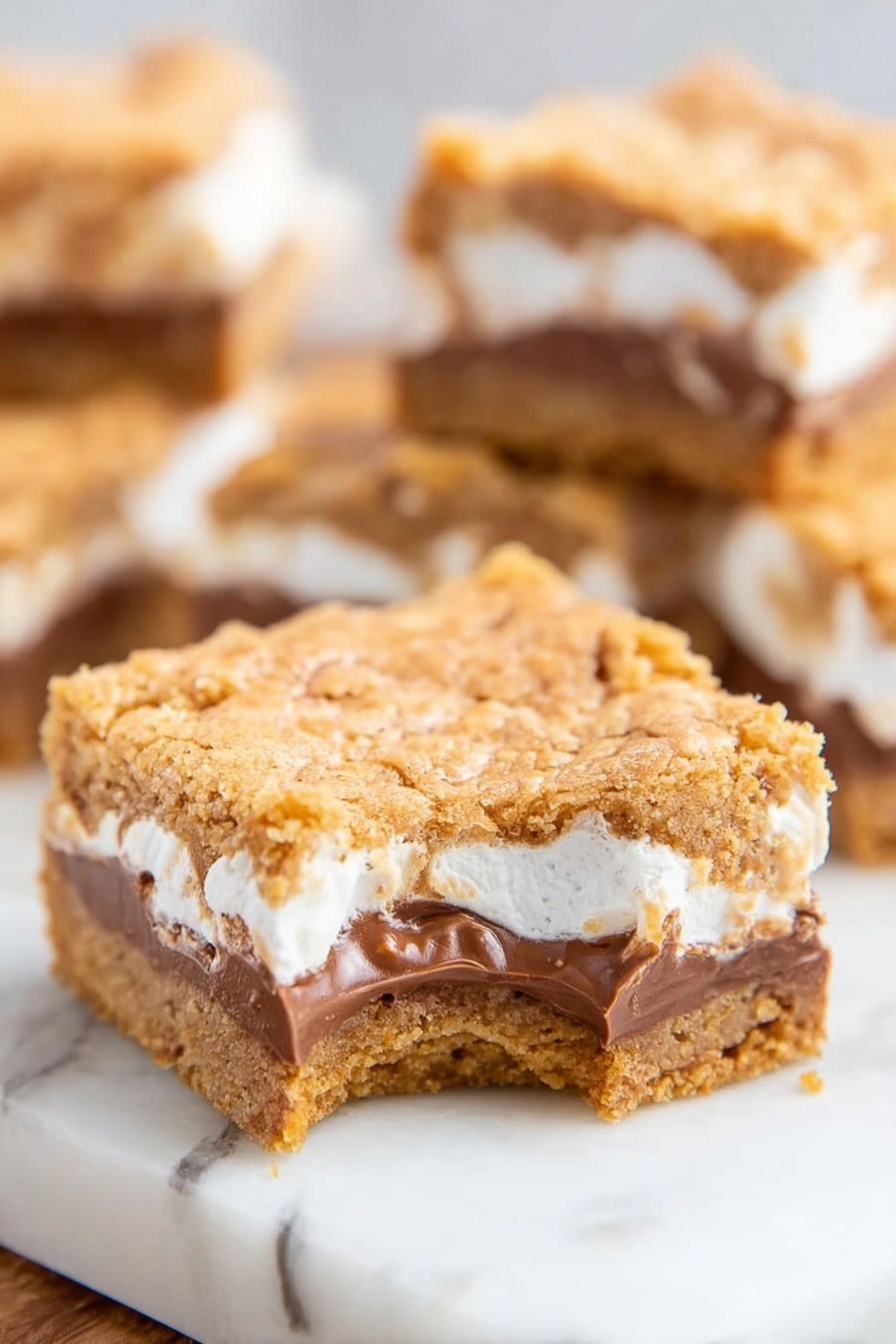
Press half of your batter evenly into the pan—that’s the goldilocks layer, not too thin, not too thick. Next comes the magic: drop your cookie butter in dollops (I do about nine, like little blobs of sunshine) across the batter. Grab a butter knife and swirl it gently—no need for perfection here, those swirls are what make it look homemade and rustic! Next, break your chocolate bars into pieces and scatter them evenly over the surface; filling those little nooks guarantees pockets of melted chocolate in every bite. Spread your marshmallow fluff over the chocolate, smoothing it gently, then dollop the remaining cookie butter on top and swirl again. Trust me, this layering is the secret to that jaw-dropping gooey effect.
Step 3: Top It Off and Bake
Gather the rest of the batter and press it into a disc with your hands—that way, it’s easier to break into chunks and cover the marshmallow layer evenly. Layer the remaining batter pieces over the top, pressing gently but don’t worry if it’s not perfect. Slide your pan into the oven and bake for 25-30 minutes. Keep a close eye near the end—the blondies should be golden and set around the edges but still slightly soft in the middle. Don’t skip the cooling time; I know it’s tempting, but letting them cool completely tightens up the structure while keeping that luscious goo all locked inside.
Tips from My Kitchen
- Don’t Skip the Parchment: Using foil or parchment with overhang is a game changer for removing the blondies without crumbling.
- Swirl Gently: Over-swirl and the layers might just blend; under-swirl, and you miss the marbled effect—experiment to find your sweet spot.
- Chocolate Choice Matters: Creamier chocolates like Cadbury melt sweeter and blend better with the marshmallow and cookie butter.
- Patience is a Virtue: Wait for full cooling before slicing to keep your blondies intact and gooey without mess.
How to Serve Gooey Cookie Butter S’mores Blondies Recipe
Garnishes
I like to keep garnishes simple because these blondies speak for themselves—but a light sprinkle of crushed graham crackers on top adds a delightful crunch and hints at that smoky campfire vibe. Sometimes I toast extra mini marshmallows under the broiler for 30 seconds and scatter them on top for a fancy golden finish.
Side Dishes
This rich dessert pairs beautifully with a scoop of vanilla ice cream or a dollop of whipped cream to cut through the sweetness. For gatherings, I sometimes serve it alongside a fresh berry salad—the tartness is a refreshing contrast that everyone’s appreciated.
Creative Ways to Present
For special occasions, I’ve layered these blondies in small glass cups for mini parfaits, layering with extra marshmallow fluff and cookie butter in between. They also make adorable stacked bars drizzled with melted chocolate and a sprinkle of sea salt for a sophisticated twist that always impresses guests.
Make Ahead and Storage
Storing Leftovers
Once cooled, I usually store any leftovers in an airtight container at room temperature for up to three days. If your kitchen is warm, the cookie butter and marshmallow might get a little melty—perfect if you love extra gooey treats, but refrigeration helps them stay a bit firmer.
Freezing
I’ve frozen these blondies a couple of times, wrapped tightly in foil and placed in a freezer-safe bag. They thaw beautifully overnight in the fridge and still retain that gooey charm, making them perfect for prepping ahead for parties or gift boxes.
Reheating
When reheating, I recommend warming individual blondie squares for about 10-15 seconds in the microwave—not too long or the marshmallow can get rubbery. A quick zap really revives the melty chocolate and cookie butter swirls like they’re freshly baked.
FAQs
-
Can I use store-bought graham cracker crumbs for this recipe?
Absolutely! Store-bought graham cracker crumbs work perfectly and save you time. Just make sure to crush them finely if they come in larger chunks to evenly distribute the flavor and texture throughout the blondies.
-
Do I need to chill the batter before baking?
Chilling isn’t necessary here because the thickness of the batter and layered toppings bake beautifully straight away. Just be sure to handle gently and press evenly into the pan for the best results.
-
Can I make these blondies gluten-free?
You can try swapping the all-purpose flour for a gluten-free 1:1 baking blend, but keep in mind the texture might change slightly. Make sure your graham crackers and other ingredients are also gluten-free to keep it safe.
-
Why is my marshmallow fluff spreading too much?
If marshmallow fluff spreads too thin during baking, try dolloping it thicker or swirling it with the cookie butter to create pockets of thickness that stay gooey without melting into the batter completely.
-
How do I cut these blondies cleanly?
Use a sharp knife dipped in hot water, then dried, to cut through the blondies smoothly. Wiping the knife clean between cuts helps keep the edges neat and prevents dragging gooey layers around.
Final Thoughts
This Gooey Cookie Butter S’mores Blondies Recipe is hands down one of my go-to desserts when I want to wow friends or just treat myself after a long day. It’s like campfire nostalgia meets cozy kitchen vibes—sweet, sticky, and supremely satisfying. I hope you’ll give it a try and make a few personal tweaks along the way, because that’s half the fun. Once you do, you’ll have a recipe that’s guaranteed to become a crowd-pleaser in your home too. Happy baking, friend!
Print
Gooey Cookie Butter S’mores Blondies Recipe
- Prep Time: 20 minutes
- Cook Time: 30 minutes
- Total Time: 2 hours 45 minutes
- Yield: 16 bars
- Category: Dessert
- Method: Baking
- Cuisine: American
Description
Delight in the ultimate comfort treat with these Gooey Cookie Butter S’mores Blondies. Featuring a buttery blondie base swirled with creamy cookie butter, layered with melty chocolate bars and topped with fluffy marshmallow fluff, these bars offer a perfect balance of rich sweetness and gooey textures. Ideal for dessert lovers seeking a nostalgic campfire flavor in an irresistibly soft blondie.
Ingredients
Blondie Batter
- 6 oz unsalted butter, melted
- 150 grams (3/4 cup) brown sugar
- 1 large egg, at room temperature
- 2 tsp vanilla extract
- 156 grams (1 1/4 cup) all-purpose flour
- 100 grams (1 cup) graham cracker crumbs, ground fine
- 1/2 tsp baking soda
- 1/2 tsp salt
Layers and Toppings
- 3 large chocolate bars (e.g., Cadbury’s Dairy Milk)
- 4 oz (1/2 cup) cookie butter (Trader Joe’s or Biscoff spread)
- 1 7-oz container marshmallow fluff
Instructions
- Preheat and Prepare Pan: Preheat your oven to 350°F (180°C). Line a 9×9-inch baking pan with parchment paper or aluminum foil, leaving an overhang on the sides for easy removal, then set aside.
- Mix Blondie Batter: In a large bowl, combine the melted butter and brown sugar. Whisk in the egg and vanilla extract until smooth. Add the all-purpose flour, graham cracker crumbs, baking soda, and salt. Mix just until combined, being careful not to overmix.
- Assemble Bottom Layer: Press half of the blondie batter evenly into the prepared baking pan.
- Add Cookie Butter Swirls: Drop about half of the cookie butter in 9 dollops over the batter. Using a knife, swirl the cookie butter into the batter gently to create marbled pockets.
- Layer Chocolate Bars: Break the chocolate bars into pieces to evenly cover the batter. Press them gently into the surface to create an even chocolate layer.
- Add Marshmallow Topping: Spread all of the marshmallow fluff evenly on top of the chocolate layer. Dollop the remaining cookie butter on top and swirl it gently into the marshmallow fluff for an extra gooey texture.
- Cover with Remaining Batter: Take the remaining blondie batter and press it between your hands into a disc shape. Place this disc over the marshmallow layer, pressing it gently to cover the marshmallows completely.
- Bake: Bake in the preheated oven for 30 minutes until the blondies are golden and set. Avoid underbaking to prevent an overly gooey mess.
- Cool Completely: Allow the blondies to cool completely in the pan before lifting them out using the foil or parchment overhang. This helps the layers set and makes slicing easier.
Notes
- If you prefer a less sweet dessert, reduce the brown sugar by 2 tablespoons.
- Use a sturdy spatula or thick knife to swirl the cookie butter gently, avoiding overmixing the batter.
- Allow the blondies to cool fully; warm bars will be too soft to cut cleanly due to the marshmallow fluff.
- Substitute gluten-free flour blend 1:1 for all-purpose flour to make this recipe gluten free.
- For easier transfer, use foil instead of parchment paper to line the pan.
- Store blondies in an airtight container at room temperature for up to 3 days or refrigerate for up to one week.
Nutrition
- Serving Size: 1 bar (assuming 16 bars)
- Calories: 320 kcal
- Sugar: 25 g
- Sodium: 150 mg
- Fat: 18 g
- Saturated Fat: 10 g
- Unsaturated Fat: 7 g
- Trans Fat: 0 g
- Carbohydrates: 38 g
- Fiber: 1 g
- Protein: 3 g
- Cholesterol: 45 mg


