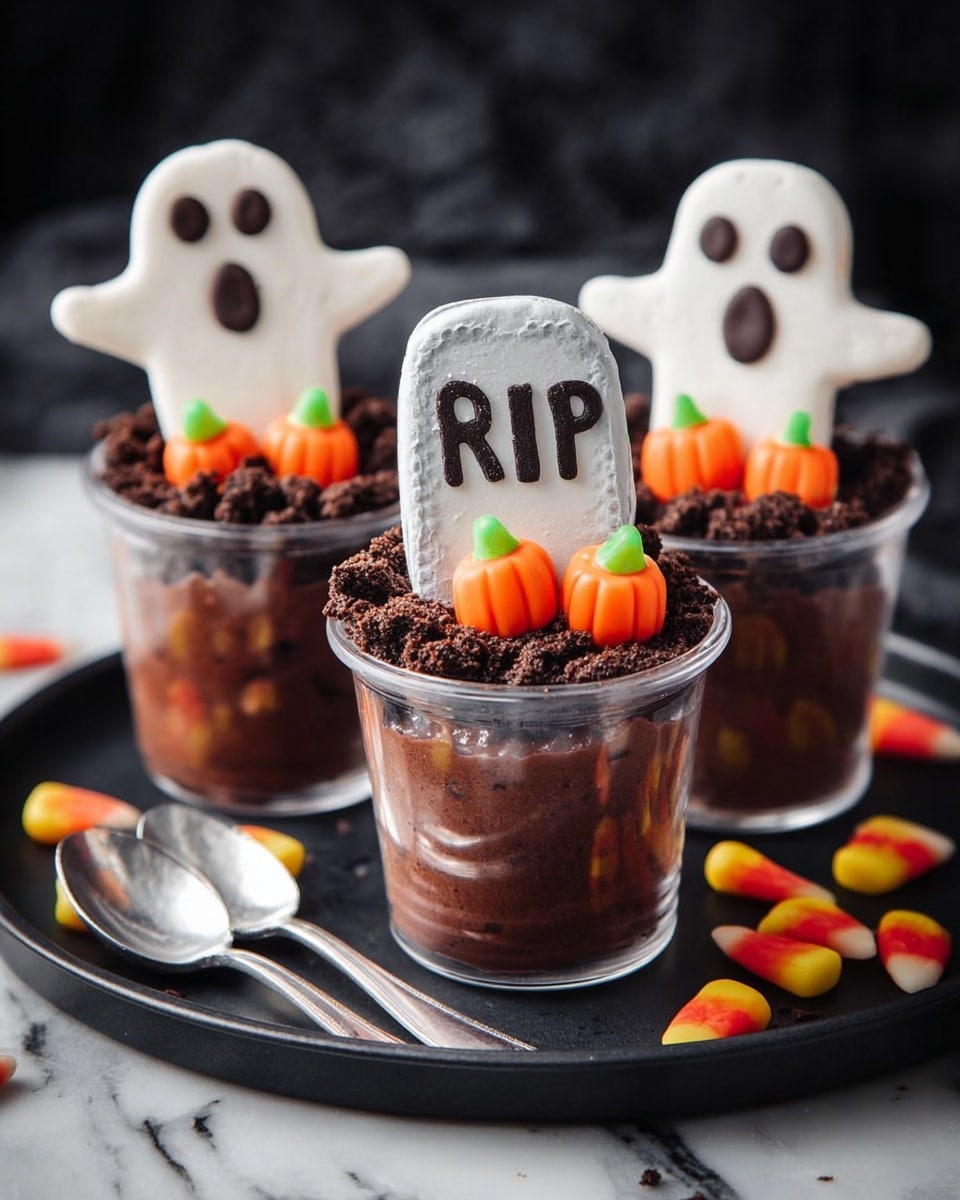
Ghosts in the Graveyard Dirt Pudding Cups Recipe
If you’re on the hunt for a fun, easy, and downright adorable Halloween treat, I have just the thing for you. This Ghosts in the Graveyard Dirt Pudding Cups Recipe is one of my go-to spooky desserts—it’s quick to make and guaranteed to bring smiles (and maybe a little shiver) to your gathering. Imagine creamy chocolate pudding layered with crunchy “dirt,” a cute marshmallow ghost, and a tiny tombstone cookie marked with “RIP.” Trust me, these pudding cups are way too cute to resist, and I can’t wait to walk you through exactly how to get them just right.
Why This Recipe Works
- Simplicity: You only need a handful of ingredients, and no baking required, so it’s perfect for quick prep—even with kids.
- Visual Appeal: The layered look with the “graveyard” decoration makes it a conversation starter at any Halloween party.
- Customizable: Easily swap out candy or cookies for your favorite spooky-themed treats to suit your taste or occasion.
- Crowd-pleaser: The balance of creamy pudding, crumbly “dirt,” and sweet decorations hits all the right notes for kids and adults alike.

Ingredients & Why They Work
These ingredients come together to create a rich chocolate base with just the right crunch and cuteness factor. Picking the right cookies and marshmallows can really elevate your Ghosts in the Graveyard Dirt Pudding Cups Recipe, so here are a few notes to help you shop.
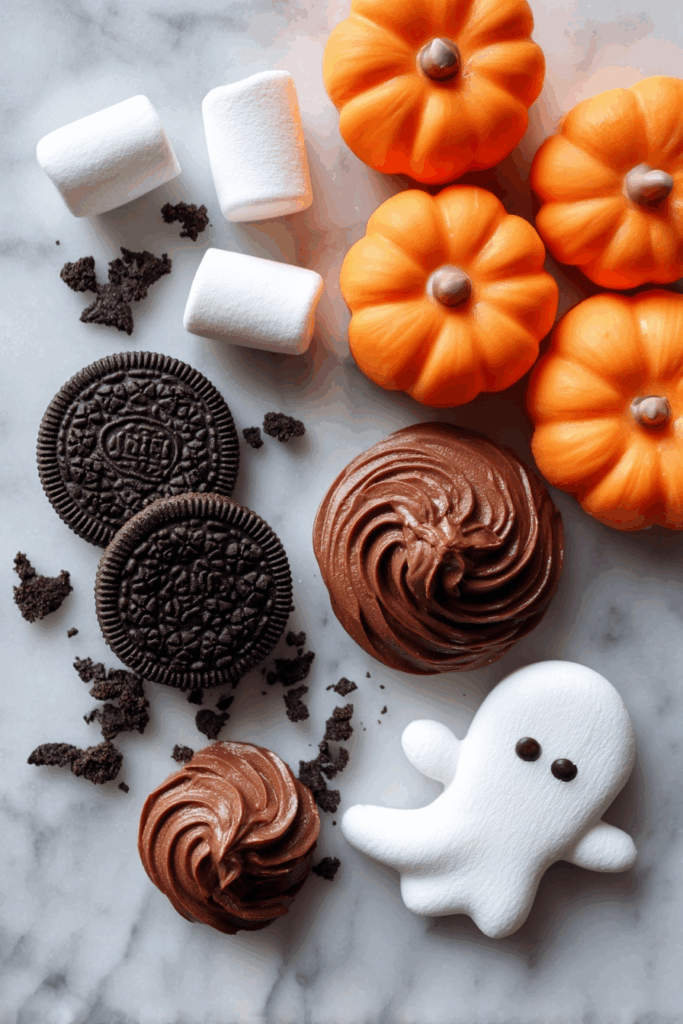
- Chocolate Pudding: The creamy foundation—homemade or store-bought both work, but use a rich chocolate flavor for best results.
- Chocolate Graham Cracker or Oreo Crumbs: Adds the perfect “dirt” texture with a little crunch; Oreo crumbs give a deeper chocolate flavor.
- Milano Cookie: I love its delicate crunch as the “headstone”—it holds up well when you pipe “RIP” on it.
- Chocolate Frosting: Essential for piping the “RIP” on your cookie—it’s easy to work with and sticks nicely to the cookie surface.
- Marshmallow Ghost: The star of the show! Look for fun shaped marshmallows (or make your own) to bring those friendly ghosts to life.
- Candy Pumpkins: Adds color and festive charm, plus a little sweet bite nestled in the “graveyard.”
Make It Your Way
I love playing around with the toppings and mix-ins in this Ghosts in the Graveyard Dirt Pudding Cups Recipe. It’s one of those desserts that really invites personal touches and creativity, so don’t be shy about making it your own!
- Variation: I once added gummy worms wriggling through the “dirt” layer for extra spooky fun—kids went wild for that!
- Dietary Modifications: Use dairy-free pudding and vegan cookies for a plant-based twist that’s just as tasty.
- Seasonal Changes: Swap candy pumpkins for candy ghosts or skulls to fit your party theme perfectly.
- Difficulty Levels: Keep it simple with pre-made pudding for an easy assembly, or make pudding from scratch if you want to impress.
Step-by-Step: How I Make Ghosts in the Graveyard Dirt Pudding Cups Recipe
Step 1: Scoop Your Chocolate Pudding Base
I always start with chilled pudding because it tastes best cold and sets the tone for the dessert. Spoon it into your clear plastic cups, filling them just about to the top—leave a little room so we can add our delicious graveyard layer. Be careful to get the surface as smooth as possible; it helps the crumb layer stick evenly.
Step 2: Sprinkle the “Dirt” Layer
Next, sprinkle the chocolate graham cracker or Oreo crumbs right on top of the pudding. I like using Oreo crumbs when I want it extra chocolaty, but graham cracker crumbs add a nice texture contrast. Don’t be shy—generous coverage looks awesome and makes every bite perfectly “dirty.”
Step 3: Decorate Your Graveyard
Here’s the fun part: using a piping bag or a small plastic bag with the corner snipped off, pipe “RIP” onto a Milano cookie with the chocolate frosting. Take your time here—this little headstone is the cute centerpiece of your graveyard. If your frosting is too stiff, warm it slightly so it flows smoothly. Place the cookie upright in the cup, then add the marshmallow ghost and candy pumpkins around it.
Step 4: Serve or Chill
You can serve these immediately, which I do when making them right before a party. Or cover with plastic wrap and refrigerate up to 24 hours. Just a heads-up, the cookies soften and marshmallows dry out the longer they sit, so I prefer to assemble close to serving time if I can.
Tips from My Kitchen
- Use Clear Cups: Using clear cups really shows off the layers and the cute graveyard scene—trust me, it makes a big difference.
- Frosting Consistency: If you find your frosting too thick to pipe “RIP,” warm it slightly or add a drop of milk to thin it out without losing stability.
- Cookie Placement: Insert the cookie a little angled for support—it’s less likely to topple over and looks more natural.
- Timing for Assembly: Assemble close to serving time if possible to keep cookies crisp and marshmallows fresh.
How to Serve Ghosts in the Graveyard Dirt Pudding Cups Recipe
Garnishes
I usually stick to the candy pumpkins and marshmallow ghosts because they create that classic graveyard vibe, but I love throwing in gummy worms or edible eyes to add a little spookier flair. Plus, a dusting of powdered sugar can mimic a light frost, which adds a cool texture and look.
Side Dishes
These pudding cups go wonderfully with simple finger foods like mini sandwiches or a veggie tray to balance sweetness. If it’s a party, I love pairing them with pumpkin spice popcorn or candy corn for a full Halloween spread.
Creative Ways to Present
For a Halloween party, I’ve tried serving these pudding cups inside a hollowed-out mini pumpkin or on a tray lined with artificial spider webs and plastic spiders for maximum creepy-cute effect. You can even add tiny LED lights under the cups for a glowing ghostly vibe—it’s always a showstopper!
Make Ahead and Storage
Storing Leftovers
I usually cover the cups tightly with plastic wrap and stick them in the fridge. They keep well for up to 24 hours, but after that, the cookie softens and marshmallows start to get less fluffy. If you’re making ahead, just wait to add the cookie and marshmallow until closer to serving.
Freezing
Honestly, I haven’t found freezing these pudding cups to be the best option. The texture of the pudding changes and the toppings suffer. If you must freeze, freeze before adding the marshmallow and cookie, and thaw fully in the fridge—just know it won’t be quite the same.
Reheating
This is a dessert you enjoy cold, so reheating isn’t really recommended. Instead, just let it sit at room temperature for a few minutes if it’s too cold right out of the fridge, and give the layers a gentle stir if the cookie is soggy and you want to blend everything beautifully.
FAQs
-
Can I make Ghosts in the Graveyard Dirt Pudding Cups Recipe without chocolate pudding?
Definitely! You can use vanilla pudding or even pumpkin-flavored pudding for a different twist. Just keep in mind the “dirt” topping is chocolate based, so vanilla will give a lighter, less intense flavor that still tastes great.
-
What can I use instead of Milano cookies for the tombstone?
Any flat, sturdy cookie works well—think rectangular shortbread, graham crackers cut into shape, or even an Oreo cookie split in half. Just make sure it can hold the piped frosting without crumbling.
-
How do I keep the marshmallow ghosts from drying out?
The best method is to assemble the marshmallow ghosts right before serving. Storing the pudding cups with marshmallows for too long causes them to dry out or harden.
-
Can I prepare these for a large party?
Absolutely! This recipe scales beautifully. Just prep the pudding and crumbs in batches and pipe “RIP” on cookies ahead of time. Assemble just before your guests arrive for freshest results.
Final Thoughts
Honestly, I can’t recommend this Ghosts in the Graveyard Dirt Pudding Cups Recipe enough if you want a delightful, spooky dessert with minimal fuss. It’s my secret weapon for Halloween entertaining—fun for kids, easy to make, and utterly adorable on the table. Give it a try this season, and I’m pretty sure it’ll become one of your favorites too. Happy haunting—and happy eating!
Print
Ghosts in the Graveyard Dirt Pudding Cups Recipe
- Prep Time: 10 minutes
- Cook Time: 0 minutes
- Total Time: 10 minutes
- Yield: 1 serving
- Category: Dessert
- Method: No-Cook
- Cuisine: American
Description
Halloween-themed Ghosts in the Graveyard Dirt Pudding Cups featuring chocolate pudding, cookie crumbs, decorated Milano cookie headstones, marshmallow ghosts, and candy pumpkins for a fun and spooky dessert.
Ingredients
Main Ingredients
- 8 ounces prepared chocolate pudding
- 2 tablespoons chocolate graham cracker crumbs
- 1 Milano cookie
- Chocolate frosting, for piping
- 1 marshmallow ghost
- 3 candy pumpkins
Instructions
- Prepare pudding: Place the prepared chocolate pudding into a clear plastic cup almost to the top.
- Add crumbs: Sprinkle the chocolate graham cracker crumbs evenly over the top of the pudding to resemble dirt.
- Decorate cookie: Using chocolate frosting with a small decorating tip or a plastic bag with a corner snipped off, pipe the letters “RIP” onto the Milano cookie to create the headstone.
- Assemble decorations: Arrange the Milano cookie, marshmallow ghost, and candy pumpkins carefully in the cup to create the ‘graveyard’ look.
- Serve or store: Serve immediately, or cover with plastic wrap and refrigerate for up to 24 hours before serving.
- Repeat: Repeat these steps to assemble additional pudding cups as needed.
Notes
- Scale the recipe to create the desired number of pudding cups for your group.
- For small prepared pudding cups, you will need about 2 cups to fill each 9-ounce plastic cup adequately.
- Add gummy worms, candy spiders, or other Halloween-themed candies for extra spooky fun.
- The pudding cups can be stored covered in the refrigerator for up to 24 hours, but the cookies may become soggy and marshmallows may dry out over time.
- Serve chilled for best taste and texture.
Nutrition
- Serving Size: 1 cup
- Calories: 300 kcal
- Sugar: 25 g
- Sodium: 150 mg
- Fat: 12 g
- Saturated Fat: 6 g
- Unsaturated Fat: 5 g
- Trans Fat: 0 g
- Carbohydrates: 45 g
- Fiber: 2 g
- Protein: 3 g
- Cholesterol: 20 mg


