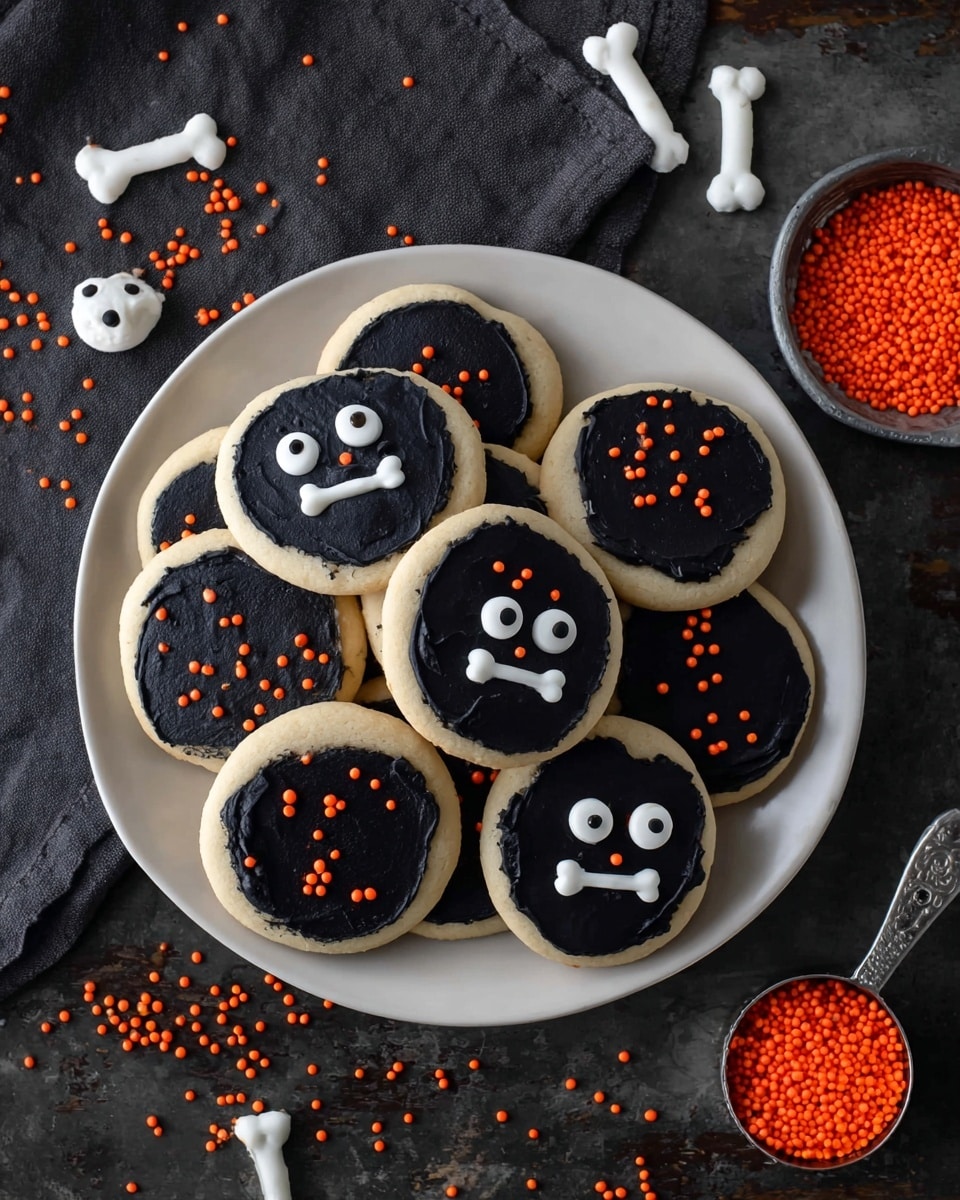
Frosted Halloween Sugar Cookies Recipe
If you’re anything like me and love a good festive treat, you’ll adore this Frosted Halloween Sugar Cookies Recipe. These cookies not only taste buttery and perfectly sweet but the frosting gets that rich, deep black color that makes them stand out at any Halloween party. Trust me, once you bake and frost these, you’ll be the star of your next spooky gathering. Let me walk you through everything you need to know to get these just right, from mixing the dough to getting that frosting to look just pumpkin-perfect.
Why This Recipe Works
- Classic Sugar Cookie Base: The blend of baking powder and cornstarch creates a tender, chewy texture that’s not too cakey or hard.
- Rich, Fluffy Black Frosting: Using gel food coloring makes the black frosting pop without watering it down or changing its consistency.
- Perfect Size & Bake Time: The cookie scoop size and baking time balance gives you soft edges with a slight crisp on the outside.
- Festive, Fun Sprinkles: Adding orange nonpareils and spooky sprinkles brings that Halloween vibe to life and adds delightful texture.

Ingredients & Why They Work
Every ingredient in this Frosted Halloween Sugar Cookies Recipe plays a role in flavor, texture, or that perfect bake. I always suggest using fresh butter and good quality vanilla extract — it really makes a difference. Plus, when it comes to sprinkles, picking fun, themed ones instantly amps up the Halloween spirit.

- All-purpose flour: The backbone of your cookie, it gives structure without weighing them down.
- Cornstarch: Makes the cookies extra soft and tender — a little secret that changes everything.
- Baking powder: Helps the cookies rise just enough for a soft bite without puffing up too much.
- Salt: Enhances the sweetness and balances the flavors perfectly.
- Unsalted butter: Using room temperature butter ensures it blends smoothly and makes those cookies rich.
- Granulated sugar: Gives the dough a nice sweetness and helps with the crispy edges.
- Egg: Binds it all together and adds a bit of moisture.
- Vanilla extract: Classic flavor that brightens every bite.
- Almond extract: A personal favorite — it adds just that little nutty twist which feels so festive.
- Powdered sugar: For the frosting’s signature creamy and smooth texture.
- Black gel food coloring: The type of coloring is key here — gel intensifies the color without thinning the frosting.
- Milk or heavy cream: Optional for frosting consistency — add just a splash if it’s too thick.
- Sprinkles (orange nonpareils, skeleton bones & candy eyeballs): To decorate and really bring out the Halloween vibe.
Make It Your Way
I love to switch up my Frosted Halloween Sugar Cookies Recipe depending on mood and occasion. You can absolutely add your twist by swapping extracts or decorating styles — the base is forgiving and fun that way.
- Variation: I once tried adding a pinch of pumpkin pie spice to the dough for an autumnal flavor boost — it was a hit at my book club gathering!
- Dietary modifications: For dairy-free, sub the butter for a plant-based spread and almond milk in the frosting.
- Seasonal changes: Just swap the sprinkles for hearts and pastel colors for a totally different holiday vibe.
Step-by-Step: How I Make Frosted Halloween Sugar Cookies Recipe
Step 1: Gather and Prep Ingredients
Before you dive in, I recommend lining your baking sheets with parchment paper or silicone mats. It stops the cookies from sticking and keeps your bakeware happy. Next, preheat your oven to 350º F. This way, it’s ready the moment your dough is mixed, helping with even baking.
Step 2: Mix Your Dry Ingredients
In a medium bowl, whisk together the all-purpose flour, cornstarch, baking powder, and salt. This distributes everything evenly so you don’t get any funky salty spots. Set aside while you cream the butter and sugar.
Step 3: Cream Butter and Sugar
Using an electric mixer on low, beat your room-temperature butter and granulated sugar for about 1 minute until fluffy and smooth. I like to scrape down the sides once halfway — it speeds things up and gets a nice even texture.
Step 4: Add Egg and Extracts
Drop in the egg, vanilla, and almond extracts. Beat for another 20 seconds until fully incorporated. The almond adds that subtle festive kick that’s just delicious. If you skip it, your cookies will still be wonderful, just a little more traditional.
Step 5: Combine Dry and Wet Ingredients
Slowly mix in the dry flour mixture on low speed for about 1 minute. The dough will look crumbly here — don’t panic! Grab a spatula and press the dough together gently right in the bowl. This step ensures you don’t overwork the dough, which keeps the cookies soft.
Step 6: Portion and Bake
I use a cookie scoop to portion the dough into about 2.5 to 3 tablespoon balls for nice large cookies. Place them about 2-3 inches apart so they have room to spread, then flatten gently with your palm. Bake the cookies for 13-15 minutes — smaller ones need just 10-12 minutes. The edges should be set but the centers soft.
Step 7: Cool Completely Before Frosting
Patience here pays off! Let your cookies cool fully on a wire rack so the frosting doesn’t melt. Believe me, I’ve ruined a batch by rushing this part — take your time and enjoy the anticipation.
Step 8: Make the Frosting
This part is fun and a little magical. Beat the butter, powdered sugar, and vanilla for 1-2 minutes until fluffy. Then stir in black gel food coloring slowly to get that iconic Halloween black — I used Wilton brand and made the frosting the day before to deepen the color. If your frosting’s thick, add a splash of milk or heavy cream — but just a tsp at a time!
Step 9: Frost and Decorate
Spread the frosting evenly over each cookie. Don’t be shy with the amount — this frosting is pure delight! Then sprinkle on your orange nonpareils, candy eyeballs, or skeleton bones. You’ll get tons of compliments, I promise.
Tips from My Kitchen
- Chill Dough If Needed: If your dough feels too soft and sticky, pop it in the fridge for 20 minutes to make scooping easier.
- Use Gel Coloring Only: Liquid colors can thin your frosting; gel keeps it thick and vibrant.
- Bake One Sheet at a Time: Ensures even heat circulation and perfectly baked cookies every batch.
- Don’t Skip Cooling: Frosting melts on warm cookies and ruins the look; wait until completely cool.
How to Serve Frosted Halloween Sugar Cookies Recipe
Garnishes
I love how simple orange nonpareils brighten these black-frosted cookies — it’s an easy, DIY way to add that Halloween pop. Candy eyeballs give a playful spooky touch kids adore, and skeleton bone sprinkles up the creepy-cute factor. If you’re feeling extra crafty, a drizzle of white royal icing adds cool spiderweb details.
Side Dishes
These cookies pair wonderfully with a warm cup of spiced pumpkin latte or even some rich hot chocolate with marshmallows—great for chilly fall nights. For a party buffet, I arrange them alongside caramel apples and candied popcorn for fun fall flavors all in one spot.
Creative Ways to Present
I like serving these on a black slate plate to let the colors shine. For parties, I set them up in a Halloween-themed tin with parchment paper and some orange shredded paper filler. Wrapping a few dozen in cellophane bags with a festive ribbon also makes a perfect treat to give neighbors or coworkers.
Make Ahead and Storage
Storing Leftovers
Once cooled and frosted, I keep leftover cookies in an airtight container at room temperature for up to 3-4 days. They stay soft and the frosting keeps its charm. Just make sure to layer them with parchment paper so they don’t stick together.
Freezing
I freeze these cookies both before and after frosting. Freeze unbaked dough balls on a tray, then transfer to a bag. Bake from frozen with an extra minute or two. For frosted cookies, freeze on a tray until firm, then layer with wax paper in a container. Thaw at room temp for best results.
Reheating
While these cookies are best enjoyed fresh, if you want that “just-baked” warmth, pop a cold cookie in the microwave for 5-7 seconds—frosting stays creamy, and the cookie softens without getting tough.
FAQs
-
Can I make the dough ahead of time for this Frosted Halloween Sugar Cookies Recipe?
Absolutely! You can prepare the dough a day or two in advance and keep it refrigerated tightly wrapped. It actually helps the flavors meld and makes the dough easier to handle when scooping. Just bring it back to room temperature before shaping and baking.
-
Why is my frosting not turning out black enough?
Gel food coloring is your best friend here. Using liquid food coloring tends to water down the frosting and dulls the color. Also, making the frosting the day before helps deepen that black as it sits. If you want even darker results, add coloring in increments and avoid over-mixing.
-
How do I keep my sugar cookies soft and fresh?
Storing them in an airtight container layered with parchment paper at room temperature is ideal. Avoid refrigeration which can dry cookies out unless they’re sealed very well. The cornstarch in the dough also helps keep them soft longer than standard sugar cookies.
-
Can I use these cookies for cookie cutters to make shapes?
Yes! Just chill the dough first—at least 30 minutes—to make rolling and cutting easier and to help cookies hold their shape better during baking. These cookies maintain a tender texture but hold up nicely as cut-outs.
Final Thoughts
This Frosted Halloween Sugar Cookies Recipe isn’t just another cookie — it’s a ritual for me each fall that brings out the kid in me and fills my kitchen with joy (and a little mess). The buttery dough, paired with that signature black frosting and festive sprinkles, makes every bite something special. So whether you’re baking for family, friends, or just yourself, give this a go — I promise it’s worth every minute. I’m cheering you on from my kitchen, and I can’t wait to hear how yours turn out!
Print
Frosted Halloween Sugar Cookies Recipe
- Prep Time: 10 minutes
- Cook Time: 15 minutes
- Total Time: 55 minutes
- Yield: 15 cookies
- Category: Dessert
- Method: Baking
- Cuisine: American
Description
These Frosted Halloween Sugar Cookies are soft, buttery, and perfectly sweet, topped with a rich black frosting and festive sprinkles. Ideal for Halloween parties, these cookies combine classic flavors with spooky decorations for a fun and delicious treat.
Ingredients
Cookie Dough
- 2 ¼ cups (270g) all purpose flour
- ½ tsp cornstarch
- 1 tsp baking powder
- ¼ tsp salt
- ½ cup (113g) unsalted butter, 1 stick, room temperature
- 1 cup (198g) granulated sugar
- 1 large egg
- 1 tsp vanilla extract
- ¼ tsp almond extract
Frosting
- ½ cup (113g) unsalted butter, 1 stick, room temperature
- 2 ½ cups (283g) powdered sugar
- ½ tsp vanilla extract
- 1 tsp milk or heavy cream, if needed
- Black gel food coloring (Wilton brand recommended)
- Sprinkles: orange nonpareils, skeleton bones, candy eye balls
Instructions
- Preheat and Prepare: Preheat the oven to 350º F. Line a baking sheet with a silicone mat or parchment paper to prevent sticking.
- Mix Dry Ingredients: In a medium mixing bowl, combine the flour, cornstarch, baking powder, and salt, then set aside.
- Cream Butter and Sugar: In a larger mixing bowl, beat the unsalted butter and granulated sugar on low speed for 1 minute with an electric mixer until smooth and fluffy.
- Add Eggs and Extracts: Beat in the large egg, vanilla extract, and almond extract for about 20 seconds until well combined.
- Combine With Dry Ingredients: Gradually add the dry ingredients to the wet mixture, mixing on low speed for 1 minute until crumbly. Use a spatula to work the dough together gently.
- Shape Cookies: Use a cookie scoop to form dough balls about 2.5-3 tablespoons each for large cookies. Place them 2-3 inches apart on the prepared baking sheet. Flatten each dough ball gently with your palm.
- Bake Cookies: Bake in the preheated oven for 13-15 minutes until edges are lightly golden. For smaller cookies, bake 10-12 minutes. Allow the cookies to cool completely on a wire rack.
- Prepare Frosting: In a clean mixing bowl, beat the unsalted butter, powdered sugar, and vanilla extract with an electric mixer until fluffy, about 1-2 minutes.
- Add Color: Mix in black gel food coloring until the frosting is evenly colored. For deeper color, prepare the frosting 24 hours in advance and cover it at room temperature to let it darken.
- Decorate Cookies: Spread the black frosting evenly over cooled cookies. Top with orange nonpareils, skeleton bones, and candy eyeball sprinkles for a festive look.
Notes
- Make the frosting a day ahead to deepen the black color for a richer appearance.
- If the frosting is too thick, add 1 tsp of milk or heavy cream to achieve a spreadable consistency.
- Flatten cookies before baking to ensure even cooking and avoid overly puffy cookies.
- Adjust baking time according to cookie size; smaller cookies bake faster than larger ones.
- Use gel food coloring for vibrant coloring without thinning the frosting.
Nutrition
- Serving Size: 1 cookie
- Calories: 180 kcal
- Sugar: 15 g
- Sodium: 90 mg
- Fat: 9 g
- Saturated Fat: 5 g
- Unsaturated Fat: 3 g
- Trans Fat: 0 g
- Carbohydrates: 22 g
- Fiber: 0 g
- Protein: 1 g
- Cholesterol: 25 mg


