Danish Butter Cookies Recipe
If you’ve ever craved that perfect melt-in-your-mouth treat that tastes like a little piece of heaven, you’re in for a real delight. This Danish Butter Cookies Recipe is one I keep coming back to because it’s simple, buttery, and irresistibly crispy—just like those classic cookies you find in those beautiful tins around the holidays. Stick around: I’ll share insider tips and tricks to ensure your cookies come out flawless every single time.
Why This Recipe Works
- Perfect Butter Balance: Using European salted butter makes the cookies rich and flavorful with just the right saltiness.
- Dual Flour Blend: Combining all-purpose and cake flour gives the cookies a delicate, tender crumb that’s crisp yet melts in your mouth.
- Chilling the Dough: Refrigerating the shaped cookies prevents spreading for those iconic shapes and a perfect texture.
- Simple Yet Classic: Minimal ingredients mean it’s easy to bake with confidence and customize to your liking.

Ingredients & Why They Work
Each ingredient here plays a crucial role in creating the iconic Danish butter cookie texture and flavor. Choosing quality butter and balancing your flours is key to raising these from good to truly unforgettable. Here’s what to look out for when you shop.

- European salted butter: This butter has a higher fat content and adds just the right hint of salt to balance the sweetness, enhancing the flavor beautifully.
- Granulated sugar: Sweetens the dough while helping create that light, crisp texture.
- Salt: Even though we use salted butter, a pinch of salt enhances all the flavors.
- Egg yolks: These enrich the dough, adding a tender crumb and a lovely golden color.
- Vanilla extract: Gives the cookies their warm, inviting aroma.
- Whole milk: Just a splash softens the dough to make it pipeable and perfect for shaping.
- All-purpose flour: Provides structure while still light enough for a tender cookie.
- Cake flour: Lowers protein content, helping the cookies stay soft and crumbly.
- Coarse sugar for decorating: Optional, but adds a pretty sparkle and a satisfying crunch on top.
Make It Your Way
While I adore the classic Danish Butter Cookies Recipe as-is, I love playing with flavors and shapes depending on the season or occasion. You should totally make it your own! It’s so forgiving and adaptable, perfect for getting creative or keeping it simple.
- Variation: I like to add a sprinkle of finely chopped almonds or a tiny dash of cardamom for a cozy twist during winter holidays—it really ups the flavor game.
- Gluten-Free Option: Try swapping the flours for a 1:1 gluten-free baking blend, though keep in mind the texture will shift a bit, but still delicious.
- Dairy-Free Swap: Use a high-fat vegan butter and a splash of almond or oat milk for a tasty dairy-free batch that friends rave about.
Step-by-Step: How I Make Danish Butter Cookies Recipe
Step 1: Ready Your Workspace & Chill Spot
I always start by clearing space in my fridge because these cookies need a good chill after shaping—this stops them from flattening during baking. Line two baking sheets with parchment or silicone mats and keep them handy; you’ll thank yourself later when things get fast and fun.
Step 2: Cream Butter, Sugar & Salt
Get your stand mixer ready with the paddle attachment. Beat the room temp butter on medium till it’s soft and smooth. Then slowly sprinkle in the sugar and salt with the mixer on low—you want this creamy and fluffy, which really traps air and makes the cookies lighter. I find this step absolutely critical to that delicate texture.
Step 3: Add Egg Yolks, Vanilla & Milk
Keep the mixer on medium and add your egg yolks, vanilla extract, and milk. This combo adds richness and just enough moisture to make the dough malleable but not sticky. Don’t rush—scrape down the bowl sides so everything blends perfectly and you don’t get dry flour surprises later.
Step 4: Mix in the Flour Blend
Whisk your all-purpose and cake flours together before adding to the mixer—in two parts for easier mixing. Use low speed and stop as soon as flour disappears. If your dough is still too stiff or hard to pipe, add another tablespoon of milk. Trust me, the right dough consistency is your secret weapon here!
Step 5: Pipe & Chill
Fill a large piping bag with the dough fitted with a ½-inch open star tip. Pipe cookies into your favorite classic shapes—rosettes, circles, pretzels, whatever you love—keeping them at least 2 inches apart. Then sprinkle with coarse sugar if you want a festive sparkle. Pop the whole tray in the fridge for 20-30 minutes so the cookies hold their shape better while baking.
Step 6: Bake to Golden Perfection
Heat your oven to 350°F with the rack in the middle. Bake for 10-15 minutes or until the edges just start to turn golden (watch closely—cookies go from done to overdone fast). Let them cool on the tray for 5 minutes before transferring to a wire rack to cool completely. This keeps them from breaking while still warm.
Tips from My Kitchen
- Butter Temperature: Leaving butter out for about 45 minutes gets it to the perfect soft, but not too melty stage—this makes creaming easier and dough smoother.
- Don’t Overmix: Once flour goes in, mix just enough to combine to avoid gluten development that can toughen your cookies.
- Watch Your Oven: Ovens can vary, so start checking these babies at 10 minutes. I always do a test cookie to find the perfect timing for my oven.
- Flour Measuring: Using a kitchen scale is a game-changer here—too much flour can dry out your cookies, so weigh it or gently spoon flour into your cup, then level it with a knife.
How to Serve Danish Butter Cookies Recipe

Garnishes
I love finishing these cookies with a sprinkle of coarse sugar for that extra sparkle and crunch. Around holidays, I sometimes dip one half in melted dark chocolate or drizzle a little white chocolate on top. It’s an easy upgrade that makes guests go “wow!”
Side Dishes
Serve these butter cookies alongside a steaming cup of your favorite tea, a robust coffee, or even hot cocoa for the kids. They also pair wonderfully with fresh fruit or light berry compote for a little balance in sweetness.
Creative Ways to Present
If you’re gifting cookies or hosting a party, arrange them in pretty tins or stack on tiered plates with doilies. I once made a cookie platter in festive shapes for Christmas—it instantly became the centerpiece of the dessert table! Adding little tags with flavors or messages adds a personal touch.
Make Ahead and Storage
Storing Leftovers
I store these Danish Butter Cookies in an airtight container at room temperature for up to 5 days. They keep their crisp edges and tender inside beautifully—just be sure your container is sealed tight to avoid any moisture sneak-ins.
Freezing
I often freeze the shaped, unbaked dough on the baking sheets, then transfer them to a freezer-safe bag. When you’re ready, bake straight from frozen—just add a couple of extra minutes to the bake time. It’s perfect for making batches ahead or spontaneous cookie cravings.
Reheating
If you want to refresh the cookies, a quick 3-4 minute warmup in a 300°F oven brings back that fresh-baked crispness without drying them out. Avoid microwaving as it softens the cookies too much.
FAQs
-
Can I use unsalted butter instead of salted?
Absolutely! Just add an extra ¼ teaspoon of kosher salt to compensate and bring out the full buttery flavor.
-
Why do I need to chill the cookies before baking?
Chilling solidifies the butter, preventing the cookies from spreading too much in the oven. This way, you get those perfectly shaped, classic cookies with crisp edges.
-
Can I make these cookies without a piping bag?
You can dollop spoonfuls of the dough, but piping gives you the traditional elegant shapes and texture. If you don’t have a piping bag, try using a zip-top bag with the corner cut or a plastic bag folded over a wooden spoon handle.
-
What if my dough is too stiff to pipe?
Just add another tablespoon of milk to soften the dough slightly—it should pipe smoothly but hold its shape.
-
Can I substitute cake flour with all-purpose flour?
Yes, but your cookies may be a tiny bit less tender. To compensate, use 260 grams of all-purpose flour instead of mixing both flours.
Final Thoughts
This Danish Butter Cookies Recipe holds a special place in my heart—it’s one of those simple, classic recipes that never fails to bring joy to my kitchen and guests alike. Whether you’re baking for a holiday, a cozy afternoon tea, or just treating yourself, these cookies deliver comfort in every buttery, crisp bite. I’m confident that once you try making them, you’ll keep this recipe close, just like I do. So, grab your ingredients and start piping—your perfect batch of Danish butter cookies awaits!
Print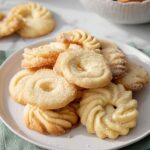
Danish Butter Cookies Recipe
- Prep Time: 15 minutes
- Cook Time: 15 minutes
- Total Time: 1 hour 30 minutes
- Yield: 24 cookies
- Category: Dessert
- Method: Baking
- Cuisine: Danish
- Diet: Vegetarian
Description
These Danish Butter Cookies are melt-in-your-mouth delights with a crisp yet tender texture. Made with a combination of all-purpose and cake flour for the perfect balance, they are piped into classic shapes, chilled to prevent spreading, and baked until just lightly golden. Perfect for festive occasions or anytime you crave a buttery, delicate cookie.
Ingredients
Wet Ingredients
- 1 cup (227 g) European salted butter room temperature
- 2 egg yolks
- 2 teaspoons (10 g) vanilla extract
- 1 tablespoon (15 g) whole milk or more to soften
Dry Ingredients
- ½ cup (100 g) granulated sugar
- ⅛ teaspoon salt
- 2 cups (220 g) all-purpose flour
- ½ cup (50 g) cake flour
For Decorating
- Coarse sugar for decorating
Instructions
- Prepare the refrigerator and baking mats: Clear space in your refrigerator to accommodate the baking sheet for chilling the shaped cookies. Line two baking sheets with parchment paper or silicone baking mats and set them aside.
- Cream butter, sugar, and salt: In a stand mixer fitted with a paddle attachment, beat the room temperature butter on medium speed until smooth. Gradually add granulated sugar and salt while mixing on low speed, then increase to medium speed and beat until the mixture is light and fluffy.
- Add egg yolks, vanilla, and milk: With the mixer running on medium speed, add the egg yolks, vanilla extract, and milk. Continue mixing until fully combined, scraping down the bowl sides to ensure even mixing.
- Mix dry ingredients and add to wet mixture: In a separate bowl, whisk together the all-purpose flour and cake flour. Add the flour mixture to the mixer in two additions on low speed, mixing until fully incorporated. If the dough feels too stiff to pipe, add an additional tablespoon of milk.
- Pipe the cookies: Transfer the cookie dough into a piping bag fitted with a ½-inch open star tip. Pipe 2-inch shapes such as rosettes, pretzels, circles, or squares onto the prepared baking sheets. Space cookies at least 2 inches apart. Optionally, sprinkle coarse sugar or festive sprinkles on top. Chill the piped dough in the refrigerator for 20 to 30 minutes to prevent spreading.
- Preheat the oven: Preheat your oven to 350°F (175°C), positioning the rack in the middle.
- Bake the cookies: Bake the chilled cookies for 15 minutes or until the edges are just lightly golden. Allow them to cool on the baking sheet for about 5 minutes before transferring to a wire rack to cool completely to room temperature.
Notes
- Use room temperature butter for easier mixing and better texture; it should be slightly cool but soft enough to indent with a finger.
- Bring eggs to room temperature by placing them in warm water for 5 minutes to ensure even baking.
- Do not overmix the dough to prevent tough cookies due to gluten development.
- Watch your cookies closely during baking as times may vary with shapes and sizes.
- You can substitute all the flour with 260 grams of all-purpose flour if cake flour is unavailable; the texture will be slightly less tender.
- Measure flour accurately using a kitchen scale or spoon and level method to avoid dense cookies.
- If using unsalted butter, add ¼ teaspoon kosher salt to the dough.
- Store baked cookies in an airtight container at room temperature for up to 5 days or freeze for up to 3 months.
- You can chill shaped cookies for up to 2 days before baking; cover if chilling longer than 30 minutes.
- Frozen unbaked-shaped dough can be kept for 2-3 months; bake from frozen with a couple of extra minutes baking time.
Nutrition
- Serving Size: 1 cookie
- Calories: 90 kcal
- Sugar: 4 g
- Sodium: 45 mg
- Fat: 6 g
- Saturated Fat: 3.5 g
- Unsaturated Fat: 2 g
- Trans Fat: 0 g
- Carbohydrates: 8 g
- Fiber: 0.2 g
- Protein: 1 g
- Cholesterol: 25 mg

