Creepy Halloween Spider Cupcakes Recipe
If you’re looking to wow your friends (and maybe spook a few kids) this Halloween, you’ve got to try this Creepy Halloween Spider Cupcakes Recipe. They’re not just delicious—they’re seriously fun and way easier to make than they look. Trust me, once you nail the chocolatey cupcake base and the silky black buttercream, piping those little spider legs and eyes is just the icing on the cake… or should I say, cupcake?
Why This Recipe Works
- Moist and Fluffy Cupcakes: Using pumpkin puree makes these chocolate cupcakes wonderfully moist without extra oil or butter.
- Rich Black Buttercream: The combo of black cocoa powder and food coloring gives the frosting that intense, spooky black shade perfect for Halloween.
- Simple Yet Effective Decoration: Fondant circles topped with piped spiders turn ordinary cupcakes into creepy critters that impress every time.
- Step-by-Step Guidance: Detailed instructions and handy tips help you avoid common mistakes and get perfect results even if you’re baking at home for the first time.

Ingredients & Why They Work
The magic of this Creepy Halloween Spider Cupcakes Recipe really comes alive thanks to the mix of ingredients that deliver flavor, texture, and that classic fall vibe. Don’t skip the pumpkin spice—it gives these cupcakes a warm, seasonal twist that blends perfectly with the chocolate. And the black cocoa powder? It’s the secret behind that deep, dark frosting color that makes your spiders look extra eerie.
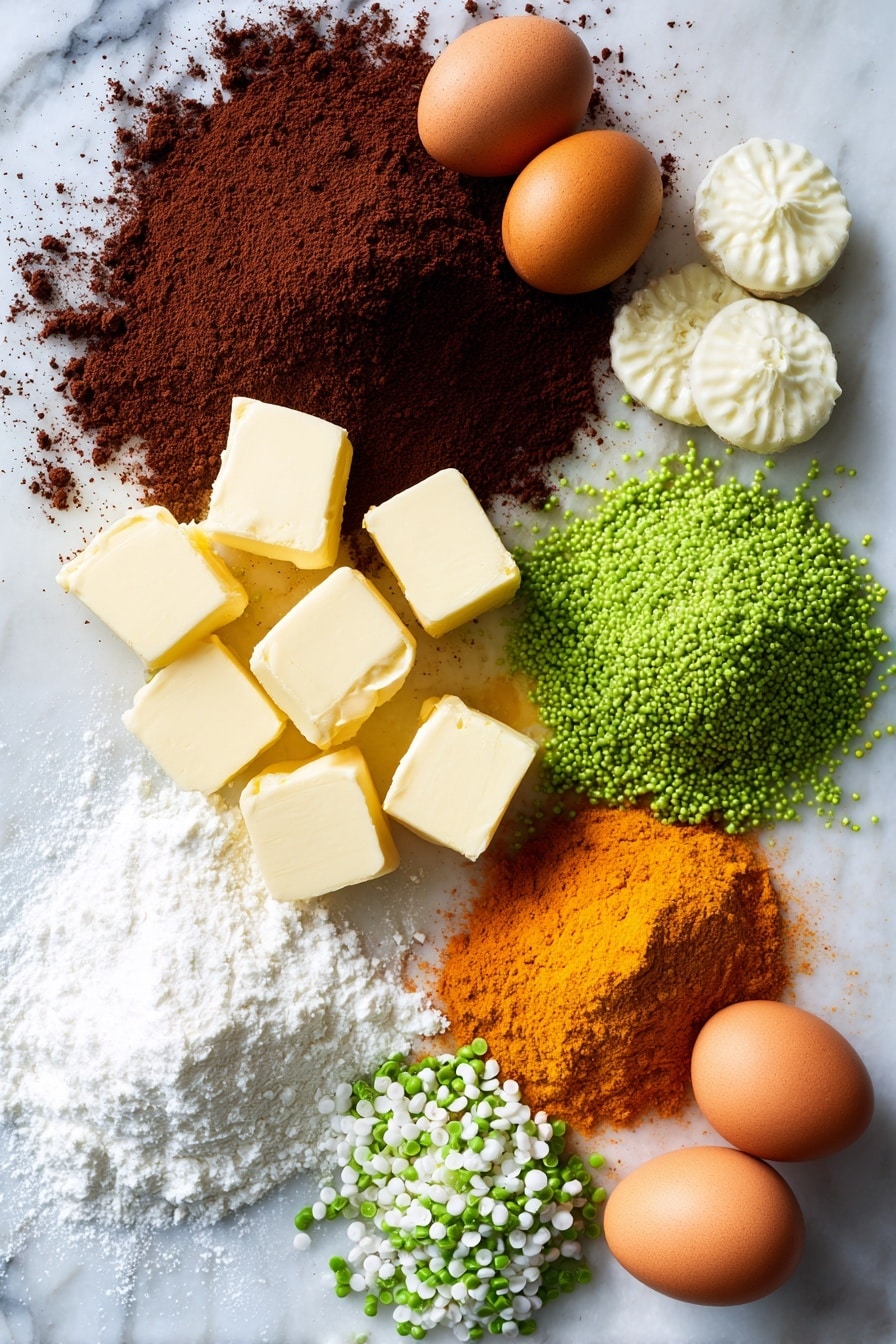
- Self-raising flour: Gives the cupcakes a nice rise without needing to add extra leavening separately, making the batter smooth and easy to work with.
- Cocoa powder: Adds rich chocolate flavor; I use Dutch-process for a smoother taste but natural cocoa works too.
- Butter (salted): Adds richness and moisture; salted butter helps balance the sweetness.
- Granulated sugar: Sweetens and helps with the cupcakes’ structure; creaming it with butter gives fluffy cupcakes.
- Eggs: Bind everything together and contribute to the tender texture.
- Pumpkin puree: Keeps the cupcakes moist and adds that delicious fall flavor; make sure it’s plain pumpkin, not pumpkin pie filling.
- Milk: Moisturizes the batter, ensuring a soft crumb.
- Baking powder: Ensures extra lift; even with self-raising flour, a little boost helps.
- Salt: Enhances all the flavors, especially chocolate.
- Pumpkin pie spice: Gives that signature autumn warmth—you can substitute with cinnamon and nutmeg if you like.
- Vanilla extract: Rounds out flavors and brings balance to the cupcake and frosting.
- Powdered sugar: For a silky smooth frosting texture; sift it to avoid lumps.
- Black cocoa powder: Provides intense chocolate flavor and a deeper black shade to the buttercream.
- Black food coloring: Just a few drops help achieve that perfect spider-black frosting shade—gel colors are best.
- White fondant: Used to make spider bodies and give cupcakes that polished look — remember to dust your surface with cornstarch to prevent sticking.
- Tiny green sprinkles: These little sprinkles make the spiders’ eyes pop right off the cupcakes—fun and creepy!
Make It Your Way
I love personalizing this Creepy Halloween Spider Cupcakes Recipe depending on the mood and the crowd. Sometimes I add a pinch more spice like ground cloves for a deeper fall vibe, or swap the pumpkin puree for apple sauce if I’m feeling adventurous. You should definitely play around until you find your perfect spooky flavor combo.
- Variation: I’ve tried swapping the cocoa powder for dark chocolate melted into the batter, and it turns the cupcakes super fudgy—just make sure to let the batter cool a bit before mixing.
- Dietary Modifications: To make these vegan, replace eggs with flax eggs and use a plant-based butter alternative, plus a non-dairy milk. It’s super doable!
- Gluten-Free: I’ve used a 1-to-1 gluten-free baking flour with self-raising properties and it came out surprisingly well—just keep an eye on the bake time.
- Spice Level: Adjust the pumpkin pie spice based on your crowd. Some like it subtle and sweet; others want more cinnamon kick.
Step-by-Step: How I Make Creepy Halloween Spider Cupcakes Recipe
Step 1: Prepare the Batter Like a Pro
Start by preheating your oven to 175°C (350°F) and lining your cupcake pan with muffin liners—that’s key to preventing sticking and makes cleanup easy. Whisk together your dry ingredients including self-raising flour, cocoa powder, pumpkin pie spice, baking powder, and salt, then sift them so your cupcakes come out light and airy. In a separate bowl, cream the butter and sugar until fluffy—this usually takes about 2 minutes with a mixer on medium speed. Don’t forget to scrape down the sides halfway through to avoid lumps. Add eggs one at a time, mixing well after each, then beat in the pumpkin puree—you’ll notice the batter looks curdled, but don’t worry, it’s supposed to! Lastly, gently fold in the dry ingredients alternating with milk, then stir in vanilla extract. Be careful not to overmix here or your cupcakes might get tough.
Step 2: Bake Perfectly Sized Cupcakes
Use a cookie scoop or an ice cream scoop to portion the batter into your liners—this helps keep every cupcake the same size, which means even baking. Fill each about three-quarters full. Pop them into the oven and bake for 15 to 18 minutes. You’ll know they’re done when a toothpick inserted smack in the center comes out clean or with just a few crumbs attached. After baking, let them cool for a few minutes in the tin, then move them to a wire rack. Cover with a kitchen towel to keep them moist—you don’t want your cupcakes drying out before the fun decorating part.
Step 3: Whip Up That Black Buttercream
While your cupcakes cool, start your frosting. Beat the butter until smooth and creamy, then sift in powdered sugar and black cocoa powder—sifting here saves you from gritty frosting, trust me. Mix the ingredients lightly with a spatula before cranking up the mixer. Scrape the bowl and beaters to mix everything evenly. Add vanilla, then let the frosting rest for 10 to 20 minutes so the black color from the cocoa can deepen. If it’s still not quite the jet black you imagined, a few drops of gel-based black food coloring will do the trick. Mix again and let sit a bit more for that perfect, spooky shade. Load your buttercream into a piping bag fitted with a star tip for the cupcake base, and another with a small round tip for the spider details.
Step 4: Decorate Your Creepy Halloween Spider Cupcakes
Start by piping reverse stars all over the top of each cupcake in a circular pattern—this creates a web-like textured effect. Next, roll out your fondant thinly and cut circles that fit neatly on each cupcake’s top. Gently place one fondant circle on each cupcake—the smooth white surface is the spider’s web. Switch your piping bag tip to the round one for spider details: pipe a small circle for the spider’s body and a smaller circle in front for the head. Add four little legs on each side by piping thin lines, then carefully place two tiny green sprinkles for the eyes using tweezers. This step always delights me—those little eyes make the spiders look alive! Don’t rush here; a steady hand makes all the difference.
Tips from My Kitchen
- Keep Batter Lumps at Bay: Sifting dry ingredients and scraping the bowl multiple times ensures even mixing and prevents lumps.
- Pumpkin Puree Counts: Using real pumpkin puree really takes these cupcakes to the next level—you can’t substitute with pumpkin pie filling because of extra sugars.
- Fondant Rolling Secret: Dust your surface with icing sugar or cornstarch to keep fondant from sticking while rolling it thin.
- Patience with Buttercream: Let the black buttercream rest to deepen the color before adding more food coloring; rushing can lead to watered down frosting and a dull finish.
How to Serve Creepy Halloween Spider Cupcakes Recipe
Garnishes
I like to keep the garnishes simple but striking—those tiny green sprinkles for the spider eyes really pop. Sometimes I scatter a few edible glitter flakes around the cupcake edges for a little extra Halloween magic. If you like a bit of crunch, a few crushed chocolate cookie crumbs sprinkled lightly on top evoke a “dirt” look that’s surprisingly fitting for spider webs!
Side Dishes
These cupcakes shine as a stand-alone treat, but if you’re hosting, pairing them with a tangy cranberry punch or spicy hot apple cider is a real crowd-pleaser. I’ve also served them alongside caramel popcorn or roasted pumpkin seeds for a crunchy counterpoint to the creamy cupcakes. Keep it fun and simple — no need to overcomplicate.
Creative Ways to Present
One of my favorite presentation tricks is to place the cupcakes on a black platter lined with faux spider webs (you can find those in craft stores). Adding little plastic spiders crawling here and there really sells the spooky vibe. I’ve also arranged them on a tiered cake stand with dim orange fairy lights around the base to create a Halloween centerpiece that’s both creepy and charming.
Make Ahead and Storage
Storing Leftovers
Since these cupcakes have buttercream and fondant, I store leftovers in an airtight container at room temperature in a cool, dry place. Keeping the fondant from sweating or getting soggy is crucial, so avoid the fridge unless your kitchen is super hot. They stay fresh for about 2-3 days this way.
Freezing
I freeze the cupcakes before decorating—once cooled, wrap each one tightly in plastic wrap and place them in a freezer-safe container. When you’re ready to decorate, thaw at room temperature for a few hours. Freezing after decorating isn’t ideal because the fondant and frosting might get damaged or stick together.
Reheating
These cupcakes are best enjoyed at room temperature. If refrigerated, just take them out about 30 minutes before serving. I don’t recommend microwaving since it can melt the buttercream and ruin the fondant, but if you must warm them, use a very low setting for just a few seconds.
FAQs
-
Can I make the cupcakes ahead of time?
Absolutely! You can bake the cupcakes up to 2 days in advance and store them covered at room temperature. For longer storage, freeze them uniced and decorate after thawing.
-
What if I don’t have black cocoa powder?
Regular cocoa powder will work, but your frosting won’t be as dark. You can boost the color by adding more black gel food coloring, but the flavor might be less intense.
-
Can I use store-bought frosting instead?
While you can, homemade buttercream has the perfect texture and flavor for this recipe. Store-bought frosting is often too soft and won’t hold the spider shape well.
-
How do I prevent the fondant from getting sticky?
Store the cupcakes in a cool, dry place away from humidity and don’t refrigerate. Dust your rolling surface and cutter with corn starch or powdered sugar when working with fondant.
-
Can I substitute the pumpkin puree?
You could try unsweetened applesauce, but the flavor and moisture level will change. Pumpkin puree gives that classic fall taste and moist crumb that’s hard to beat.
Final Thoughts
Making this Creepy Halloween Spider Cupcakes Recipe has become a little tradition in my kitchen every fall. The best part is seeing the smiles and “oohs” when these sweet little spiders make their debut on the dessert table. The recipe is friendly enough for bakers of all levels and fun for the whole family to decorate together. Seriously, give it a go—it’s the kind of treat that brings the Halloween spirit and the yummiest morning-after leftovers. Can’t wait to hear how your cupcakes turn out!
Print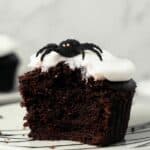
Creepy Halloween Spider Cupcakes Recipe
- Prep Time: 20 minutes
- Cook Time: 18 minutes
- Total Time: 1 hour 35 minutes
- Yield: 14 cupcakes
- Category: Dessert
- Method: Baking
- Cuisine: American
- Diet: Vegetarian
Description
Celebrate Halloween with these creepy chocolate spider cupcakes featuring moist pumpkin-infused chocolate cupcakes topped with black cocoa buttercream and decorated with white fondant spiders with tiny green sprinkle eyes. Perfect for festive parties and spooky treats.
Ingredients
Chocolate Cupcakes
- 180 g self raising flour
- 20 g cocoa powder
- 100 g salted butter
- 200 g granulated sugar
- 2 eggs
- 200 g pumpkin puree
- 100 ml milk
- ½ teaspoon baking powder
- ¼ teaspoon salt
- ½ teaspoon pumpkin pie spice
- 1 teaspoon vanilla extract
Buttercream
- 450 g powdered sugar
- 225 g salted butter
- 2 tablespoons black cocoa powder
- 2 tablespoons milk
- 1 teaspoon vanilla extract
- Black food coloring
Decoration
- 175 g white fondant
- Tiny green sprinkles (for the spiders’ eyes)
Instructions
- Bake the cupcakes: Preheat your oven to 175°C and line a cupcake pan with muffin liners. In a mixing bowl, whisk together the self-raising flour, cocoa powder, pumpkin pie spice, baking powder, and salt, then sift and set aside.
- Cream butter and sugar: In another bowl, combine the granulated sugar and salted butter and cream with a mixer on medium speed until light and fluffy, about 2 minutes. Scrape down the bowl sides halfway for even mixing.
- Add eggs: Beat in the eggs one at a time, ensuring each is fully incorporated before adding the next. Scrape the bowl sides midway through mixing to ensure thorough blending.
- Combine wet and dry ingredients: Add pumpkin puree and mix until combined, expecting the batter to curdle slightly. Fold in half the sifted flour mixture gently. Add milk and fold again, followed by the remaining flour mixture. Add vanilla extract and mix well without overmixing.
- Fill cupcake liners: Scoop the batter into the prepared cupcake liners, filling each about three-quarters full for ideal rise and texture.
- Bake: Bake in the preheated oven for 18 minutes or until a toothpick inserted into the center comes out clean. Let cupcakes rest in the pan for 1-2 minutes, then transfer to a wire rack to cool completely while covered with a kitchen towel to retain moisture.
- Make the buttercream: Beat the butter in a large bowl until smooth and creamy. Sift in powdered sugar and black cocoa powder. Lightly mix with a spatula before using the mixer again on medium speed until smooth and well combined, scraping down sides and beaters.
- Add flavor and color: Beat in vanilla extract. Let the buttercream rest for 10 to 20 minutes for the cocoa color to intensify. If not dark enough, add black food coloring or a combination of red, green, and brown gel colors. Mix well and rest again for another 10 to 15 minutes.
- Prepare piping bags: Transfer buttercream to a piping bag fitted with a star tip (#1M). Prepare another piping bag with a small round tip (#3) for spider details.
- Decorate cupcakes: Pipe a circle of reverse stars with the star tip buttercream on each cupcake. Roll out white fondant thinly (about 1/8 inch) and cut out 2-inch circles for each cupcake. Place the fondant circles in the center over the buttercream.
- Pipe spiders: Switch the buttercream to the round tip piping bag. Pipe a small circle for the spider’s body and a smaller circle in front for the head. Add 4 legs on each side with thin lines of buttercream.
- Add eyes: Use tweezers to place two tiny green sprinkles on the spider’s head for eyes. Repeat for all cupcakes to complete the creepy spider decoration.
Notes
- Scraping the bowl ensures no unmixed ingredients remain for a consistent batter.
- Using a cookie or ice cream scoop with a release mechanism helps maintain uniform cupcake sizes and even baking.
- Baking times depend on the cupcake liner size; adjust if using larger or smaller liners accordingly.
- Cover cupcakes with a kitchen towel while cooling to keep them moist and prevent drying out.
- Mixing powdered sugar and cocoa powder with a spatula before using the mixer helps prevent sugar from flying around and improves blending.
- Gel-based food coloring is preferred as it doesn’t affect buttercream texture like liquid dyes. Mixing red, green, and brown gels can substitute for black coloring.
- If the buttercream amount is too large for a single piping bag, use multiple bags and refill as needed for convenience.
- Knead fondant well and dust your workspace with icing sugar or cornstarch to prevent sticking before rolling.
- Fondant circles should fit the cupcake size; use a cutter corresponding to your cupcake diameter.
- Store decorated cupcakes in a cool, air-conditioned room to avoid fondant sogginess; avoid refrigeration to prevent condensation on fondant.
Nutrition
- Serving Size: 1 cupcake
- Calories: 350 kcal
- Sugar: 30 g
- Sodium: 150 mg
- Fat: 18 g
- Saturated Fat: 10 g
- Unsaturated Fat: 6 g
- Trans Fat: 0 g
- Carbohydrates: 45 g
- Fiber: 3 g
- Protein: 4 g
- Cholesterol: 60 mg


