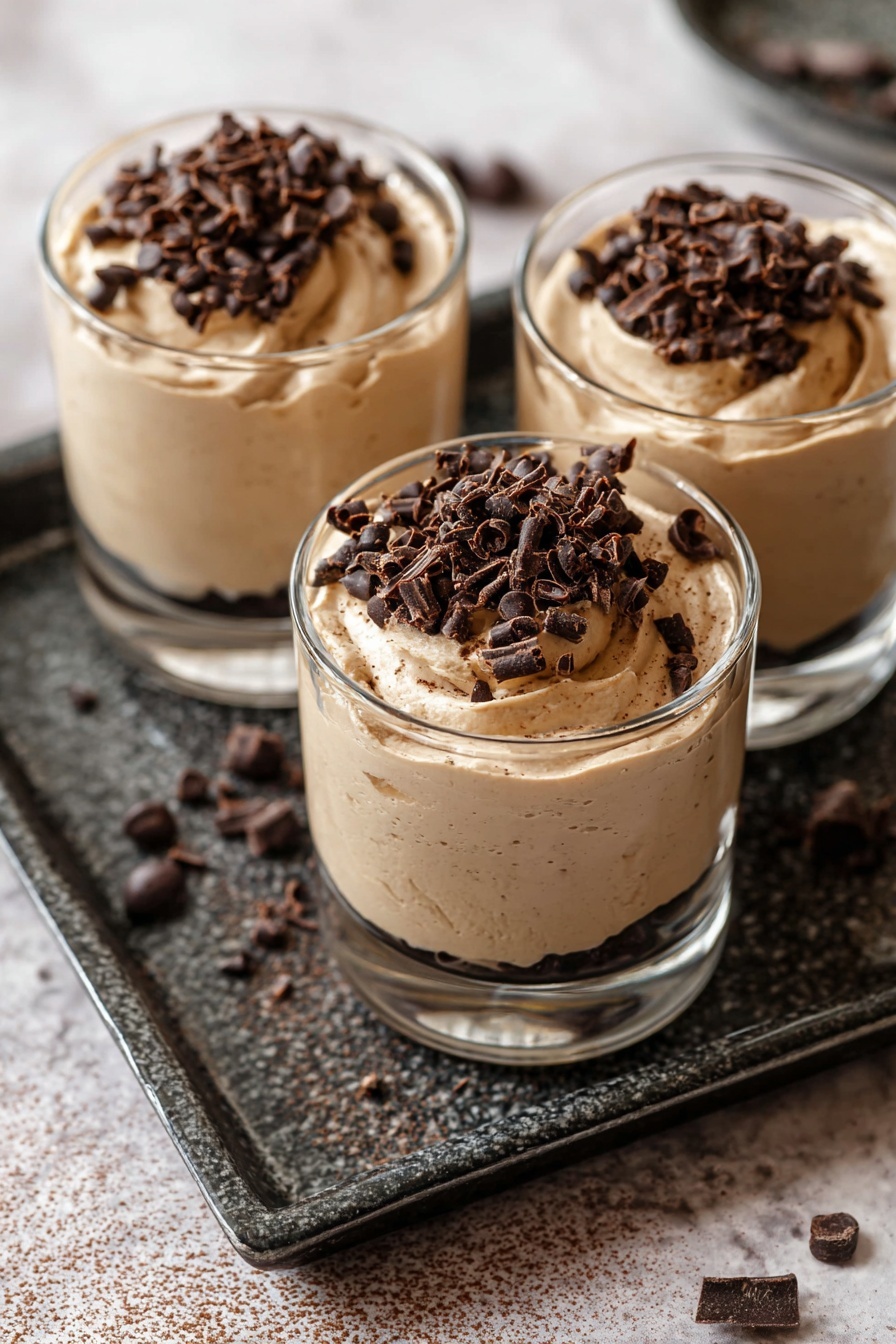
Coffee Mousse Recipe
If you’re anything like me, a rich, silky dessert that tastes like coffee heaven is exactly what you need after a long day. That’s why I’m so excited to share this Coffee Mousse Recipe with you — it’s incredibly smooth, fluffy, and just sweet enough to hit that perfect spot without being overpowering. Whether you’re impressing guests or just treating yourself, this recipe consistently delivers amazing results and is surprisingly simple to make. Grab your whisk and let’s dive in!
Why This Recipe Works
- Balanced Coffee Flavor: Using instant coffee granules dissolves evenly, giving you consistent, robust coffee notes without bitterness.
- Light Yet Creamy Texture: Whipping the cream to just firm peaks and folding gently preserves the airy mousse feel, not too dense, not too runny.
- Gelatine for Stability: Just the right amount of gelatine sets the mousse perfectly without making it rubbery.
- Simple Ingredients, Big Impact: No complicated steps or strange additives — just quality basics coming together beautifully.

Ingredients & Why They Work
Each ingredient in this Coffee Mousse Recipe plays a crucial role, from dissolving the coffee to balancing sweetness and texture. Knowing a little about why they’re here will help you nail the mousse every time — plus, I’ll throw in tips for picking quality ingredients that really shine.

- Instant Coffee Granules: They dissolve quickly in the syrup, delivering a consistent, strong coffee flavor without graininess—preferably just the right amount for smoothness.
- Water: The base for dissolving coffee and gelatine, ensuring the infusion is smooth rather than bitter.
- Sugar: Balances the bitterness and enhances the mousse’s rich flavor—caster sugar dissolves more easily than granulated.
- Powdered Gelatine: Provides structure so the mousse sets well but remains tender and light.
- Vanilla Extract: A subtle warmth that complements both the coffee and cream perfectly.
- Cold Whipping Cream: Whipped to firm peaks, it’s the backbone of the mousse’s luscious, airy texture.
- Cocoa or Chocolate Shavings: For garnish—they add visual appeal and a hint of chocolate to contrast the coffee notes.
Make It Your Way
I love to tweak this Coffee Mousse Recipe depending on my mood or the occasion. Once you get comfortable with the base recipe, there’s so much fun in customizing it to suit your personal taste!
- Variation: If you prefer a stronger coffee kick, bump up the coffee granules to 5-6 teaspoons. I’ve done this when serving to espresso lovers, and trust me, it’s like a sweet, fluffy latte in dessert form.
- Dietary Modifications: Swap the whipping cream for coconut cream for a dairy-free twist—just know the texture might be a tad different but still delicious!
- Seasonal Changes: Add a sprinkle of cinnamon or nutmeg on top in the fall for a cozy vibe that pairs amazingly with coffee flavors.
- Difficulty Levels: Feeling adventurous? Fold in some finely chopped dark chocolate or a splash of coffee liqueur for grown-up flair.
Step-by-Step: How I Make Coffee Mousse Recipe
Step 1: Dissolve Gelatine and Combine Coffee Basics
Start by gently heating water in a medium saucepan over low heat — low and slow is your friend here! Sprinkle the powdered gelatine over the surface and stir constantly with a rubber spatula. I like using a silicone spatula because rubbing it against the pan’s sides helps dissolve the gelatine completely without lumps. Make sure it doesn’t boil; you want it just warmed enough to disappear smoothly.
Step 2: Sweeten and Add Coffee Flavor
Next, stir in the instant coffee granules and sugar, continuing to mix until the sugar dissolves fully. This mixture will start becoming syrupy—keep the heat low to avoid boiling, which can make the coffee taste bitter. Once everything’s combined, transfer it to a large bowl and pop it into the fridge for around 15–20 minutes. You’re aiming for a thick, cool syrup, not a set jelly—this is key for smooth mousse texture.
Step 3: Whip the Cream to the Perfect Peak
While the coffee syrup chills, pour your cold whipping cream into a clean, chilled bowl. Using an electric mixer or balloon whisk, whip the cream until it holds firm peaks—this means when you lift the whisk, the cream’s peak stands up, but isn’t grainy or overbeaten. Overwhipped cream can become grainy and separate, so watch closely—it should feel light and airy.
Step 4: Bring It All Together Gently
Stir the vanilla extract into the cooled coffee syrup first. Then, add about a quarter of the whipped cream to the coffee syrup and stir vigorously to loosen the thick syrup. This step makes it easier to fold in the remaining cream without deflating all that gorgeous air.
For the rest of the cream, switch to a folding technique: scoop from the bottom of the bowl and fold over the top gently. Repeat this folding twice more with remaining cream until it’s all just combined. Your goal is a light, fluffy texture that holds its shape—not a soupy mess.
Step 5: Chill and Serve
Divide your divine mousse into dessert glasses or bowls and refrigerate for at least two hours, or overnight if you can wait that long! Just before serving, sprinkle with cocoa powder or chocolate shavings — both add a touch of elegance and a little chocolatey magic that compliments the coffee perfectly.
Tips from My Kitchen
- Perfect Gelatine Dissolving: If you notice gelatine bits sticking, don’t worry! Use your spatula to rub them against the pan sides—they’ll dissolve much faster that way.
- Don’t Rush Cooling: Allowing the coffee syrup to cool properly is the secret to keeping the mousse airy; hot syrup will deflate whipped cream instantly.
- Folding Technique Matters: Folding in cream rather than stirring prevents you from losing that light mousse texture you worked so hard on.
- Avoid Overwhipping Cream: It’s tempting to whip it extra stiff, but overdoing it can create a grainy mouthfeel. Stop as soon as peaks hold gently.
How to Serve Coffee Mousse Recipe
Garnishes
I usually stick with classic cocoa powder dusted lightly over the top or chocolate shavings for an elegant finish—the slight bitterness of cocoa pairs beautifully with the sweet coffee mousse. Sometimes, I’ll even toss on crushed espresso beans for an extra crunch and a bold look, especially when serving guests who love coffee straight up.
Side Dishes
This coffee mousse pairs wonderfully with something simple like biscotti or buttery shortbread cookies—those crunchy textures contrast the mousse’s creaminess like a dream. For a full dessert spread, I like serving fresh berries on the side to add a bright, fruity balance.
Creative Ways to Present
One of my favorite presentation tricks is layering the mousse in tall glasses with crushed cookies or thin chocolate shards for texture contrast. For special occasions, I’ve piped the mousse into mini glass jars topped with edible gold flakes and a small sprig of mint—it couldn’t be easier but instantly looks fancy enough for parties.
Make Ahead and Storage
Storing Leftovers
Once chilled, coffee mousse keeps beautifully in the fridge for up to 3 days if you cover it tightly. I like to keep leftovers in airtight containers or cover dessert glasses with cling wrap to prevent the mousse from drying out or absorbing other fridge smells.
Freezing
Freezing coffee mousse isn’t my go-to because it can subtly change the texture, making it less airy after thawing. But if you want to try, freeze in airtight containers and thaw overnight in the fridge—expect a slightly denser texture but still tasty.
Reheating
This dessert is best served chilled and doesn’t need reheating. If leftovers feel a bit firmer from the cold, just let them sit at room temperature for 10–15 minutes before serving so the mousse softens slightly.
FAQs
-
Can I use espresso instead of instant coffee for this Coffee Mousse Recipe?
Absolutely! You can replace the water and instant coffee granules with about 1/4 cup of strong brewed espresso. Just make sure it’s cooled before mixing with gelatine, and since espresso is more concentrated, you might want to adjust the sugar slightly to keep the balance just right.
-
How do I know when the whipped cream is at firm peaks for the mousse?
You’ll want to stop whipping when the cream holds its shape if you lift your whisk out of the bowl, with a peak that stands up but slightly bends at the tip. If the peaks are stiff and dry-looking, it’s overwhipped and the mousse texture could suffer.
-
Is there a vegan alternative for the gelatine in this recipe?
Yes, you can use agar-agar powder as a plant-based substitute, but it requires different preparation—usually boiling in liquid and then cooling quickly. Be sure to follow the agar-agar package instructions because it sets firmer and faster than gelatine.
-
Can I prepare this Coffee Mousse Recipe ahead of time?
Definitely! In fact, chilling it overnight improves the flavor and sets the texture perfectly, so it’s a great make-ahead dessert for parties or special dinners.
-
Why does my mousse sometimes turn watery?
Watery mousse usually happens if the gelatine wasn’t fully dissolved or the coffee syrup was too warm when mixed with whipped cream, causing it to lose structure. Always dissolve gelatine completely and let the syrup cool properly before folding in cream.
Final Thoughts
This Coffee Mousse Recipe has been a favorite in my kitchen for years—there’s something so comforting about taking a few simple ingredients and turning them into a dessert that feels both luxurious and welcoming. Whether you’re a seasoned cook or a newbie, I promise you’ll enjoy the process and especially the payoff of that first creamy spoonful. Give it a try and share it with friends—their smiles (and requests for seconds) will be worth every whisk!
Print
Coffee Mousse Recipe
- Prep Time: 10 minutes
- Cook Time: 5 minutes
- Total Time: 2 hours 30 minutes
- Yield: 6 servings
- Category: Dessert
- Method: Stovetop
- Cuisine: International
- Diet: Vegetarian
Description
A silky smooth and airy coffee mousse made with instant coffee, whipped cream, and a touch of vanilla. This elegant dessert is perfect for coffee lovers, requiring minimal ingredients and simple steps to create a delightfully rich yet light treat, ideal served chilled and topped with cocoa or chocolate shavings.
Ingredients
Coffee Mixture
- 1 tablespoon instant coffee granules
- ¼ cup water
- ¾ cup caster sugar or white granulated sugar
- ½ teaspoon powdered gelatine
- 1 teaspoon vanilla extract
Cream
- 1 ½ cups whipping cream, cold
To Serve
- Cocoa powder or chocolate shavings
Instructions
- Dissolve Gelatine: Place the water into a medium saucepan over low heat and sprinkle the powdered gelatine over the top. Stir constantly with a silicone or rubber spatula until the gelatine fully dissolves, making sure the mixture does not boil.
- Add Coffee and Sugar: Add the instant coffee granules and sugar to the saucepan and continue stirring gently until the sugar completely dissolves, without allowing the mixture to boil.
- Cool Coffee Syrup: Transfer the coffee mixture to a large mixing bowl and refrigerate for 15-20 minutes until cool and thickened but not set into a jelly.
- Whip Cream: In a separate large bowl, pour the cold whipping cream and beat with an electric mixer to firm peaks. Be careful not to overwhip as the cream can become grainy; stop once peaks hold their shape firmly.
- Add Vanilla: Stir the vanilla extract into the cooled coffee syrup.
- Combine Cream and Coffee Syrup: Add one quarter of the whipped cream to the coffee syrup and stir to loosen it. Add a second quarter and gently fold the mixture using a bottom-to-top folding motion to keep it airy. Repeat folding with the remaining cream in two additions until the mixture is light, fluffy, and holds its shape.
- Chill Mousse: Divide the mousse evenly between dessert glasses or bowls and refrigerate for at least 2 hours or overnight to set.
- Serve: Just before serving, sprinkle with cocoa powder or chocolate shavings for garnish.
Notes
- Use a standard 20 ml Australian tablespoon (equal to 4 teaspoons) to measure ingredients accurately.
- Use coffee granules for best flavor. If substituting with coffee powder, reduce the amount to 3 teaspoons.
- For a stronger coffee flavor, increase coffee granules to 5-6 teaspoons, similar to a strong sweet latte.
- You may substitute the water and coffee granules with ¼ cup of strong espresso and omit the water from the recipe.
- Be careful not to boil the gelatine or coffee syrup to preserve texture and prevent bitterness.
- Do not overwhip the cream to avoid graininess; aim for firm peaks.
- Nutrition values are approximate based on typical ingredient brands and serving size.
Nutrition
- Serving Size: 1 serving
- Calories: 280 kcal
- Sugar: 25 g
- Sodium: 45 mg
- Fat: 18 g
- Saturated Fat: 11 g
- Unsaturated Fat: 6 g
- Trans Fat: 0 g
- Carbohydrates: 26 g
- Fiber: 1 g
- Protein: 3 g
- Cholesterol: 65 mg


