Chocolate Swirl Buns Recipe
If you’re craving something rich, comforting, and absolutely showstopping, let me share my favorite Chocolate Swirl Buns Recipe with you. These buns are soft, fluffy, and deeply chocolatey with a gorgeous swirl pattern that looks way fancier than it really is. They’re perfect for breakfast, an afternoon treat, or a cozy dessert — and I promise once you try them, you’ll be hooked like I am!
Why This Recipe Works
- Soft, Elastic Dough: The balance of warm milk, fresh yeast, and melted butter creates a tender, pillowy dough that rises beautifully.
- Deep Chocolate Flavor: Using bittersweet chocolate with cocoa powder and powdered sugar makes the filling rich but not too sweet, perfect for true chocolate fans.
- Eye-Catching Swirls: The clever folding and slicing technique gives you those stunning chocolate twists that impress without stress.
- Versatile & Crowd-Pleasing: These buns work great fresh out of the oven or reheated, making them ideal for any occasion.

Ingredients & Why They Work
Every ingredient in this Chocolate Swirl Buns Recipe plays a crucial role, whether for texture, flavor, or that beautiful rise you want from your dough. I always recommend using fresh yeast if you can — it gives a lighter, fluffier texture than dried yeast.

- Warm milk: Activates the yeast and adds moisture to the dough for softness.
- Sugar: Feeds the yeast and adds just the right touch of sweetness.
- Fresh yeast: Gives a better rise and richer flavor compared to dry yeast.
- Egg: Adds richness and helps bind the dough.
- Melted butter: Brings tenderness and a lovely buttery aroma.
- Flour: The main structure of the dough; I like using strong bread flour for chewiness but all-purpose works too.
- Salt: Enhances flavor and balances sweetness.
- Bittersweet chocolate: Provides deep, rich chocolate flavor that isn’t too sweet.
- Butter (for filling): Makes the filling creamy and helps the chocolate blend smoothly.
- Cocoa powder: Intensifies the chocolate flavor in the filling.
- Powdered sugar: Adds sweetness and lightens the filling texture.
- Oil: Keeps the filling smooth and spreadable.
- Egg (for egg wash): Gives the buns a gorgeous golden, shiny crust when baked.
Make It Your Way
This recipe is a great canvas for your own spin—once you get the hang of the dough and filling, try it out with different chocolates or add nuts for a crunch. I often tweak the filling depending on the season or my cravings.
- Variation: I once swapped out bittersweet chocolate for dark chocolate with sea salt flakes sprinkled on top—everyone loved the salty-sweet combo!
- Dietary Adjustments: For dairy-free buns, replace butter with coconut oil and use plant-based milk—you might need to experiment with the dough texture a bit.
- Added Extras: Toss in some chopped hazelnuts or toasted almonds to the filling for an extra layer of flavor and texture.
Step-by-Step: How I Make Chocolate Swirl Buns Recipe
Step 1: Wake Up Your Yeast
Start by mixing the warm milk and sugar in a big bowl. Then sprinkle in the fresh yeast and let it sit for 5 to 10 minutes until you see it get frothy and bubbly—that’s your yeast waking up and ready to go. If it doesn’t foam up, your yeast might be old or the milk too hot, so tweak that and try again.
Step 2: Bring the Dough Together
Add the egg, melted butter, and salt to your yeast mixture, then start mixing in the flour a little at a time. The dough should come together into a soft but not sticky ball. Knead it for about 8-10 minutes until it’s smooth and elastic. This is where patience pays off—the more you knead, the better the texture!
Step 3: First Rise and Prep Filling
Cover your dough with a damp cloth or plastic wrap and let it rise in a warm spot for about an hour or until it doubles in size. While that’s happening, melt the bittersweet chocolate and butter together gently, then stir in cocoa powder, powdered sugar, and oil until luscious and smooth. Let it cool a bit so it’s not hot when you spread it on later.
Step 4: Roll, Spread, & Fold for Perfect Swirls
Divide the risen dough into two. Roll each half into a large rectangle. Spread half the chocolate filling thinly on one rectangle, keeping a small border free. Fold the dough in half, then gently roll it out again so it’s slightly thinner. Spread more filling on half, fold again, and trim edges—don’t toss those scraps! I always save the trimmings to make smaller buns or snacks.
Remember to keep flouring your surface and the dough while rolling to stop sticking or tearing—that’s the trick to getting those clean swirls without holes.
Step 5: Twist & Shape the Buns
Roll the dough into a rectangle again, then cut it into strips about four fingers wide. Each strip gets 3 cuts down the center but make sure to stop before you reach the edges—that way, when you twist the strips, they hold their shape perfectly. Twist each strip, then coil them into buns and place on a parchment-lined baking sheet. Cover and let rise another 35 minutes.
Step 6: Bake to Perfection
Preheat your oven to 375°F (190°C). Brush everything with beaten egg wash for that glossy, golden crust and bake the buns for 20-35 minutes until they’re puffed and their tops take on a deep golden hue. Let them cool just a bit—you’ll want to dive in warm, trust me.
Tips from My Kitchen
- Handle Dough Gently: When rolling and folding, don’t press too hard—this keeps the layers tender and the swirls distinct.
- Keep Surfaces Floured: To avoid tearing the delicate dough, I dust my board and rolling pin generously but not overdo it, or dough gets dry.
- Use Fresh Yeast: Fresh yeast makes a noticeable difference in fluffiness and rise; I always stock it in my fridge when baking bread-like recipes.
- Don’t Skip the Egg Wash: It’s the secret to those shiny buns that look as good as they taste!
How to Serve Chocolate Swirl Buns Recipe

Garnishes
I love dusting these buns lightly with powdered sugar just before serving—it adds a pretty, delicate look and a sweet finish without overpowering the chocolate. Sometimes I drizzle a bit of melted dark chocolate on top for that café-style indulgence.
Side Dishes
Pair these buns with a hot cup of coffee or a frothy latte for breakfast or brunch. For a cozy dessert vibe, a dollop of whipped cream or a scoop of vanilla ice cream on the side balances the richness wonderfully.
Creative Ways to Present
For special mornings, I arrange these swirled buns on a wooden board, sprinkle with edible flowers or fresh berries, and serve alongside a small pot of homemade jam or chocolate sauce. The presentation never fails to impress guests and makes any day feel festive.
Make Ahead and Storage
Storing Leftovers
I keep leftover buns in an airtight container at room temperature for up to 2 days. If you want to keep them fresh longer, wrap each bun individually in plastic wrap before storing to lock in moisture.
Freezing
These buns freeze beautifully! After they cool completely, wrap them individually and pop them in a freezer bag. When ready, thaw overnight in the fridge or for a couple of hours at room temp before reheating.
Reheating
I like reheating gently in a toaster oven or regular oven at 300°F (150°C) for about 10 minutes to bring back the soft, fresh-baked texture. If you’re in a hurry, a quick zap in the microwave for 15-20 seconds works too—just watch out so it doesn’t dry out.
FAQs
-
Can I use dry yeast instead of fresh yeast?
Absolutely! Use about one-third of the amount of fresh yeast called for (roughly 8 grams for this recipe). Dissolve it in warm milk with sugar just as you would fresh yeast and let it foam before mixing.
-
How do I prevent the filling from leaking out during baking?
Stick to spreading the filling thinly and leaving a small border on your dough rectangles. Also, when folding and rolling, be gentle to avoid tearing the dough which can cause leaks.
-
Can I make these buns in advance?
You can prepare and shape the buns the night before, then cover and refrigerate overnight. Let them come to room temperature and rise a bit before baking in the morning—it’s a great time saver!
-
What’s the best way to reheat Chocolate Swirl Buns?
For the best texture, warm them in the oven or toaster oven at a low temperature until heated through. Microwaving works for convenience but can sometimes make them a bit soggy or dry if overdone.
Final Thoughts
Honestly, this Chocolate Swirl Buns Recipe holds a special place in my heart. It’s one of those comforting recipes that turns your kitchen into a cozy haven, fills your home with an irresistible chocolate scent, and fills your belly with warm happiness. I love sharing these with friends because they’re not just tasty, they’re a true labor of love made easier with the steps and tips I’ve shared here. So grab your apron and dive in—you won’t regret making these buns your new favorite treat!
Print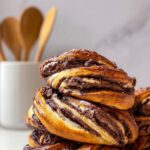
Chocolate Swirl Buns Recipe
- Prep Time: 15 minutes
- Cook Time: 35 minutes
- Total Time: 2 hours
- Yield: 8 servings
- Category: Breakfast
- Method: Baking
- Cuisine: European
- Diet: Vegetarian
Description
Swirled Chocolate Buns are soft, fluffy homemade buns with a rich bittersweet chocolate filling swirled through layers of tender dough, creating a perfect balance of chocolate and buttery flavors. These buns are ideal for breakfast treat or a decadent snack, featuring a beautiful twisted shape and a golden, shiny crust from an egg wash.
Ingredients
For the Dough
- 1 ⅓ cups warm milk (320 ml)
- ⅓ cup sugar (70 g)
- 0.9 oz fresh yeast (25 g)
- 1 large egg, room temperature
- ¼ cup melted butter (60 g)
- 4 ⅓ cups flour (560 g)
- 1 tsp salt (7 g)
For the Filling
- 3.5 oz bittersweet chocolate (100 g)
- ½ cup butter (100 g)
- ¾ cup cocoa powder (75 g)
- ¾ cup powdered sugar (75 g)
- ¼ cup oil (60 ml)
For the Egg Wash
- 1 egg, beaten
Instructions
- Activate yeast: In a large bowl, mix the warm milk and sugar until dissolved. Add the fresh yeast and let it sit for 10 minutes until frothy and bubbly, ensuring the yeast is active.
- Make the dough: Add the egg, melted butter, and salt to the yeast mixture. Gradually incorporate the flour, mixing until a sticky dough forms. Knead the dough on a floured surface until it becomes soft, smooth, and elastic, about 10 minutes.
- First rise: Place the dough in a greased bowl, cover it with a clean towel or plastic wrap, and let it rise in a warm place for 1 hour, or until it doubles in size.
- Prepare the filling: Melt the bittersweet chocolate and butter together either in a microwave or over a double boiler. Remove from heat, then stir in the cocoa powder, powdered sugar, and oil until the mixture is smooth. Set aside to cool slightly.
- Divide and roll dough: Punch down the risen dough and divide into two equal parts. Roll each part into a large rectangle on a floured surface.
- First layer of filling and fold: Spread half of the cocoa filling evenly over one dough rectangle, leaving a small border around the edges. Fold the dough in half lengthwise and gently roll it out again to seal the filling inside.
- Second layer and fold: Spread more filling on half of the folded dough, then fold it again to create layers. Trim any uneven edges of the dough to have clean sides. Save trimmed pieces to shape smaller buns.
- Flour and roll tightly: Keep flouring the surface and dough while rolling to prevent sticking or tearing. Roll the dough tightly once more.
- Cut strips and create twists: Cut the dough into strips about 4 fingers wide. For each strip, make 3 vertical cuts in the center but do not cut all the way through to the edges. Twist each strip carefully and roll it into buns, creating a beautiful twisted swirl shape.
- Second rise: Place the shaped buns on a parchment-lined baking sheet. Cover them with a towel or plastic wrap and let them rise for 35 minutes until slightly puffed.
- Preheat oven and prepare buns: Preheat your oven to 375°F (190°C). Brush each bun with the beaten egg to achieve a shiny golden crust.
- Bake: Bake the buns for 35 minutes, or until they turn golden brown and sound hollow when tapped.
- Cool and serve: Allow the buns to cool slightly before serving warm to enjoy their full chocolatey richness.
Notes
- Use room temperature ingredients for better dough consistency and yeast activation.
- If you don’t have fresh yeast, use an equivalent amount of active dry yeast, but proof it accordingly.
- Keep flouring the rolling surface and dough frequently to prevent sticking and tearing during rolling and folding.
- Trimmed dough pieces can be shaped into mini buns to avoid waste.
- For a shinier crust, you can brush with a mixture of egg and milk instead of just egg.
- Letting the buns cool slightly helps the chocolate filling set, preventing mess when eating.
- If you’d like a nuttier flavor, add chopped nuts to the filling mixture.
Nutrition
- Serving Size: 1 bun
- Calories: 320 kcal
- Sugar: 15 g
- Sodium: 200 mg
- Fat: 15 g
- Saturated Fat: 8 g
- Unsaturated Fat: 5 g
- Trans Fat: 0 g
- Carbohydrates: 38 g
- Fiber: 3 g
- Protein: 6 g
- Cholesterol: 55 mg


