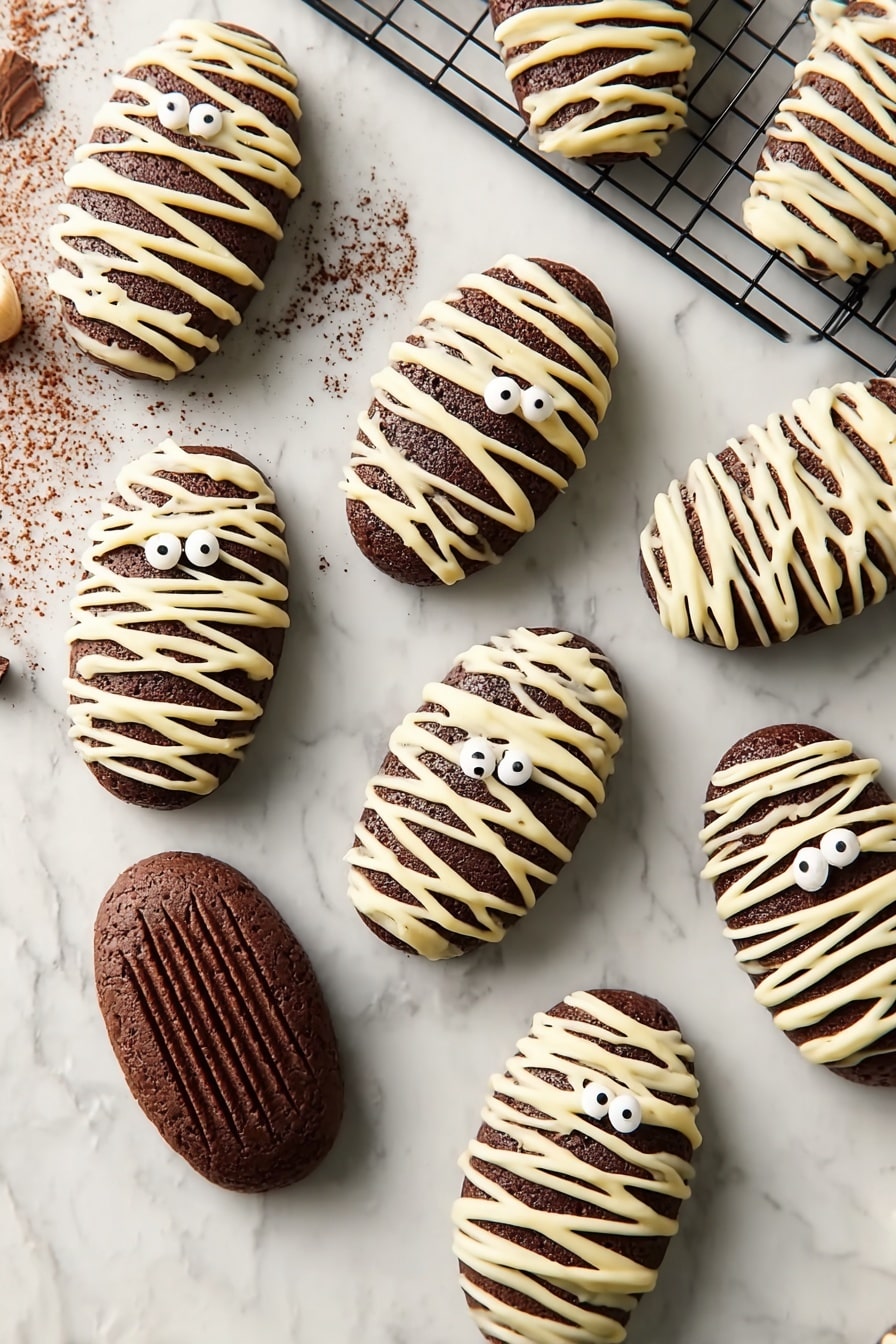
Chocolate Madeleine Mummies Recipe
If you’re looking for a fun twist on a classic treat that doubles as a cute Halloween snack, you’re in for a real treat with this Chocolate Madeleine Mummies Recipe. These little delicate cakes are infused with rich chocolate flavor and decorated to look like adorable mummies, perfect for spooky gatherings or a cozy night in with friends. Trust me, once you try this recipe, it’ll be your go-to Halloween baking project!
Why This Recipe Works
- Deliciously Moist Texture: The combination of butter, dark chocolate, and whisked eggs makes these madeleines incredibly tender and rich.
- Perfect Balance of Flavors: Cocoa powder and almond flour add depth, while honey brings a subtle sweetness that complements the chocolate perfectly.
- Fun, Easy Decoration: Using melted white chocolate and candy eyes turns ordinary madeleines into Halloween mummies effortlessly.
- Great Make-Ahead Treat: These mummies store well and maintain flavor, making them ideal for parties or last-minute celebrations.

Ingredients & Why They Work
This Chocolate Madeleine Mummies Recipe uses simple but thoughtfully selected ingredients that harmonize beautifully. Each component plays a key role, from the texture to the flavor, so grabbing quality ingredients will really pay off here.
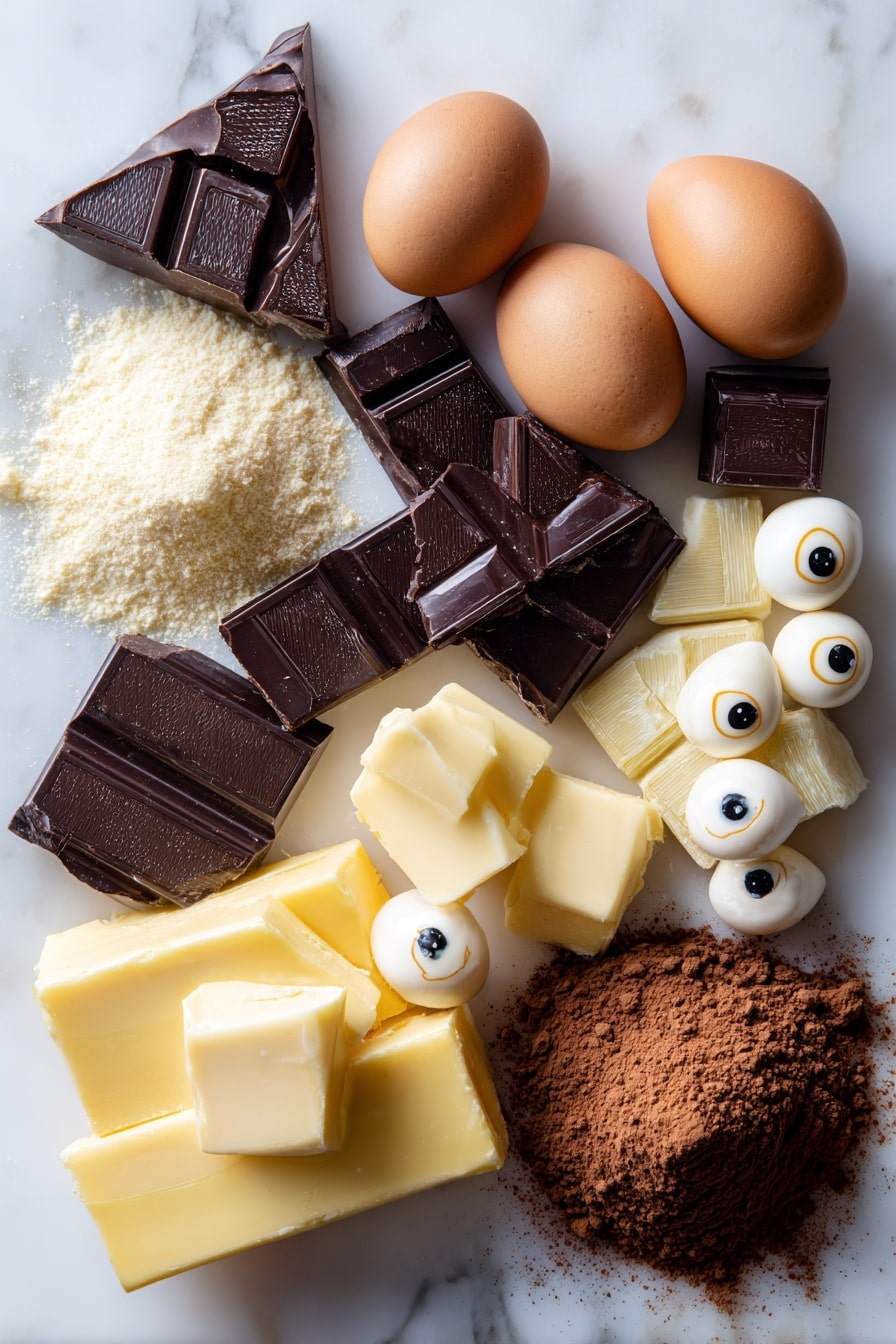
- Unsalted Butter: Provides rich moisture and a tender crumb; make sure it’s fresh for the best flavor.
- Dark Chocolate: Adds a deep chocolate intensity; melting it together with butter creates a luscious base.
- Vanilla Extract: Enhances all flavors with its warm, sweet aroma.
- Eggs: Whisked to create lightness and structure without heaviness.
- Honey: A natural sweetener that adds subtle floral notes and helps keep the madeleines moist.
- Granulated Sugar: Balances sweetness and helps create that tender texture when combined with eggs.
- Whipping Cream: Adds a smooth richness that complements the chocolate perfectly.
- Pastry Flour: Softer than all-purpose flour, it keeps your madeleines tender and delicate.
- Almond Flour: Adds a touch of nuttiness and helps with crumb structure.
- Cocoa Powder: Intensifies the chocolate flavor without adding moisture.
- Baking Powder: Ensures a gentle rise for that lovely madeleine hump.
- White Chocolate (for decoration): Melts smoothly for piping mummy strips.
- Candy Eyes: The adorable finishing touch that brings your mummy to life.
Make It Your Way
I love playing around with this recipe depending on the occasion or what I have on hand. The decorating part is especially fun to get creative with — because let’s face it, those little mummies are as cute as they are delicious!
- Variation: For an extra nutty twist, I sometimes swap almond flour with hazelnut flour—I love how it adds a slightly toasted flavor.
- Dietary Mods: You can replace granulated sugar with coconut sugar for a more caramel undertone, perfect if you want a less refined sweetness.
- Seasonal Flair: Adding a pinch of cinnamon or espresso powder to the batter can add warmth and complexity, especially in cooler months.
Step-by-Step: How I Make Chocolate Madeleine Mummies Recipe
Step 1: Melt the Chocolate and Butter the Easy Way
Start by melting your dark chocolate and unsalted butter together in a small bowl over a water bath. Make sure they combine into a smooth, fairly fluid mixture. Adding vanilla extract here infuses amazing aroma right from the start. Once melted, set this lovely chocolate-butter mix aside to cool slightly while you prep the other ingredients. I always keep an eye on this step — overheating can cause the chocolate to seize, so gentle heat is key.
Step 2: Whisk Eggs and Sugar Gently
In a large bowl, whisk eggs and sugar together until combined. Then add cream and honey, whisking again. To get that smooth consistency without cooking your eggs, place the bowl over a simmering water bath for about a minute while whisking constantly—this melts the sugar and helps incorporate the honey perfectly. Pro tip: don’t hang out over the bath too long or you’ll end up with scrambled eggs, which is definitely not what we’re after.
Step 3: Fold in Dry Ingredients with Care
Sift your pastry flour, almond flour, cocoa powder, and baking powder into the wet mixture. Then gently fold them together using a spatula—you want to preserve the lightness here, so mix just until you see no streaks of flour left. It’s perfectly normal for the batter to be a little thick and stiff at this stage, especially after chilling.
Step 4: Combine and Chill for Success
Now, fold the melted chocolate and butter mixture into your batter in three batches. Cover and refrigerate at least 30 minutes—this step is crucial. Chilling helps the batter firm up and results in a more pronounced madeleine belly once baked. I also pop my madeleine pan in the fridge during this time to keep everything cool and cooperative.
Step 5: Pipe and Bake Perfectly
Brush your madeleine pan lightly with butter and dust with cocoa powder to prevent sticking. Using a pastry bag, pipe the batter into each shell, filling them about ¾ full—you don’t need perfect shapes, madeleine pans are forgiving! For even better results, let your filled pan chill in the fridge for another 30 minutes before baking. Bake at 340°F (170°C) for 8 to 10 minutes. Resist the urge to peek early—the madeleines need that consistent heat for their iconic hump.
Step 6: Decorate Your Mummies
Once cooled on a wire rack, it’s time for the fun part: decorating with melted white chocolate. Fit the chocolate into a small-tipped pastry bag and pipe messy, crosshatch stripes to mimic mummy wrappings. Don’t forget to leave spaces for the candy eyes—stick them on with a dab of white chocolate if needed. If you can’t find candy eyes, I’ve made my own by piping tiny dots of white chocolate and adding smaller dark chocolate dots for pupils—easy and just as cute!
Tips from My Kitchen
- Water Bath Whisking: Keep the bowl moving swiftly over the water—not touching it—to avoid cooking the eggs, which preserves a silky batter.
- Chill Twice: Refrigerate both your batter and pan for the best madeleine rise and texture.
- Don’t Stress Piping: The batter is forgiving; just get it in the pan without spilling everywhere and you’re good to go.
- Customize Eyes: If candy eyes are tough to find, DIY googly eyes with chocolate and white chocolate—they’re surprisingly easy and adorable.
How to Serve Chocolate Madeleine Mummies Recipe
Garnishes
I like keeping it simple with these mummies — the contrasting white chocolate wrappings and candy eyes say it all. But if you want to get fancy, a light dusting of powdered sugar or a few edible glitter sprinkles can add a magical finishing touch, especially for kids’ parties. A few fresh mint leaves on the side add a pop of green and freshness to balance the rich chocolate flavor.
Side Dishes
These Chocolate Madeleine Mummies pair wonderfully with a thick hot chocolate or your favorite spiced tea like chai. I’ve also served them alongside a simple berry compote or fresh fruit salad, which really cuts through the chocolate richness and adds a fresh finish.
Creative Ways to Present
For a Halloween party, I’ve arranged these mummies on black or orange platters surrounded by little pumpkins and dry ice for that spooky fog effect. You can also place each mummy in a mini cupcake liner or wrap them gently in parchment paper tied with twine for an adorable take-home treat. If decorating with kids, let them help pipe the bandages and stick on eyes—it’s a blast!
Make Ahead and Storage
Storing Leftovers
Leftover madeleines keep nicely in an airtight container at room temperature for up to 3 days. I like to layer them between parchment paper to keep the decorations safe and prevent sticking. They stay fresh, moist, and delicious without any special tricks.
Freezing
If you want to freeze Chocolate Madeleine Mummies, freeze them undecorated first on a baking sheet, then transfer to a freezer bag or container. When ready to enjoy, thaw fully at room temperature and decorate with white chocolate and candy eyes fresh. This keeps the mummies looking their best!
Reheating
To warm up leftovers, I place them in a low oven (about 275°F) for 5 minutes—just enough to warm through without drying out. Avoid microwaving as it can melt or distort the decoration, and that mummy look is too cute to lose.
FAQs
-
Can I use regular all-purpose flour instead of pastry flour in this recipe?
Yes, you can substitute all-purpose flour for pastry flour, but the texture might be slightly firmer and less delicate. Pastry flour has a lower protein content, which gives madeleines their tender crumb. Using all-purpose is fine in a pinch, just be careful not to overmix to keep the cake light.
-
What if I don’t have a madeleine pan?
If you don’t have a madeleine pan, you can try using mini muffin tins instead. Just adjust the baking time accordingly, and you won’t get the classic hump but still enjoy the delicious flavors. Alternatively, making plain chocolate cupcakes and decorating them like mummies is a fun workaround.
-
How do I make homemade candy eyes if I can’t find store-bought ones?
Simply pipe small dots of melted white chocolate onto parchment paper and, after they set slightly, add smaller dark chocolate dots in the center for pupils. Let them harden in a cool place. They’re super easy to make and look adorable!
-
Can I make these Chocolate Madeleine Mummies ahead for a party?
Absolutely! You can bake the madeleines a day or two ahead and store them in an airtight container. Decorate them the morning of your event for the best look, or if time is tight, decorate and chill them the night before—they keep quite well.
Final Thoughts
This Chocolate Madeleine Mummies Recipe has become a seasonal favorite for me—not just because they’re adorable and delicious, but because making them feels like a fun little ritual every fall. They’re simple enough for a weekday treat but impressive enough to serve guests, and I really hope you enjoy the process as much as the tasty results. So, grab your pan, melt that chocolate, and let’s celebrate Halloween with these charming little mummies—you won’t regret it!
Print
Chocolate Madeleine Mummies Recipe
- Prep Time: 15 minutes
- Cook Time: 10 minutes
- Total Time: 25 minutes
- Yield: 16 madeleines
- Category: Dessert
- Method: Baking
- Cuisine: French
- Diet: Vegetarian
Description
These Chocolate Madeleine Mummies are a spooky and delicious Halloween treat featuring rich chocolate madeleines decorated with white chocolate mummy wrappings and candy eyes. Perfect for festive gatherings, these bite-sized cakes combine a moist, flavorful batter with fun and easy decorating techniques.
Ingredients
Chocolate Madeleines
- ⅝ cup unsalted butter (140 grams)
- ⅕ cup dark chocolate, chopped (34 grams)
- 1 teaspoon vanilla extract
- 2 large eggs
- 1 ½ tablespoons honey (30 grams)
- ½ cup granulated white sugar (80 grams)
- 2 ½ tablespoons whipping cream
- ½ cup pastry flour, sifted (56 grams)
- ⅓ cup almond flour, sifted (30 grams)
- ⅓ cup cocoa powder (30 grams)
- 1 teaspoon baking powder (8 grams)
Halloween Madeleine Mummy Decorations
- ½ cup white chocolate, melted
- 32 small candy eyes
Instructions
- Melt Chocolate and Butter: In a small bowl set over a water bath, melt the dark chocolate and unsalted butter together until smooth and fluid. Stir in the vanilla extract, then set aside to cool slightly.
- Prepare Wet Ingredients: In a large bowl, whisk together the eggs and granulated sugar until combined. Add the whipping cream and whisk again. Stir in the honey, then continue whisking the mixture over a water bath until the sugar has fully melted and the ingredients are well incorporated, about 1 minute. Be careful not to cook the eggs.
- Add Dry Ingredients: Sift the pastry flour, almond flour, cocoa powder, and baking powder into the wet mixture. Gently fold these dry ingredients into the wet mixture until just combined, forming the madeleine batter.
- Combine Chocolate Mixture: Gradually add the melted chocolate and butter mixture into the batter in three batches, folding gently until fully incorporated.
- Chill Batter: Cover the batter and refrigerate for at least 30 minutes to firm up and enhance texture. Meanwhile, preheat the oven to 340 degrees Fahrenheit.
- Prepare Madeleine Pan: Lightly brush the madeleine pan with butter and dust with cocoa powder, tapping out any excess. Transfer the chilled batter into a pastry bag for easy piping.
- Pipe Batter and Optional Chill: Pipe the batter carefully into the wells of the madeleine pan. Optionally, cover and refrigerate again for 30 minutes to keep the batter cold, which helps develop a characteristic madeleine hump.
- Bake Madeleines: Bake the madeleines in the preheated oven for 10 minutes. Avoid opening the oven door early to ensure even baking.
- Cool Madeleines: Once baked, gently tap the pan to release the madeleines and transfer them onto a wire rack to cool completely before decorating.
- Decorate as Mummies: Fill a pastry bag fitted with a small tip with the melted white chocolate. Pipe messy crosshatch patterns over the cooled madeleines to mimic mummy wrappings, leaving space for eyes.
- Add Candy Eyes: Attach small candy eyes onto the madeleines using a dab of melted white chocolate as adhesive if needed.
- Store and Serve: Store the decorated chocolate madeleine mummies in a cool place. Enjoy as a fun Halloween treat.
Notes
- For melting sugar in the egg mixture, use a simple water bath by pouring boiling water into a pot and holding the bowl with the egg mixture above it while whisking. Avoid overheating to prevent cooking the eggs.
- The chilled madeleine batter will be stiff; gently stir with a spatula a few times before piping.
- Madeleine wells are forgiving, so don’t worry about piping perfect shapes.
- Place the madeleine pan in the fridge before filling to keep it cold, encouraging a larger madeleine belly.
- Note that lighter-coloured madeleine pans may bake faster, so monitor baking time accordingly.
- If candy eyes are unavailable, you can make your own by piping small white chocolate dots on parchment, then adding smaller dark chocolate dots for pupils. Let them cool in a cool spot.
Nutrition
- Serving Size: 1 madeleine
- Calories: 150 kcal
- Sugar: 12 g
- Sodium: 50 mg
- Fat: 9 g
- Saturated Fat: 5 g
- Unsaturated Fat: 3 g
- Trans Fat: 0 g
- Carbohydrates: 15 g
- Fiber: 2 g
- Protein: 2 g
- Cholesterol: 50 mg


