Butter Cookies Recipe
If you’re looking for a buttery, melt-in-your-mouth treat that’s both classic and irresistibly simple, this Butter Cookies Recipe is exactly what you need. I’ve made these cookies countless times, and each batch feels like a warm hug from the kitchen. Stick with me, and I’ll share all my tips on how to get these cookies perfectly crisp yet tender every time.
Why This Recipe Works
- Butter Quality: Using high-quality, name-brand butter ensures the cookies have a rich, authentic flavor that truly shines.
- Simple Ingredient List: With just a handful of pantry staples, the cookie’s flavor and texture stay pure and buttery without distractions.
- Chilling the Dough After Piping: This crucial step helps the cookies keep their shape and prevents spreading, giving you the perfect crisp edges.
- Just the Right Piping Consistency: Adding milk one tablespoon at a time lets you control the dough’s texture for beautiful, even cookies.

Ingredients & Why They Work
Every ingredient in this Butter Cookies Recipe plays an important role in creating that tender crumb and buttery richness we love. Choosing the right butter and carefully balancing flour are simple but key. I’ll also give you some quick tips on how to avoid common pitfalls, like dough that spreads too much.

- Unsalted Butter: I can’t stress this enough — go for a high-quality, name-brand butter like Kerrygold or Tillamook. The flavor difference is so worth it, and unsalted butter lets you control the saltiness in the recipe.
- Granulated Sugar: Adds just the right sweetness and helps create that slight crisp on the cookie edges.
- Large Egg: Binds everything together and adds richness to the dough.
- Vanilla Extract: Enhances the buttery flavor with a subtle warm note. Use pure vanilla if you can.
- All-Purpose Flour: The backbone of the cookie, it gives structure while keeping things tender when combined properly with the butter.
- Salt: Balances sweetness and enhances the overall flavor of the cookies.
- Milk: Added a tablespoon at a time to adjust dough consistency for piping perfectly round cookies without making the dough too runny.
Make It Your Way
I love how this Butter Cookies Recipe is a perfect blank canvas — you can keep them classic or customize with your favorite touches. I often add sprinkles for festive occasions or dip half the cookie in melted chocolate for a bit of indulgence. You might find your new go-to twist here!
- Variation: For a nutty crunch, I sometimes add finely chopped toasted almonds or pecans to the dough—it adds a lovely texture without overpowering the buttery flavor.
- Dietary Modification: If you want to try dairy-free, coconut oil or a vegan butter substitute can work, but expect minor texture differences—I prefer the original butter myself for that authentic taste.
- Seasonal Touch: A hint of lemon zest or orange zest in the dough adds a fresh brightness that’s fantastic during spring and summer.
Step-by-Step: How I Make Butter Cookies Recipe
Step 1: Cream the Butter and Sugar Until Fluffy
Start by softening your butter to room temperature—this is crucial. I leave mine out for about an hour before baking. Then, in a large bowl or stand mixer, beat the butter and sugar together on medium-low speed until the mixture becomes light and fluffy, like a soft cloud. This step traps air, giving the cookies their delicate texture, so don’t rush it. Usually, 3-5 minutes works well.
Step 2: Add Egg and Vanilla, Then Mix Until Smooth
Next, crack in your egg and pour in the vanilla extract. Continue mixing on medium-low until the batter looks smooth and creamy. This helps combine the flavors evenly without overworking the dough, which can toughen your cookies.
Step 3: Gently Incorporate Flour and Salt
Slowly add the all-purpose flour and salt to your mix, folding or mixing just until everything comes together. The key here is to avoid overmixing — once the flour disappears, stop mixing. Overworking the dough can result in chewy cookies, and that’s not what we’re after.
Step 4: Adjust Dough Texture with Milk
This is one of the tricks I’ve learned over time. Add milk one tablespoon at a time just until the dough reaches a soft consistency perfect for piping—firm but pliable. If you add too much, the dough will spread too much during baking. You want it just fluid enough to pipe nice circles without losing shape.
Step 5: Pipe and Chill Before Baking
Place the dough in a piping bag fitted with a round tip. Pipe small circles of dough onto a parchment-lined baking sheet, leaving enough space between each cookie. If you want to get creative, add colorful sprinkles right now for a festive touch. Now, here’s the non-negotiable: chill those piped cookies in the fridge for at least 20-30 minutes. This step stopped my cookies from spreading all over the place and gives you those beautiful, crisp edges.
Step 6: Bake and Cool Completely
Bake your butter cookies in a preheated 350°F (175°C) oven for about 10 minutes, or until the edges just start to turn golden. Keep a close eye here—the difference between perfect and slightly overdone is just a minute or two. Once done, transfer the trays to wire racks and let the cookies cool fully before you even think about trying one. Patience pays off with better texture and flavor!
Tips from My Kitchen
- Use Room Temperature Butter: This helps the butter cream better with the sugar for a lighter cookie texture.
- Chill After Piping: It’s my secret weapon to prevent spreading and to keep that cute cookie shape intact.
- Add Flour Cautiously: If your dough seems too wet or your cookies spread too much, add flour a tablespoon at a time. Weather and butter moisture can vary!
- Don’t Skip Cooling on Rack: I’ve learned that warm cookies crumble easily; fully cooled cookies snap perfectly.
How to Serve Butter Cookies Recipe

Garnishes
I usually keep it simple—just a sprinkle of colored sugar or festive jimmies on top before baking for some extra joy, especially around the holidays. Once cooled, sometimes I lightly dust them with powdered sugar or even dip half in melted dark chocolate for a little flair. The buttery cookie tastes amazing with a hint of chocolate and a touch of sweetness from the sugar dusting.
Side Dishes
Pair these buttery delights with a comforting cup of tea—Earl Grey or chamomile work wonderfully—or a steaming mug of coffee if you prefer. I’ve also enjoyed them alongside a scoop of homemade vanilla ice cream for a special after-dinner treat.
Creative Ways to Present
For parties or gift-giving, I like to stack these cookies in a pretty tin with parchment paper separating each layer. Another favorite is arranging them on a tiered dessert stand with fresh berries and edible flowers for a charming touch that always gets compliments!
Make Ahead and Storage
Storing Leftovers
I store leftover butter cookies in an airtight container at room temperature, usually on the counter, and they stay fresh and crisp for up to a week. If you live in a humid area, keeping them sealed tightly is extra important to maintain that perfect snap.
Freezing
Yes, you can freeze these cookies! After they’ve cooled completely, I place them in a single layer on a baking sheet to freeze until firm, then transfer to a zip-top bag or airtight container. They keep beautifully for up to 6-8 months and taste just as fresh when thawed.
Reheating
If you want to enjoy them warm, pop a few cookies in a preheated oven at 300°F for 5 minutes. This refreshes their crispness without drying them out like a microwave can. Just be careful not to overbake or they might become too hard.
FAQs
-
Can I substitute salted butter for unsalted in this Butter Cookies Recipe?
You can use salted butter, but reduce or omit the additional salt the recipe calls for. Using unsalted butter lets you control the salt level more precisely for the best flavor balance.
-
Why do my butter cookies spread too much during baking?
That’s a common issue! It often happens if the dough is too soft or the butter has a high moisture content. To fix this, chill the cookies well before baking and consider adding a little extra flour. Also, using high-quality butter with consistent fat content helps significantly.
-
Can I make the dough ahead of time and bake later?
Absolutely! You can mix the dough, pipe the cookies on the sheet pans, and refrigerate them tightly covered for up to 24 hours before baking. This can help develop more flavor and keeps things convenient for busy days.
-
What’s the best piping tip to use for these cookies?
I recommend a medium-sized round tip for perfectly shaped cookies. If you don’t have a piping bag, you can use a zip-top bag with the corner snipped off to pipe the dough.
-
Can I add flavors to this Butter Cookies Recipe?
Yes! Citrus zest, almond extract, or even a pinch of cinnamon can be added for a unique twist. Just add the flavorings along with the vanilla in step two for even distribution.
Final Thoughts
This Butter Cookies Recipe holds a special place in my heart because it’s so comforting, straightforward, and endlessly adaptable. Whether you’re baking for a holiday, a gift, or just because, these cookies deliver buttery, tender bites that feel like home with every nibble. Give them a try—you won’t regret it, and I’d bet they’ll become your new favorite go-to cookie too!
Print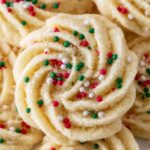
Butter Cookies Recipe
- Prep Time: 10 minutes
- Cook Time: 12 minutes
- Total Time: 47 minutes
- Yield: 24 cookies
- Category: Dessert
- Method: Baking
- Cuisine: American
Description
Classic Butter Cookies recipe featuring a rich, tender texture and delicate vanilla flavor. Perfectly piped and baked to golden edges, these cookies are simple to make and ideal for any occasion.
Ingredients
Cookie Dough
- 1 cup Unsalted butter softened
- 1 cup Granulated sugar
- 1 Large egg
- 2 teaspoons Vanilla extract
- 2 cups All purpose flour
- ½ teaspoon Salt
- 1-2 tablespoons Milk (any kind)
Instructions
- Preheat oven: Preheat the oven to 350 degrees Fahrenheit and line a baking sheet with parchment paper. Set aside for later use.
- Cream butter and sugar: In a large bowl or stand mixer, beat the softened butter and granulated sugar on medium-low speed until the mixture is light and fluffy.
- Add egg and vanilla: Incorporate the large egg and vanilla extract into the mixture, continuing to beat on medium-low speed until the batter is smooth.
- Add dry ingredients: Gradually add the all-purpose flour and salt, mixing just until fully combined. Avoid overmixing to keep the cookies tender.
- Adjust consistency with milk: Add milk one tablespoon at a time, using the minimum amount needed to achieve a piping consistency suitable for shaping the cookies.
- Pipe the cookies: Transfer the dough to a piping bag and pipe small circles evenly onto the prepared baking sheet. Optionally, add sprinkles on top.
- Chill the dough: Refrigerate the baking sheet with piped cookies for at least 30 minutes to prevent spreading during baking.
- Bake: Bake the cookies in the preheated oven for 10 minutes or until the edges begin to turn a golden brown color.
- Cool: Remove cookies from the oven and allow them to cool completely on the baking sheet before serving or storing.
Notes
- Store cookies at room temperature for 5-7 days or freeze for up to 6-8 months.
- Chilling the dough after piping but before baking is essential to prevent spreading.
- If cookies spread too much, add a few more tablespoons of flour to the dough to compensate for humidity or butter moisture variations.
- Use high-quality, brand-name butter such as Challenge, Kerrygold, or Tillamook for best results due to consistent moisture content.
- Weather conditions and altitude can affect baking, so adjust flour as needed accordingly.
Nutrition
- Serving Size: 1 cookie
- Calories: 90 kcal
- Sugar: 6 g
- Sodium: 40 mg
- Fat: 6 g
- Saturated Fat: 4 g
- Unsaturated Fat: 2 g
- Trans Fat: 0 g
- Carbohydrates: 9 g
- Fiber: 0.2 g
- Protein: 1 g
- Cholesterol: 15 mg
