
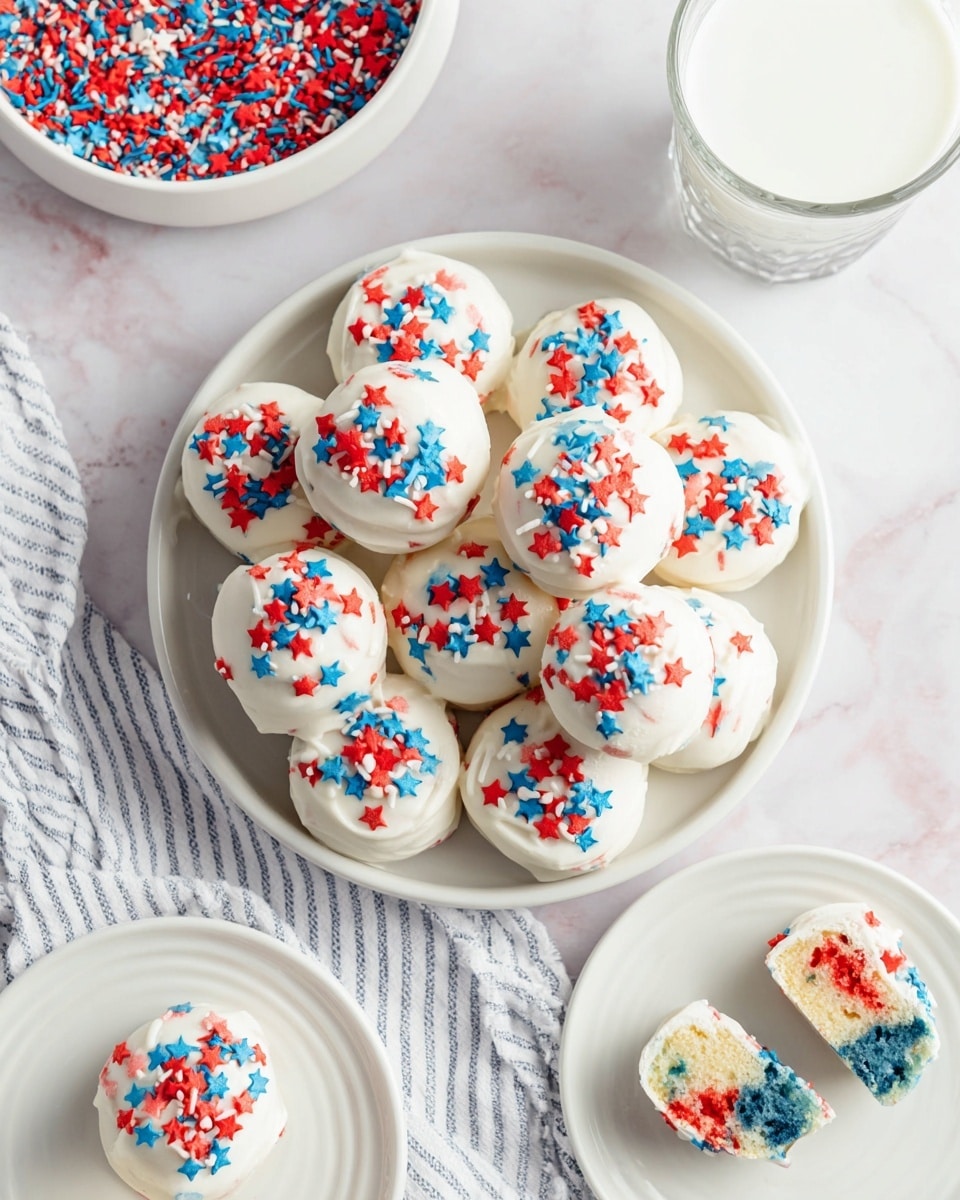
4th of July Cake Balls Recipe
If you’re searching for a show-stopping, fun, and festive treat this summer, you’re going to love this 4th of July Cake Balls Recipe. These little pops of joy bring all the red, white, and blue excitement of the holiday right to your fingertips—and the best part is, they’re surprisingly easy to make! Perfect for picnics, barbecues, or just a sweet way to celebrate, these cake balls have become my go-to for festive gatherings. Let me walk you through how to make them so you can wow your friends and family too.
Why This Recipe Works
- Vibrant, Layered Colors: Separating and colorizing the batter creates a stunning tri-color effect that feels truly festive.
- Cream Cheese Binding: The cream cheese adds moisture and richness, making the cake balls perfectly tender and easy to mold.
- Double Dipping Fun: Using various candy melts lets you play around with different coatings and sprinkles, adding texture and crunch to every bite.
- Chilling for Stability: The chilling steps ensure the cake balls don’t fall apart during dipping, simplifying the whole process.

Ingredients & Why They Work
This recipe calls for simple, approachable ingredients that come together for a delightful texture and bright, patriotic colors. Picking quality melting wafers and cream cheese at room temp really makes a difference in smoothness and ease of handling.
- White Cake Mix: Using white cake mix gives a neutral canvas perfect for coloring; plus, it’s hassle-free without making cake from scratch.
- Red and Blue Food Coloring: Gel food coloring works best for bright colors without thinning the batter.
- Cream Cheese: Softened to room temp, it blends perfectly into the crumbled cake to hold everything together.
- Vanilla Melting Wafers: These melt smoothly and harden nicely for a glossy coating that’s easy to work with.
- Red and Blue Candy Melts: Used to create that extra patriotic pop, plus great for dipping and decorating.
- Sprinkles: Choose red, white, and blue stars, nonpareils, or glittery festive shapes to top off the cake balls with a crunch and sparkle.
Make It Your Way
What I love about this 4th of July Cake Balls Recipe is how easy it is to tailor it to your taste or occasion. Sometimes I add a touch of almond extract for extra flavor or swap sprinkles to match different holidays or party themes.
- Variation: I once mixed in mini chocolate chips with one color batch — it added a fun texture surprise, though be mindful it makes rolling a bit trickier.
- Dietary Swap: For dairy-free versions, you can experiment with vegan cream cheese and dairy-free melting wafers. It takes a little trial, but the concept stays the same.
- Seasonal Changes: Beyond the 4th of July, switch the food coloring for fall colors or pastel shades to keep these cake balls relevant for any holiday.
Step-by-Step: How I Make 4th of July Cake Balls Recipe
Step 1: Prepare and Color Your Batter
First things first, preheat your oven as directed on your cake mix box—mine is usually 350°F. Grease three small pans (8×8 inches work nicely). The fun part here is dividing your batter into three bowls. Leave one plain, then add red food coloring to the second and blue to the third—adding it slowly, five drops at a time, until you get that perfect rich hue. Using separate spoons keeps colors pure and vibrant, so don’t skip that step!
Step 2: Bake and Cool Your Layers
Bake each colored batter in its own pan for about 14-16 minutes, or until a toothpick comes out clean and the tops look firm but not browned. Trust me, this ensures your cake stays moist and light. Once done, set your pans on a wire rack and let them cool completely; this patience pays off when you crumble the cakes later!
Step 3: Crumble Cake and Mix with Cream Cheese
This is my favorite part: crumble the cooled cakes into bowls and whip your cream cheese smooth with a mixer until creamy—no lumps allowed! Divide the cream cheese evenly between your colors, then mix each until the texture resembles soft dough. Whether you use a mixer on low speed or a spatula and some elbow grease, make sure it’s well blended. Don’t forget to clean your tools between colors for bright, clean layers.
Step 4: Shape and Chill the Cake Balls
Start breaking off small one-inch chunks from each colored cake bowl, then roll them together into tight balls with your hands. I like to think of it as crafting little edible fireworks! Place your balls on parchment-lined trays and pop them into the fridge to chill for at least 1-2 hours. This chilling step is crucial—trust me, it stops them from falling apart later when you dip them.
Step 5: Dip and Decorate
Ready for the messy fun? Melt your white vanilla wafers gently either in a double boiler or microwave, stirring every 30 seconds to avoid burning. Using a fork, dip each chilled cake ball into the melted coating and tap off the excess to keep the coating thin and elegant. While the coating is still wet, sprinkle on your red, white, and blue sprinkles for that festive sparkle. Refrigerate again for about 15 minutes so the coating sets beautifully.
Tips from My Kitchen
- Color Layers: Mixing gently when adding food coloring keeps the batter texture perfect without overmixing.
- Chill Patience: Don’t rush the chilling! Firm cake balls dip easier and look neater without cracks.
- Melting Wafers: Stir frequently to avoid clumping or burning the candy melts—it’s a quick fix to a common dip disaster.
- Sprinkle Timing: Always add sprinkles right after dipping while coating is still wet for the best stick.
How to Serve 4th of July Cake Balls Recipe
Garnishes
I usually stick with festive red, white, and blue sprinkles—not just the classic star shapes but also tiny pearls or glittery sugar crystals. It adds just the right touch of sparkle and crunch that makes each bite feel special and celebratory.
Side Dishes
Serve these cake balls alongside light summer fare like fresh fruit salad, creamy coleslaw, or even salty popcorn for a fun mix of flavors and textures. They pair especially well with sparkling drinks or homemade lemonades to balance that sweet richness.
Creative Ways to Present
For a party, I like to arrange the cake balls on a tiered platter for a stunning centerpiece. You can also skewer them with decorative sticks for easy grab-and-go treats, or place them in mini cupcake liners to keep things tidy and adding a little flair.
Make Ahead and Storage
Storing Leftovers
I recommend storing leftover cake balls in an airtight container in the fridge for up to five days. They hold up really well—just make sure they’re covered so they don’t pick up any fridge odors.
Freezing
Freezing these cake balls works like a charm! I pop them on a parchment-lined tray first to freeze individually, then transfer to a freezer-safe bag. This keeps them from sticking together, and they can keep for up to 3 months.
Reheating
When you’re ready to enjoy frozen cake balls, thaw them in the fridge overnight for best texture. No need to reheat; they’re perfect served chilled like mini cakes. But if you want the coating a little softer, a 10-15 second quick zap in the microwave usually does the trick.
FAQs
-
Can I use homemade cake instead of cake mix for this 4th of July Cake Balls Recipe?
Absolutely! You can use any cake recipe you love, just make sure it’s fully cooled and not overly moist or wet. Homemade cakes can add a nice personal touch, but the cake mix keeps it quick and foolproof.
-
How do I prevent cracks when dipping cake balls?
Chilling the cake balls thoroughly before dipping is key—at least 1-2 hours in the fridge. Also, make sure your candy melts are smooth and not too thick; you can thin them slightly with a tiny bit of vegetable oil if needed.
-
Can these cake balls be made ahead for a party?
Definitely! These are perfect to make a day or two before your event. Store them chilled in an airtight container and bring them out just before serving for fresh, festive treats.
-
What if I don’t have red or blue food coloring?
You can use natural colorings like beet juice for red and blueberry powder for blue, though the colors might be less intense. Otherwise, grab gel food coloring from your local baking aisle for the brightest results.
Final Thoughts
This 4th of July Cake Balls Recipe has honestly become one of my favorite festive treats because it’s not only visually stunning but incredibly tasty and fun to make. Sharing these little bites of celebration always brings smiles and a burst of sweetness to the party. If you want to impress your guests without spending all day in the kitchen, this recipe is your new best friend. Give it a try—you might even find yourself making these year-round!
Print
4th of July Cake Balls Recipe
- Prep Time: 1 hour
- Cook Time: 16 minutes
- Total Time: 3 hours
- Yield: 30 cake balls
- Category: Dessert
- Method: Baking
- Cuisine: American
- Diet: Vegetarian
Description
Celebrate the 4th of July with these festive and colorful 4th of July Cake Balls. Made from moist white cake infused with vibrant red and blue hues, combined with creamy softened cream cheese, then dipped in smooth vanilla melting wafers and decorated with patriotic sprinkles. These bite-sized treats are perfect for your Independence Day party or summer gatherings.
Ingredients
Cake Mix
- 15.25 ounce white cake mix, plus ingredients needed on box to prepare batter
- Red food coloring
- Blue food coloring
Cream Cheese Mixture
- 8 ounce block cream cheese, softened to room temperature
Coating
- 10 ounce bag Ghirardelli vanilla melting wafers
- ½ cup red candy melts
- ½ cup blue candy melts
Decoration
- Red, white, and blue sprinkles
Instructions
- Preheat Oven and Prepare Pans: Preheat the oven to 350°F or at the temperature recommended on the cake mix package. Lightly grease three small baking pans (8×8 inch pans recommended) and set aside.
- Prepare Cake Batter: In a large mixing bowl, combine the white cake mix with the ingredients listed on the box and whisk together until a smooth batter forms.
- Divide and Color Batter: Separate the batter evenly into three smaller bowls. Leave one plain, add red food coloring to the second bowl, and blue food coloring to the third. Add 5 drops at a time, mixing well with separate spoons until the desired shades are reached.
- Bake the Cakes: Pour each colored batter into its respective greased baking pan. Bake for 16 minutes or until a toothpick inserted in the center comes out clean and the cake tops look set.
- Cool Cakes: Remove the pans from the oven and place them on a wire rack to cool completely.
- Crumble Cakes: Once cooled, crumble each cake into smaller pieces and place in separate bowls according to color.
- Prepare Cream Cheese Mixture: In a large mixing bowl, beat the softened cream cheese with a hand mixer on medium-high until smooth and creamy. Divide the cream cheese evenly into three portions.
- Combine Cake and Cream Cheese: Add one portion of cream cheese to each bowl of crumbled cake. Mix thoroughly until fully incorporated using a hand mixer on low to medium or a rubber spatula. Clean the mixer or spatula between each color.
- Form Cake Balls: Line two baking trays with parchment paper. Take small one-inch chunks from each colored cake mixture and roll the colors together with your hands into balls. Place the formed balls onto the prepared trays.
- Chill Cake Balls: Refrigerate the trays for 1 to 2 hours to allow the cake balls to firm up and hold their shape for dipping.
- Melt Coating: Using a double boiler over low heat or a microwave on low/defrost setting, melt the white vanilla melting wafers until smooth. Stir every 30 seconds to prevent burning.
- Dip Cake Balls: Place one cake ball at a time on a fork and dip it into the melted wafers. Tap the fork gently to remove excess coating and thin out the layer. Place the coated ball back on the baking tray and immediately sprinkle with red, white, and blue sprinkles. Repeat with all cake balls.
- Set Coating: Return the dipped cake balls to the refrigerator for 15 minutes to allow the coating to fully set.
- Serve and Store: Keep the finished cake balls refrigerated until ready to serve. Enjoy these festive treats at your celebration!
Notes
- Refrigerate leftovers in an airtight container for up to 5 days to maintain freshness.
- Use separate spoons and mixing utensils for each batter color to avoid color contamination.
- If cream cheese is too cold, it will be difficult to blend; ensure it is softened to room temperature before mixing.
- Chilling the cake balls before dipping is essential to help them keep their shape and prevent melting of the coating.
- For a smoother coating, avoid overheating the melting wafers as they can become grainy or burn.
Nutrition
- Serving Size: 1 cake ball
- Calories: 150 kcal
- Sugar: 18 g
- Sodium: 120 mg
- Fat: 7 g
- Saturated Fat: 4 g
- Unsaturated Fat: 2 g
- Trans Fat: 0 g
- Carbohydrates: 20 g
- Fiber: 0 g
- Protein: 1 g
- Cholesterol: 15 mg

