
Spider Cookies Recipe
If you’re looking for a cookie that’s as fun to make as it is to eat, you’ve got to try this Spider Cookies Recipe. These little critters are perfect for Halloween, themed parties, or just whenever you need a whimsical treat that brings out your inner kid. I promise, once you make them with my tips, you’ll find these cookies can become a household favorite because the combination of buttery dough and rich chocolate “legs” is simply irresistible. Ready to have some baking fun? Let’s dive in!
Why This Recipe Works
- Perfect Cookie Texture: The blend of brown and granulated sugars plus melted butter creates soft, chewy cookies with just enough crisp at the edges.
- Simple Yet Show-Stopping: Adding chocolate chips after baking and drawing legs with melted chocolate gives them that spider look without complicated decorating skills.
- Crowd-Pleasing Flavors: Vanilla and rich chocolate come together in a way that’s familiar but somehow extra fun with this spooky twist.
- Flexible & Fun: You can easily customize the decorating step or add seasonal variations, making these cookies great year-round or for specific events.

Ingredients & Why They Work
These ingredients come together to make dough that’s soft and easy to work with, yet holds shape beautifully for baking, which is key when you want your spider cookies to look just right. Plus, the chocolate chips provide the perfect amount of melty sweetness and punch of chocolate in every bite.
- All-purpose flour: Provides structure and a classic chewy cookie texture without being too cakey or crumbly.
- Baking soda: Helps the cookies rise slightly, giving them a light, airy interior while keeping them soft.
- Salt: Just a pinch enhances the sweetness and balances the chocolate flavors.
- Butter (melted and warm): Gives richness and tenderness to the dough; melting it helps dissolve sugars for a nice chewy texture.
- Light brown sugar: Offers moisture and a subtle molasses note that deepens cookie flavor.
- Granulated sugar: Adds the right amount of sweetness and helps with slight crispiness on the edges.
- Egg & egg yolk: Provide structure and richness; the extra yolk keeps these cookies tender and moist.
- Vanilla extract: Brings warmth and rounds out all the flavors beautifully.
- Semi-sweet chocolate chips: Split between dough and decoration, they give melty chocolate in the cookie and a perfect canvas for “spider legs.”
Make It Your Way
I love how versatile this Spider Cookies Recipe is—whether you want to add a dash of cinnamon, swap some chocolate chips for white chocolate, or even try mini M&Ms for colorful legs, the dough holds up beautifully. Feel free to make this recipe your own!
- Cinnamon Kick: Adding a teaspoon of cinnamon spices things up, giving your spider cookies a warm autumn vibe that I adore on chillier evenings.
- Nut-Free Variation: I’ve made these without any nuts or substitutes and they come out just as delicious—perfect if you’re baking for little ones with allergies.
- Vegan Swap: Try using vegan butter and a flax “egg” to create a vegan-friendly batch; though the texture shifts slightly, it’s still tasty and fun to decorate.
Step-by-Step: How I Make Spider Cookies Recipe
Step 1: Gather Your Ingredients and Preheat
First off, get everything out—you’ll want your melted butter cooled to warm but not hot, and the oven preheated to 350°F. This makes the process go smoothly without waiting or scrambling.
Step 2: Mix Dry Ingredients
In a medium bowl, whisk together the flour, baking soda, and salt. Mixing them first keeps flavors balanced and ensures no clumps of baking soda sneak into a bite of your cookie.
Step 3: Beat Butter & Sugars, Add Eggs
Use an electric mixer to blend the melted butter with both brown and granulated sugars until the mixture is smooth and creamy. Then, crack in the egg and egg yolk along with vanilla extract, and beat again until everything is well combined. This step is key for luscious, chewy cookies.
Step 4: Combine Wet & Dry, Stir in Chocolate Chips
Slowly add the flour mixture to the wet ingredients, mixing just until you don’t see any flour streaks. Don’t overmix! Then gently fold in ¾ cup of chocolate chips to get melty pockets of chocolate in the cookie.
Step 5: Scoop and Bake
Scoop the dough into generous balls and place them spaced apart on parchment paper lined baking sheets. Bake for 10-12 minutes. You want the edges lightly golden but the centers still nice and soft—exactly how I like them.
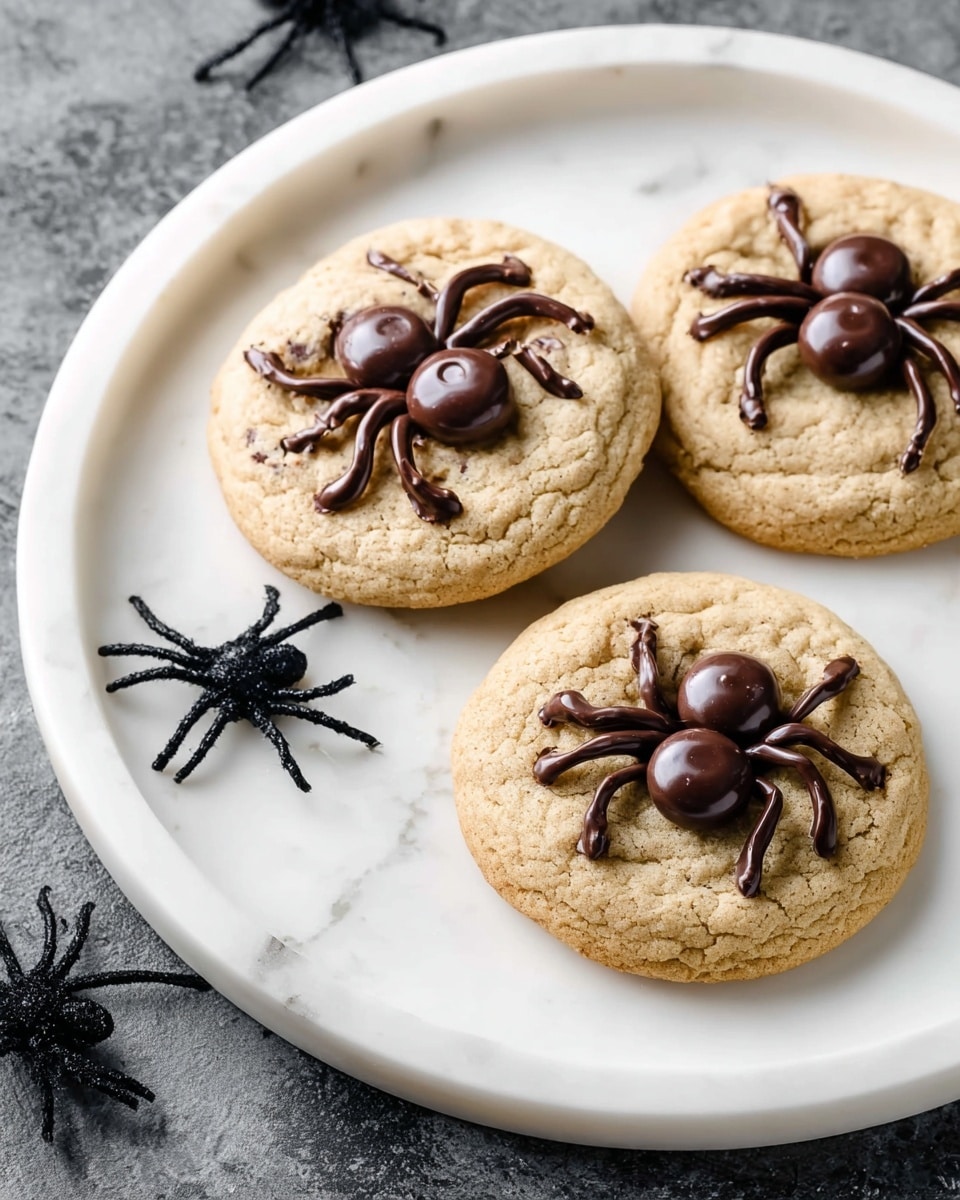
Step 6: Add Chocolate “Spider Bodies” & Draw Legs
Once the cookies come out of the oven, press 3-4 chocolate chips into the tops point-side up to form the spider’s body. Then melt the remaining chocolate chips in a microwave-safe bowl on low power, stirring every 30 seconds to avoid burning.
Transfer melted chocolate into a ziplock bag and snip the tiniest corner to create a piping bag for spider legs. Carefully squeeze out 8 thin lines around the chocolate chip cluster—legs facing outward—and you’re done.
Tips from My Kitchen
- Don’t Overbake: I’ve learned biting into an overbaked spider cookie is sad—watch for slightly soft centers for that perfect chewy texture.
- Cool Before Decorating: Wait 5 minutes before adding chocolate legs, so your chips don’t melt away but still adhere well.
- Use Small Scissor Cut: Making a tiny hole in the ziplock bag helps you control the chocolate flow for neat leg details.
- Batch Baking: Make double batches and freeze dough balls—you’ll thank yourself on busy days.
How to Serve Spider Cookies Recipe
Garnishes
I like to keep the garnishes simple—extra chocolate chips or even tiny edible candy eyes stuck into the melted chocolate make the spiders look way cuter. If you want to get crafty, try mini candy pumpkins or colored sugar sprinkles around the edges for a festive vibe.
Side Dishes
Spider cookies pair perfectly with a cold glass of milk, but I also love serving them alongside a warm cup of spiced apple cider or a creamy hot chocolate—especially if it’s a fall gathering or spooky movie night.
Creative Ways to Present
For Halloween parties, I’ve arranged these cookies on a platter with fake spider webs and plastic spiders to really set the mood. For kid’s birthdays, placing them in clear treat bags tied with orange and black ribbons makes a fun takeaway gift that your guests will adore.
Make Ahead and Storage
Storing Leftovers
I keep leftover Spider Cookies in an airtight container at room temperature—it usually lasts 1-2 days before everyone devours them. The cookies stay soft and the chocolate legs firm up nicely, so they’re still a treat after sitting around.
Freezing
For longer storage, I freeze baked cookies in a freezer-safe bag for up to 3 months. When you want a batch, just thaw at room temperature and the cookies taste just as fresh as the day you baked them.
Reheating
If you want to reheat, I recommend 10-15 seconds in the microwave or a brief 3-4 minutes in a low oven (around 275°F) to soften them up without melting the chocolate legs too much. This warms them back to that freshly baked yumminess.
FAQs
-
Can I use chocolate chunks instead of chocolate chips in this Spider Cookies Recipe?
Absolutely! Chocolate chunks work great and will give you delicious patches of melty chocolate with a bit more texture. Just be sure to cut them into smaller pieces if they’re too big for the spider decoration part.
-
How do I make the spider legs look neat and even?
Use a ziplock bag with a very small corner cut—practice squeezing the melted chocolate on parchment paper first to get comfortable. Steady hands help, but if a leg looks uneven, just add an extra one or fix it while the chocolate is still soft.
-
Is this Spider Cookies Recipe kid-friendly for baking with children?
Definitely! Kids love making these because the decorating step lets them be creative—and with adult supervision for the oven and melted chocolate, it’s a fun and safe activity for all ages.
-
Can I freeze the cookie dough instead of baked cookies?
Yes! I often freeze the dough scooped into balls on a baking sheet, then transfer them to a freezer-safe bag. When ready, bake straight from frozen—just add a minute or two to the baking time.
-
What are some fun occasions for making Spider Cookies?
Halloween is the obvious one, but also consider creepy-crawly themed birthday parties, movie marathons with spooky flicks, or even as playful treats for family game nights. They’re always a hit!
Final Thoughts
These Spider Cookies have become one of my go-to baking projects when I want something a bit playful but totally delicious. I love how easy they are to make, how charming they look, and of course, how amazing they taste! Whether you’re baking with kids or entertaining friends, this Spider Cookies Recipe brings smiles and a little bit of spooky magic to the kitchen. Try it out—your oven (and guests) will thank you!
Print
Spider Cookies Recipe
- Prep Time: 20 minutes
- Cook Time: 12 minutes
- Total Time: 32 minutes
- Yield: 15 cookies
- Category: Dessert
- Method: Baking
- Cuisine: American
Description
These festive Spider Cookies are a fun and delicious treat perfect for Halloween. Soft, chocolate-chip filled cookies decorated with melted chocolate to resemble spooky spider legs, making them both tasty and visually impressive.
Ingredients
Dry Ingredients
- 2 cups + 2 tablespoons all-purpose flour
- ½ teaspoon baking soda
- ½ teaspoon salt
Wet Ingredients
- 12 tablespoons butter, melted and cooled until warm
- 1 cup light brown sugar
- ½ cup granulated sugar
- 1 large egg
- 1 large egg yolk
- 2 teaspoons vanilla extract
Chocolate
- 2 cups semi-sweet chocolate chips, divided
Instructions
- Preheat Oven: Preheat your oven to 350 degrees Fahrenheit to prepare for baking.
- Make Cooking Dough: In a medium bowl, whisk together the all-purpose flour, salt, and baking soda. In a separate large bowl, use an electric mixer to beat melted butter with light brown sugar and granulated sugar until well blended. Add the egg, egg yolk, and vanilla extract, mixing until combined. Gradually stir in the dry ingredients until just combined, then gently fold in ¾ cup of the semi-sweet chocolate chips. The dough will be soft.
- Bake Cookies: Scoop the dough into balls and place them on a parchment-lined cookie sheet, spacing them evenly. Bake for 12 minutes until the edges are lightly golden.
- Add Chocolate Chips on Top: Remove the cookies from the oven and immediately press 3-4 chocolate chips into the top of each cookie with the pointed side up to resemble spider bodies.
- Melt Remaining Chocolate: Place the remaining chocolate chips in a microwave-safe bowl. Microwave on low power, stirring every 30 seconds, until the chocolate is fully melted and smooth.
- Draw Spider Legs: Transfer the melted chocolate to a small ziplock bag and carefully cut a tiny slit in one corner of the bag to create a piping tip. Squeeze the melted chocolate through this slit to draw 8 spider legs radiating from the cluster of chocolate chips on each cookie. Let the chocolate set before serving.
Notes
- Make Ahead Instructions: Store leftover spider cookies in an airtight container at room temperature for 1-2 days to maintain freshness.
- Freezing Instructions: Freeze baked spider cookies in a freezer-safe bag or container for up to 3 months. Thaw before serving.
- For best results, ensure the melted chocolate is not too hot before piping the spider legs to prevent melting the cookies.
- Use parchment paper to prevent sticking and for easy cleanup.
Nutrition
- Serving Size: 1 cookie
- Calories: 220 kcal
- Sugar: 15 g
- Sodium: 120 mg
- Fat: 12 g
- Saturated Fat: 7 g
- Unsaturated Fat: 4 g
- Trans Fat: 0 g
- Carbohydrates: 27 g
- Fiber: 1 g
- Protein: 2 g
- Cholesterol: 40 mg


