
Cupcake Ornaments Recipe
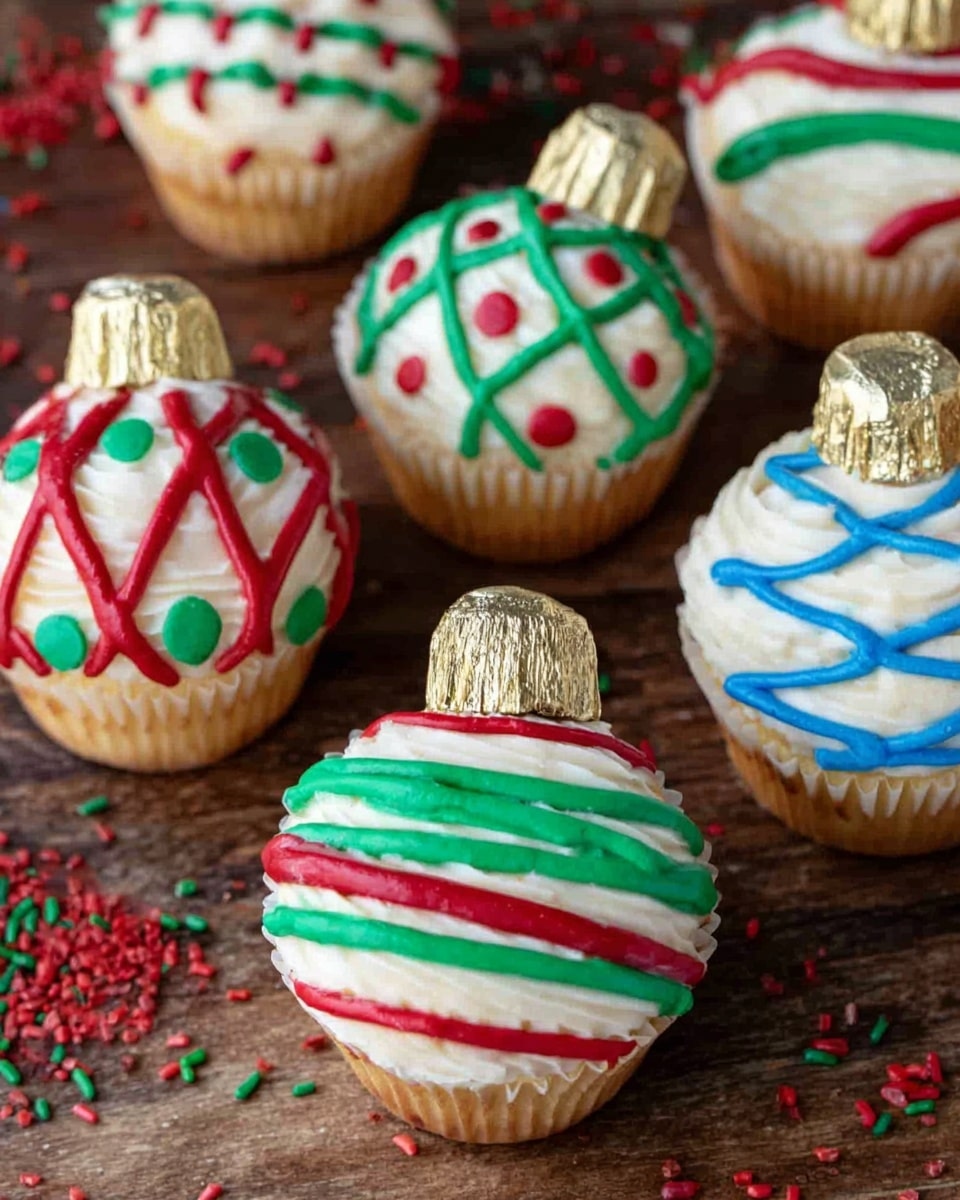
If you’re on the hunt for a festive, fun, and totally adorable project for your holiday gatherings, you absolutely have to try this Cupcake Ornaments Recipe. Believe me, these cupcakes aren’t just tasty – they double as charming little decorations that bring instant joy! I’ve made these for parties and family get-togethers, and everyone always asks for the secret. So pull up a chair, grab your apron, and let’s dive into how you can whip up these cheerful treats with ease.
Why This Recipe Works
- Simple Ingredients: The recipe uses pantry staples and one candy, making it easy and quick.
- Eye-Catching Design: The colorful frosting and Reese’s cups turn cupcakes into festive ornaments.
- Customizable Frosting: You can easily mix colors or adjust sweetness to your liking.
- Perfect Portion Size: The cupcakes are pre-portioned in liners, making serving and decorating a breeze.

Ingredients & Why They Work
Every ingredient in this Cupcake Ornaments Recipe plays a role in both flavor and festive flair. Plus, these are super easy to source, even last minute. Here are the key ones you’ll want to have on hand:
- Cupcakes: Using pre-baked cupcakes in liners saves you from fussing with baking – store-bought or homemade both work.
- Reese’s miniature cups: These add a chocolatey, nutty crunch and serve as the perfect “hook” on your ornament cupcake.
- Powdered sugar: Key for fluffy frosting that holds its shape on your cupcake canvas.
- Butter: Brings richness to the frosting and helps smooth texture.
- Evaporated milk: Adds creaminess and thins out the frosting just enough without losing body.
- Vanilla extract: The magic touch to enhance flavor without overpowering.
- Red, blue, and green icing pens (or food coloring): These give your cupcakes that holiday sparkle and let you get creative with decoration.
Make It Your Way
One of the best things about the Cupcake Ornaments Recipe is how flexible it is. I used to stick exactly to the colors suggested, but now I love experimenting with different shades or even adding edible glitter for some sparkle on top. You can really make these your own little holiday masterpieces.
- Variation: When I made these with my niece, we swapped out red and green for purple and silver to match her holiday party theme – it was a hit!
- Dietary modification: You can easily use dairy-free butter and powdered sugar to make this vegan-friendly.
- Texture toggle: If you prefer stiffer frosting for piping, just add more powdered sugar until it holds peaks.
Step-by-Step: How I Make Cupcake Ornaments Recipe
Step 1: Whip Up That Frosting
Start by combining powdered sugar, butter, evaporated milk, and vanilla extract in a large bowl. I use my electric mixer on medium speed to get a smooth, fluffy frosting that’s just right. If it feels too thick, a splash more evaporated milk thins things out; too runny, add a bit more powdered sugar. This frosting is the base that bright colors will stick to, so take your time getting it perfect.
Step 2: Divide and Dye
Pour about ¾ cup of frosting each into two small bowls. Add red food coloring to one and green to the other, mixing till you get vibrant, festive shades you love. The rest remains white for frosting the cupcakes’ tops. This part’s fun to play with – don’t worry about being perfect, it just adds to the charm!
Step 3: Frost the Cupcakes
Using a spatula or butter knife, generously frost each cupcake with the white frosting. I like to swirl it a bit to mimic the look of fluffy snow on an ornament. If you’re feeling fancy, a piping bag with a star tip works beautifully here. Remember, it doesn’t have to look perfect – rustic charm is part of the appeal.
Step 4: Decorate Your Ornaments
Fill piping bags or ziplock bags (with a tiny snip at the corner) with your red and green frosting. Now the decorating fun begins! Draw swirls, dots, stripes, or whatever ornament pattern makes you smile. I’ve found that simple shapes look great and are easy even for kids to handle. It’s where your creativity truly shines.
Step 5: The Sweet Finishing Touch
Place a Reese’s miniature cup right in the center of each cupcake liner, pressing gently into the frosting to “cap” your ornament. Here’s a little trick I love: twist a paperclip into a teeny “fish hook” and stick it into the Reese’s cup to mimic an ornament hanger. It’s a small detail but makes these cupcakes even more festive.
Tips from My Kitchen
- Frosting Consistency: Don’t rush frosting thickness – it makes your decorating smoother and the cupcakes prettier.
- Color Mixing: Start with a few drops of food coloring and add more slowly to avoid overly intense colors.
- Cupcake Base: I’ve tried store-bought and homemade cupcakes; both work great, but less sweet bases let the frosting and candy really shine.
- Avoid Overfilling Bags: Small piping bags are easier to handle and control when adding ornament details.
How to Serve Cupcake Ornaments Recipe
Garnishes
I generally keep garnishes simple so the ornament look stands out. A dusting of edible glitter or a few little sugar pearls works beautifully. Sometimes I’ll add just a touch of crushed candy canes around the base for that peppermint crunch and festive vibe.
Side Dishes
These cupcakes pair wonderfully with a warm holiday drink—think hot cocoa or spiced apple cider—and a fresh fruit platter to balance all that sweetness. I like to serve them alongside a small cheese plate during parties to mix savory with sweet.
Creative Ways to Present
For last year’s cookie exchange, I arranged my cupcake ornaments in a round wooden tray lined with evergreen sprigs and tiny fairy lights—instant showstopper. If you want a gift idea, pack a few in a festive box with clear windows so the presentation matches the cuteness inside.
Make Ahead and Storage
Storing Leftovers
Cover your decorated cupcakes loosely with plastic wrap and store them in the fridge if you’re not serving right away. I’ve found that they stay fresh for up to 3 days without the frosting drying out or the Reese’s cups losing their shape.
Freezing
If you want to freeze them, freeze undecorated cupcakes separately first. Later, thaw them completely before frosting and decorating. Freezing after decorating tends to ruin the delicate frosting texture and candy placement from my experience.
Reheating
Reheating cupcakes isn’t usually necessary here, but if you want to warm an undecorated cupcake, a quick 10-15 second zap in the microwave works fine. For decorated ones, just enjoy at room temp to keep the frosting and candies intact.
FAQs
-
Can I use different candy instead of Reese’s miniature cups?
Absolutely! While the Reese’s miniature cups mimic the ornament hook beautifully and add chocolate flavor, you can substitute with any small round candies or mini chocolates you love. Just keep in mind the size so they fit nicely on top.
-
How long does the frosting last once colored?
The frosting, once dyed, lasts as long as the base frosting—about 3 days stored in an airtight container in the fridge. I recommend only coloring what you plan to use within that timeframe to keep it fresh and vibrant.
-
Can I make the cupcakes from scratch instead of store-bought?
Definitely! If you love baking, make your favorite cupcake recipe. Just bake them in liners and let fully cool before decorating. Homemade cupcakes add a special personal touch to your Cupcake Ornaments Recipe.
-
What if I don’t have piping bags?
No worries! Ziplock bags with a tiny cut in the corner work just as well for decorating. Or use a small spoon to carefully add dot and swirl details if you prefer a freestyle approach – they’ll look charming either way.
-
How do I prevent the frosting from melting on warm days?
Keep your decorated cupcakes refrigerated until right before serving. If it’s particularly warm, avoid direct sunlight and serve quickly once out of the fridge—this keeps the frosting firm and looking its best.
Final Thoughts
Honestly, this Cupcake Ornaments Recipe holds a special spot in my kitchen heart. It’s one of the few holiday treats that’s not only delicious but also doubles as décor and a conversation starter. Whether you’re baking for a crowd or an intimate family evening, I promise these cupcakes will bring a smile. So next time you want something festive yet fuss-free, grab your frosting and candy, and make some cupcake ornaments—you won’t regret it!
Print
Cupcake Ornaments Recipe
- Prep Time: 30 minutes
- Cook Time: 0 minutes
- Total Time: 30 minutes
- Yield: 24 servings
- Category: Dessert
- Method: No-Cook
- Cuisine: American
Description
These festive Cupcake Ornaments are a delightful holiday treat featuring moist cupcakes topped with creamy vanilla frosting and decorated with colorful icing and Reese’s miniature cups to resemble Christmas ornaments. Perfect for holiday parties and gatherings, these cupcakes combine classic flavors with a fun, seasonal design that kids and adults will love.
Ingredients
Cupcakes
- 24 cupcakes, baked in cupcake liners
- 24 Reese’s miniature cups
For the Frosting
- 5 cups powdered sugar
- 5 tablespoons butter
- 5 tablespoons evaporated milk
- 1 1/2 teaspoons vanilla extract
- Red, blue, and green icing pens (or color your own homemade frosting)
Instructions
- Make the Frosting: Combine the powdered sugar, butter, evaporated milk, and vanilla extract in a mixing bowl and beat on medium speed until the mixture becomes smooth and fluffy. Adjust consistency by adding more powdered sugar to thicken or more evaporated milk to thin the frosting as needed.
- Prepare Colored Frosting: Divide about 1 1/2 cups of the white frosting equally into two small bowls, placing approximately 3/4 cup in each. Add a few drops of red food coloring to one bowl and green food coloring to the other, mixing until you achieve your desired shades.
- Frost Cupcakes: Use the remaining 1 1/2 cups of white frosting to generously frost the tops of all 24 cupcakes, creating an even base layer for decoration.
- Prepare Piping Bags: Transfer the red and green colored frostings into separate piping bags or ziplock bags with a small corner snipped off for easy piping.
- Decorate Cupcakes: Use the colored frosting to pipe ornament designs onto the frosted cupcakes. Add creative patterns or festive shapes to resemble holiday ornaments.
- Add Reese’s Miniature Cups: Place one Reese’s miniature cup inside each cupcake liner on top of the decorated frosting to complete the ornament look. For added flair, twist a paper clip into a small fish hook shape and insert it into the Reese’s to mimic an ornament hanger.
Notes
- If the frosting is too thin, add additional powdered sugar a tablespoon at a time until desired thickness is reached.
- For a thicker frosting to hold intricate designs better, chill the frosting slightly before piping.
- Substitute butter with margarine for a dairy-free option; adjust flavor accordingly.
- Use food coloring gels instead of liquid drops for more vibrant colors without thinning the frosting.
- To make the ornament hanger, use colorful paper clips or small candy canes for a festive touch.
- The cupcakes can be made ahead of time and frosted just before serving.
Nutrition
- Serving Size: 1 cupcake
- Calories: 320 kcal
- Sugar: 30 g
- Sodium: 150 mg
- Fat: 15 g
- Saturated Fat: 7 g
- Unsaturated Fat: 6 g
- Trans Fat: 0 g
- Carbohydrates: 40 g
- Fiber: 1 g
- Protein: 3 g
- Cholesterol: 40 mg
