
Halloween Pizzas Recipe
If you’re looking for a fun, festive way to celebrate the spooky season, I have just the thing for you — a seriously fun and easy Halloween Pizzas Recipe that’s perfect for family gatherings, kids’ parties, or even a cozy night in. These decorated pizzas are not only adorable but quick to whip up, and they taste absolutely delicious. Stick with me, and I’ll share all my secrets to making this Halloween-themed meal a guaranteed hit!
Why This Recipe Works
- Quick and Simple Dough: The no-rise pizza crust means no waiting around — you’ll have pizza ready to go in under 30 minutes.
- Flexible Toppings: You can customize your Halloween pizzas with a variety of toppings to suit your family’s favorite flavors or spooky designs.
- Kid-Friendly Fun: Decorating these pizzas is a delightful activity that gets everyone involved in the kitchen.
- Balanced Flavor: The combination of fresh mozzarella and tangy tomato sauce keeps each bite satisfying and comforting.

Ingredients & Why They Work
Every ingredient in this Halloween Pizzas Recipe plays its part perfectly. The dough is soft and crisp just right, the sauce adds just the right tang, and the toppings bring in color, texture, and flavor — plus, they’re easy to find, so no stress about hunting down specialty items.
- All-purpose flour: It creates the perfect base for a pizza crust that’s tender but sturdy enough to hold those toppings without sagging.
- Fleischmann’s Pizza Yeast: This active yeast makes the dough rise enough for soft chewiness, but since it’s a no-rise recipe, it saves you time.
- Granulated sugar: Helps activate the yeast and boosts a light sweetness that balances the savory toppings.
- Salt: Enhances all the flavors — don’t skip or cut back too much.
- Very warm water: Activates the yeast quickly; just make sure it’s not too hot or you’ll kill the yeast.
- Vegetable or canola oil: Adds moisture, making the crust tender and easy to spread.
- Pizza sauce: A flavorful, familiar base that ties everything together — homemade or store-bought both work great.
- Fresh mozzarella cheese: Melts beautifully, giving that classic pizza pull and creamy texture.
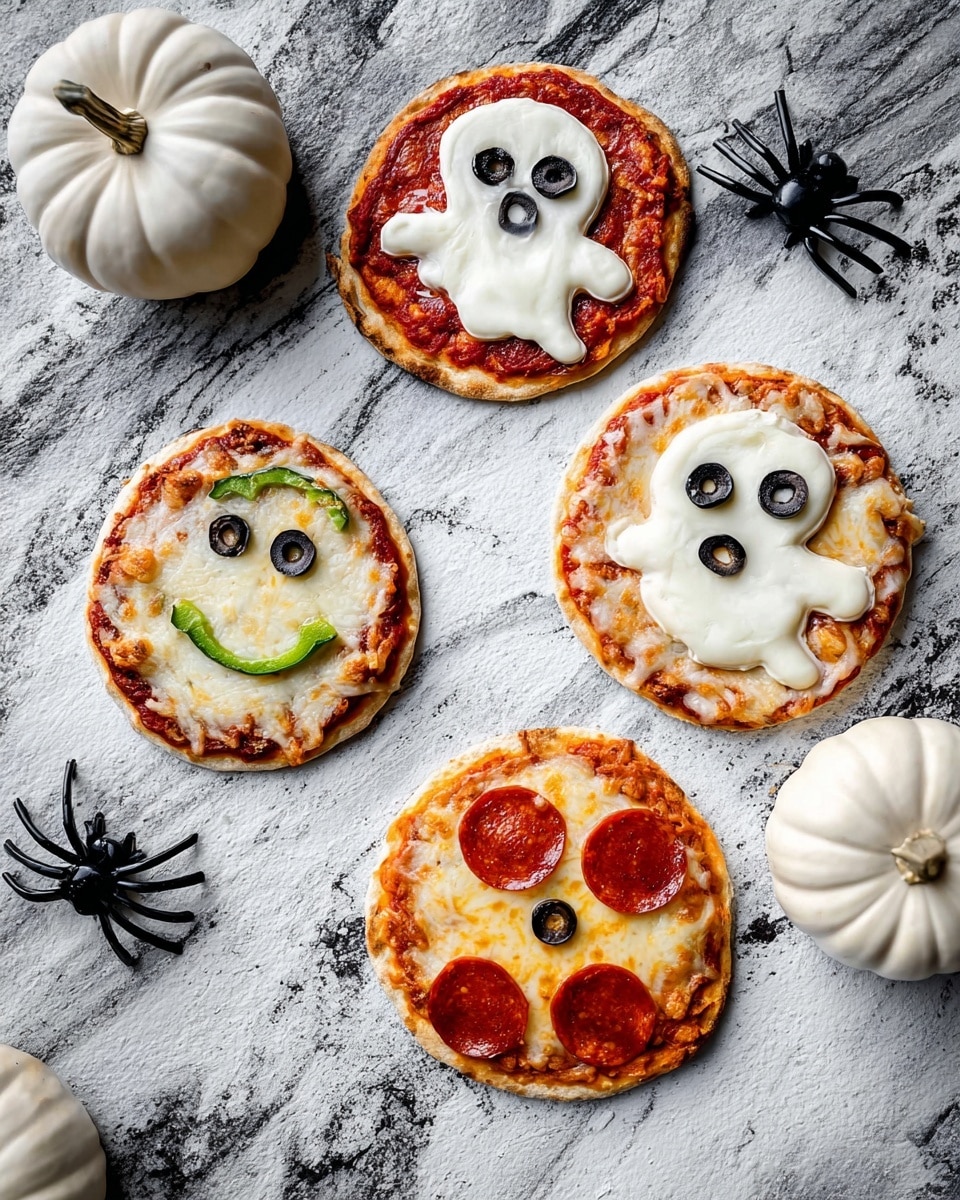
- Pizza toppings (pepperoni, bell peppers, olives, onion, pineapple, parsley, salami, Canadian bacon): Choose your favorites to create fun Halloween shapes — black olives can be spiders, bell peppers can form creepy eyes, and pepperoni make perfect little bats or pumpkins.
Make It Your Way
I love switching up the toppings for these Halloween pizzas depending on who’s helping me make them or what’s in the fridge. Feel free to get creative! After all, the best part is the fun of decorating your spooky pizzas exactly how you want.
- Vegetarian variation: I’ve tried this without any meat — just lots of colorful veggies like bell peppers and olives — and it’s just as crowd-pleasing.
- Make it gluten-free: For a gluten-free crust, swap in your favorite store-bought or homemade gluten-free pizza dough and follow the same topping ideas.
- Spicy twist: Add a sprinkle of red pepper flakes or use spicy sausage to give it a Halloween bite.
Step-by-Step: How I Make Halloween Pizzas Recipe
Step 1: Mix and Knead Your Dough
Start by combining 1 cup of flour with the undissolved yeast, sugar, and salt in a large bowl. Then, add your warm water and oil, stirring it all up until the mixture comes together — it should take around a minute. Gradually add the rest of the flour until the dough forms a slightly sticky ball. Turn it out onto a floured surface and knead for about 4 minutes until the dough is smooth and elastic. Trust me, don’t skip this step — it makes all the difference in the texture!
Step 2: Shape and Parbake Your Crusts
Divide your dough into four even pieces and roll or pat each into roughly 8-inch circles. Place them on a greased baking sheet and bake at 450°F for 5-6 minutes. You want the crusts to be just set, with a light golden color on the bottom — this pre-bake step helps avoid soggy crusts once you add the toppings.
Step 3: Decorate Your Halloween Pizzas
Spread each parbaked crust with pizza sauce, then add your fresh mozzarella and chosen toppings to create fun Halloween designs — think spider webs, pumpkins, ghosts, or whatever your imagination conjures. This part is my favorite because it turns cooking into an art project, especially if you have little helpers around!
Step 4: Bake Until Bubbly and Delicious
Pop your decorated pizzas back into the hot oven for another 5-8 minutes. You’re looking for bubbly, melted cheese and toppings that are cooked through but still vibrant. Keep an eye on them so nothing burns — every oven is a little different!
Tips from My Kitchen
- Use Warm, Not Hot Water: I’ve burned yeast before by using water that was too hot. Warm water around 110°F works best for activating it.
- Parbake Crusts for Crispiness: Baking the dough first keeps the crust from getting soggy when you add sauce and toppings later.
- Get Creative with Toppings: I like to use olives to make spooky spider eyes and bell peppers for pumpkin shapes — it makes the whole cooking experience more fun.
- Watch Your Bake Time Closely: Ovens vary, so check on the pizzas early to avoid overcooking — especially when using different toppings.
How to Serve Halloween Pizzas Recipe
Garnishes
I like to finish Halloween pizzas with a sprinkle of fresh parsley or a few red pepper flakes for a pop of color and a little heat. Sometimes a drizzle of good olive oil right after baking adds a nice touch too. It’s those little details that make the pizzas feel extra special without extra work.
Side Dishes
Serve these pizzas with a crisp green salad or some crunchy veggie sticks with dip on the side to balance the meal. For a Halloween twist, I’ve paired them with a blood orange soda or a fruity punch — perfect for parties!
Creative Ways to Present
Try arranging mini Halloween pizzas on a large platter in a spooky pattern, or place them on individual black plates with Halloween-themed napkins for an extra festive vibe. If you’re hosting a party, consider letting guests decorate their own pizza for a fun interactive activity.
Make Ahead and Storage
Storing Leftovers
Once cooled, I wrap leftover Halloween pizzas tightly in plastic wrap and pop them into an airtight container in the fridge. They keep well for up to 3 days. Whenever I’ve reheated leftovers, they taste nearly as good as fresh!
Freezing
This recipe freezes beautifully. I usually parbake the crusts, assemble the pizzas, cover them well with foil and plastic wrap, and freeze for up to two months. When craving a fast spooky snack, it’s a game changer!
Reheating
Reheat your pizzas in a hot oven at 375°F for 8-10 minutes or until warmed through and the cheese is bubbly again. Avoid the microwave, which can make the crust soggy — the oven brings back that lovely crispiness.
FAQs
-
Can I make the dough ahead of time for this Halloween Pizzas Recipe?
Absolutely! You can prepare the dough a few hours before you want to bake and keep it in an airtight container in the fridge. Just bring it to room temperature before rolling out. This saves time on the day you’re serving.
-
What are some easy Halloween-themed topping ideas?
Use olives and pepperoni to make spooky eyes or spiders, bell pepper slices to form pumpkin shapes, and onions to create ghostly designs. Pineapple chunks can act as ghost eyes, and parsley offers a nice “grass” effect around your creations.
-
Can I substitute the fresh mozzarella with shredded mozzarella?
Yes, shredded mozzarella works fine. However, fresh mozzarella melts creamier and gives a more authentic texture. If you’re in a pinch, shredded is a good shortcut.
-
Is this recipe kid-friendly?
Definitely! The no-rise dough is easy to handle, and decorating the pizzas is a fun activity for kids to get involved with. Just supervise the oven part, and you’ll have a great group cooking experience.
Final Thoughts
I’ve been making this Halloween Pizzas Recipe for years now, and it never fails to bring smiles around the table. The ease of the dough combined with the creativity of decorating means you get all the fun without the fuss. Whether you’re feeding a crowd or just getting cozy with a loved one, these pizzas are a festive, tasty way to celebrate the season. I hope you’ll give this recipe a try — and then watch it become your new Halloween tradition!
Print
Halloween Pizzas Recipe
- Prep Time: 15 minutes
- Cook Time: 12 minutes
- Total Time: 27 minutes
- Yield: 4 servings
- Category: Main Course
- Method: Baking
- Cuisine: American
Description
This Halloween-themed pizza recipe features a no-rise pizza crust that is quick and easy to prepare. Topped with classic pizza sauce, fresh mozzarella, and an assortment of festive toppings such as pepperoni, bell peppers, olives, and more, these pizzas are perfect for a spooky celebration. The dough is partially pre-baked before adding toppings, ensuring a crisp crust with melted, bubbly cheese and creative designs.
Ingredients
No-Rise Pizza Crust
- 1 ¾ to 2 cups all-purpose flour
- 1 envelope Fleischmann’s Pizza Yeast
- 1 1/2 teaspoons granulated sugar
- 3/4 teaspoon salt
- 2/3 cup very warm water
- 3 Tablespoons vegetable oil or canola oil
Toppings
- 1 cup pizza sauce
- 1/2 pound fresh mozzarella cheese
- Desired pizza toppings: pepperoni, bell peppers, olives, onion, pineapple, parsley, salami, Canadian bacon
Instructions
- Preheat Oven: Preheat your oven to 450°F to prepare for baking the pizzas.
- Mix Dry Ingredients: In a large bowl, combine 1 cup of flour, undissolved yeast, sugar, and salt.
- Add Wet Ingredients and Mix: Add the very warm water and oil to the dry mixture and blend well for about 1 minute.
- Form Dough: Gradually add the remaining flour until a soft dough forms. It should be slightly sticky but form a ball.
- Knead Dough: Turn the dough onto a floured surface and knead for about 4 minutes until smooth and elastic, adding flour as needed.
- Divide Dough: Split the dough into 4 equal portions.
- Shape Crusts: Roll or pat each portion into an 8-inch circle. Place each circle on a greased baking sheet.
- Par-Bake Crusts: Bake the crusts for 5-6 minutes until just set and lightly browned on the bottom.
- Add Sauce and Toppings: Spread pizza sauce evenly over each crust, then add mozzarella cheese and your chosen toppings to create Halloween designs.
- Bake Pizzas: Return the pizzas to the oven and bake for an additional 5-8 minutes until the cheese is melted and bubbly.
Notes
- Make Ahead: Prepare pizza sauce and store in the refrigerator for up to one week. Chop and store toppings separately in airtight containers in the fridge.
- Dough can be made a few hours in advance and kept in an airtight container in the refrigerator.
- Freezing: Assemble pizzas on par-baked crusts, cover well, and freeze for up to 2 months. Bake from frozen, increasing cook time by a few minutes.
Nutrition
- Serving Size: 1 pizza
- Calories: 350 kcal
- Sugar: 4 g
- Sodium: 600 mg
- Fat: 12 g
- Saturated Fat: 5 g
- Unsaturated Fat: 6 g
- Trans Fat: 0 g
- Carbohydrates: 45 g
- Fiber: 2 g
- Protein: 15 g
- Cholesterol: 20 mg


