
No Bake Halloween Cheesecake Cups Recipe
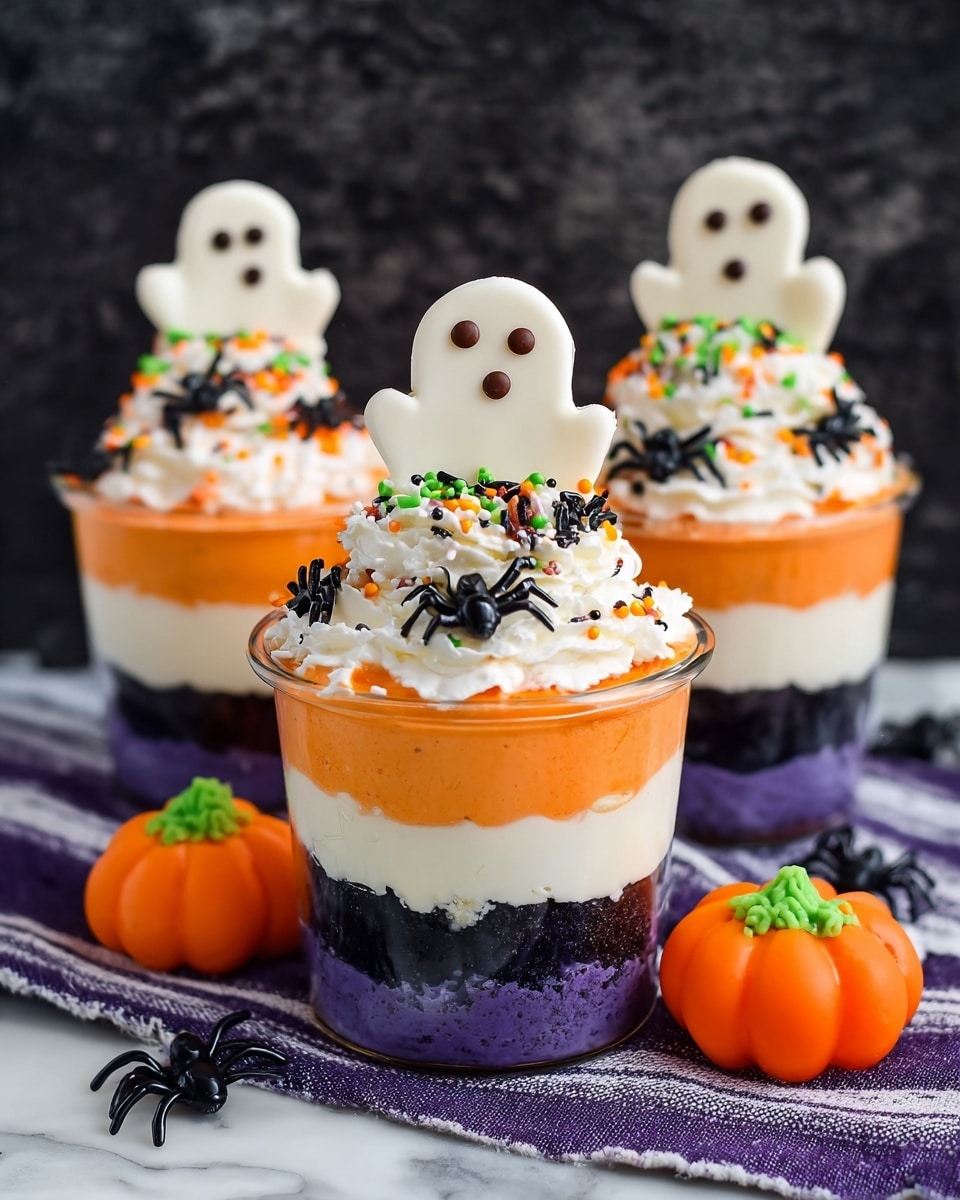
If you’re looking for a fun, festive treat that’s both easy and delicious, you’ll adore this No Bake Halloween Cheesecake Cups Recipe. These individual cheesecake parfaits are creamy, colorful, and topped with all the spooky trimmings—perfect for a Halloween party or just a sweet, no-fuss dessert night. I promise, once you try this, you’ll want to serve these every fall!
Why This Recipe Works
- No-Bake Convenience: You don’t need an oven, so it’s quick and perfect for last-minute gatherings or warm weather months.
- Festive Layers: The orange and white cheesecake layers create a striking look that’s totally Halloween-appropriate.
- Crunchy Oreo Base: Using crushed Oreos adds texture and an irresistible chocolatey twist.
- Customizable Toppings: From ghost Peeps to candy pumpkins, you can dress these cups up however you like!

Ingredients & Why They Work
Each ingredient in this No Bake Halloween Cheesecake Cups Recipe was chosen to make your life easier and your dessert tastier—plus, most are pantry staples. When you get the right cream cheese and combine it with fluffy Cool Whip, the filling becomes simply dreamy. And those Oreos? They keep this both fun and crunchy.
- Oreo cookies: I always use Oreos for their rich chocolate flavor and perfect crumbly texture that forms the cheesecake base flawlessly.
- Cream cheese: Make sure it’s softened to room temperature, or you’ll end up with lumps; it’s the backbone of that smooth, tangy filling.
- Powdered sugar: This sweetener blends seamlessly without graininess—essential for creamy cheesecake consistency.
- Vanilla extract: A simple touch that lifts all the flavors and keeps the filling from being bland.
- Cool Whip: Thawed and folded in, it adds lightness to the filling so it’s not too dense.
- Orange gel coloring: This lets you get a vibrant, Halloween-worthy hue without watering down the cheesecake.
- Toppings (Ghost Peeps, Halloween sprinkles, candy pumpkins): These fun garnishes make your dessert look like it belongs at any festive table.
Make It Your Way
I love that this No Bake Halloween Cheesecake Cups Recipe is super adaptable. Sometimes I swap out Oreos for graham crackers or Biscoff cookies to mix up the flavor. Also, if you want a pop of color, tint the cheesecake layers with your favorite gel color—green works great if you want a Frankenstein vibe! Go ahead and get creative; it’s your dessert, after all.
- Variation: Once, I made a peppermint twist by adding crushed candy canes in the crust and swapping in peppermint extract—so festive for a winter party!
- Dairy-Free Alternative: Try using dairy-free cream cheese and whipped topping to accommodate dietary needs without skimping on texture.
- Make It Spooky: Add edible eyes or drizzle with melted chocolate for extra Halloween drama.
Step-by-Step: How I Make No Bake Halloween Cheesecake Cups Recipe
Step 1: Crush the Oreo Cookies for the Base
First things first, grab half the Oreos and crush them finely—my go-to trick is to pop them in a food processor. Don’t skip this bit; fine crumbs make for a perfectly compact base that holds up well. Evenly divide the crumbs into 7 small cups (5-ounce ones work like a charm). Getting an even layer here helps your cheesecake cups look polished.
Step 2: Whip Up the Creamy Cheesecake Filling
Beat together softened cream cheese, powdered sugar, and vanilla until super smooth and creamy—take your time here because lumps are the enemy! Gently fold in 2 cups of thawed Cool Whip for that light, airy texture we want. Once mixed, divide the filling into two bowls. Add orange gel coloring to one bowl and stir until you get a bright color that screams Halloween.
Step 3: Layer Your Cheesecake Cups
Using a piping bag or spoon, add the white cheesecake layer right on top of the Oreo crumbs. Then, crush the remaining Oreos and sprinkle them on top of the white layer for some extra crunch. Next comes the orange cheesecake—spoon or pipe it evenly over the cookie crumbs. This layering not only looks amazing but balances the flavors and textures perfectly.
Step 4: Top With Cool Whip and Festive Toppings
Whip out a piping bag fitted with a 1M tip (or a sturdy zip-top bag with the corner snipped) and swirl the remaining Cool Whip on top for a fluffy, pretty finish. Just before serving, decorate with ghost Peeps, Halloween sprinkles, and candy pumpkins so your cups look as fun as they taste!
Tips from My Kitchen
- Room Temperature Ingredients: I always set cream cheese out ahead of time; it makes mixing so much easier and smoother—no lumps!
- Using a Food Processor: Crushing Oreos in a processor helps get those perfectly fine crumbs with very little effort or mess.
- Piping Bag Shortcut: If you don’t have a piping bag, a ziplock bag with a cut corner works wonders for neat layers.
- Add Toppings Last Minute: Wait to add candy decorations until just before serving—they stay fresh and don’t melt into the cheesecake.
How to Serve No Bake Halloween Cheesecake Cups Recipe
Garnishes
I swear by ghost Peeps here—their marshmallow softness contrasts beautifully with the creamy cheesecake. I also add Halloween sprinkles for color and texture, and of course, those miniature candy pumpkins bring that perfect seasonal vibe that kids love.
Side Dishes
For a complete Halloween spread, I like pairing these cheesecake cups with salted caramel popcorn or spiced pumpkin muffins. It keeps things balanced: light and creamy alongside salty or spiced snacks.
Creative Ways to Present
One year, I served these cups in mini mason jars and added little Halloween flags on toothpicks for a charming touch. You can also layer the cheesecake inside clear plastic cups with black or orange doilies underneath for a spooky yet elegant look.
Make Ahead and Storage
Storing Leftovers
These cheesecake cups keep beautifully covered in the fridge for up to 3 days. I like to put them in airtight containers or cover them tightly with plastic wrap. Just remember to keep the toppings off until you’re ready to serve to keep everything looking fresh.
Freezing
I’ve frozen whole cheesecake cups a couple of times wrapped tightly in plastic wrap and foil, and they stay pretty good up to a month. Just thaw in the fridge overnight. The texture softens a little but still tastes great for an easy make-ahead treat.
Reheating
Since these are no bake and chilled, reheating isn’t really necessary. If you want to take the chill off, just let them sit at room temperature for 15 minutes before serving—that way, the flavors open up nicely without the filling melting.
FAQs
-
Can I use other cookies instead of Oreos for this No Bake Halloween Cheesecake Cups Recipe?
Absolutely! While Oreos add a fantastic chocolate flavor and texture, you can swap in crushed graham crackers, Biscoff cookies, or even chocolate chip cookies, depending on your taste. Just make sure to crush them finely so they layer well.
-
How long should I let the cheesecake cups set before serving?
I usually chill these for at least an hour to let the layers firm up a bit, but honestly, they’re delicious anytime after assembly. The longer they chill, the better the flavors meld and the firmer the texture gets.
-
Can I prepare these No Bake Halloween Cheesecake Cups Recipe ahead of time for a party?
Yes! In fact, prepping the cheesecake cups a day ahead is perfect. Just wait to add the toppings until right before serving so they stay fresh and vibrant. Store the cups covered tightly in the refrigerator or container with a lid for easy transport.
-
What if I don’t have gel coloring; can I use liquid food coloring instead?
You can use liquid food coloring, but be cautious as it can thin out the cheesecake filling slightly. Gel coloring is more concentrated, so it gives a nice vibrant color without affecting texture.
Final Thoughts
This No Bake Halloween Cheesecake Cups Recipe holds a special place in my heart because it combines nostalgic flavors with playful, festive presentation—all without any baking fuss. I truly enjoy how versatile and fun it is to make with friends or family, especially around the holidays. Trust me, once you try these, you’ll be reaching for this recipe for every fall celebration and spooky get-together. So go ahead, make these cups your new seasonal tradition—you won’t regret it!
Print
No Bake Halloween Cheesecake Cups Recipe
- Prep Time: 15 minutes
- Cook Time: 0 minutes
- Total Time: 15 minutes
- Yield: 7 parfaits
- Category: Dessert
- Method: No-Cook
- Cuisine: American
- Diet: Vegetarian
Description
No Bake Halloween Cheesecake Cups are a fun and festive dessert perfect for Halloween parties. These creamy cheesecake parfaits have a crunchy Oreo base, a smooth cream cheese filling tinted in vibrant orange and white layers, and spooky themed toppings including ghost Peeps, Halloween sprinkles, and candy pumpkins. Ready in just 15 minutes with no baking required, these easy-to-make treats are sure to impress guests of all ages.
Ingredients
Crust
- 14 Oreo cookies
Cheesecake Filling
- 2 – 8 ounce packages cream cheese, softened
- ½ cup powdered sugar
- 2 teaspoons vanilla extract
- 1 – 8 ounce container Cool Whip, thawed and divided
- Orange gel coloring
Toppings
- Ghost Peeps
- Halloween sprinkles
- Candy pumpkins
Instructions
- Prepare the crust: Crush 7 Oreo cookies into fine crumbs using a food processor or by pulsing them in a bag. Divide the crumbs evenly among 7 – 5 ounce cups to form the base layer.
- Make the cheesecake filling: Beat softened cream cheese, powdered sugar, and vanilla extract together until creamy and smooth. Gently fold in 2 cups of Cool Whip to create a light filling.
- Tint the cheesecake: Divide the cheesecake filling evenly into two bowls. Add orange gel coloring to one bowl and mix until the color is vibrant and uniform.
- Add the white cheesecake layer: Spoon or pipe the white cheesecake filling evenly over the Oreo crust layer in each cup.
- Add the second crust layer: Crush the remaining 7 Oreo cookies into crumbs and divide them evenly on top of the white cheesecake layer in the cups.
- Add the orange cheesecake layer: Spoon or pipe the orange cheesecake filling evenly over the Oreo crumb layer in each cup.
- Top with whipped cream: Using a piping bag fitted with tip 1M, swirl the remaining Cool Whip on top of each parfait to create a decorative finish.
- Decorate: Add ghost Peeps, Halloween sprinkles, and candy pumpkins on top just before serving for a festive look.
Notes
- Use room temperature cream cheese to make beating easier and achieve a smoother filling.
- A food processor helps crush the Oreos quickly and evenly into fine crumbs.
- You can swap Oreos for graham cracker crumbs or Biscoff cookies to change the crust flavor.
- Feel free to use different gel colors to create fun layers besides orange and white, such as bright green for a spooky theme.
- Use a piping bag or a ziplock bag with the corner cut off for neat and speedy filling in the cups.
- Add toppings last minute especially if transporting the parfaits to keep them fresh and intact during travel.
Nutrition
- Serving Size: 1 parfait
- Calories: 350 kcal
- Sugar: 30 g
- Sodium: 220 mg
- Fat: 22 g
- Saturated Fat: 12 g
- Unsaturated Fat: 8 g
- Trans Fat: 0 g
- Carbohydrates: 30 g
- Fiber: 1 g
- Protein: 4 g
- Cholesterol: 45 mg

