
Halloween Dirt Cake Cups Recipe
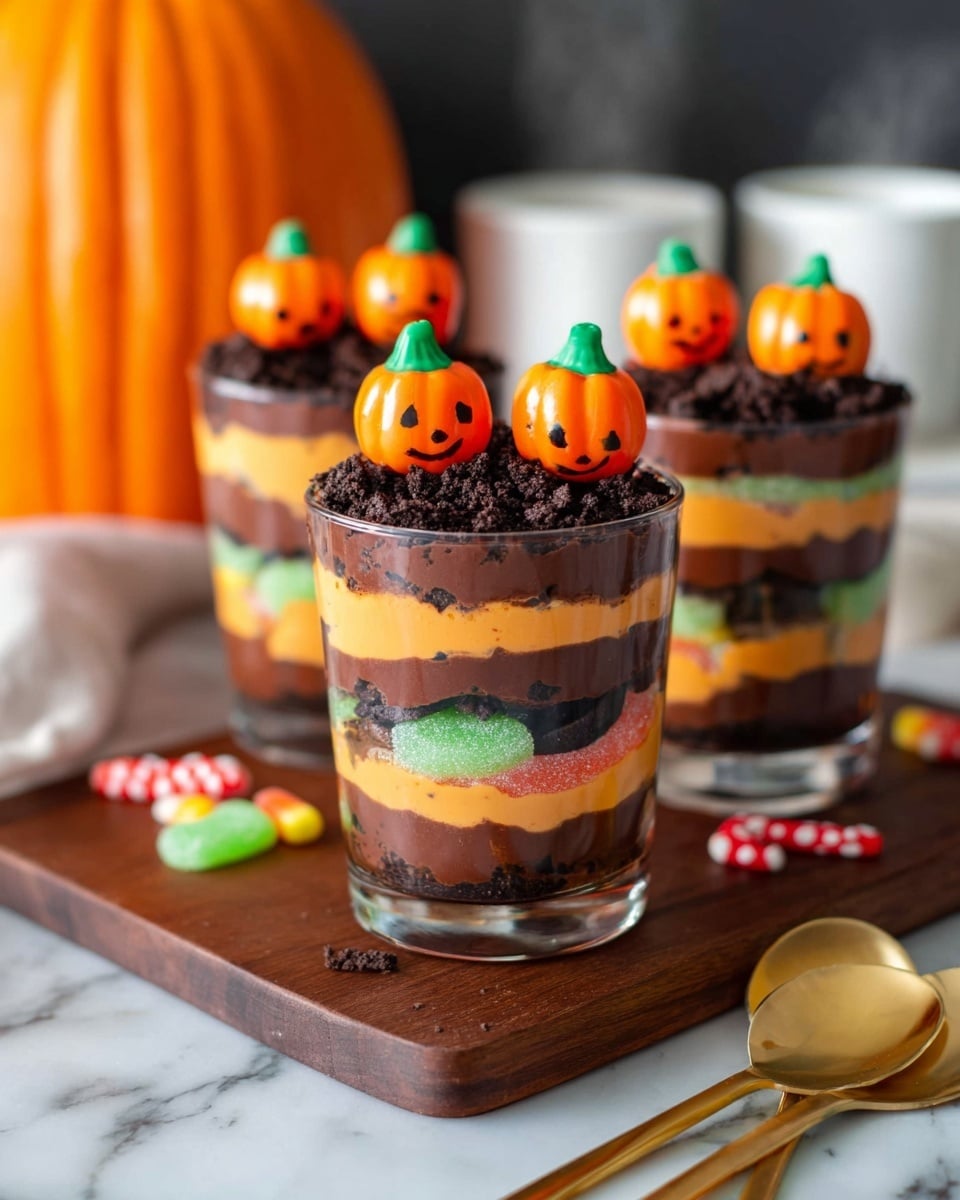
If you’re looking for a dessert that’s as fun to make as it is to eat, you’ve got to try this Halloween Dirt Cake Cups Recipe. Trust me, these little cups are a total crowd-pleaser – every bite brings together creamy pudding, crunchy Oreos, and playful gummy worms to really nail that spooky “dirt” vibe. Whether you’re hosting a Halloween party or just want a festive treat, these cups are super easy to whip up and guaranteed to impress.
Why This Recipe Works
- Layered Texture: The pudding and crushed Oreos create a perfect balance between creamy and crunchy in every spoonful.
- Festive Presentation: Bright orange pudding colored just right for Halloween, topped with candy pumpkins and gummy worms, really nails the spooky look.
- Quick & Easy: Using instant pudding mixes means you can have these ready in under 30 minutes with almost zero fuss.
- Kid-Friendly Fun: It’s a hands-on treat that kids love helping with, making it great for family cooking time.

Ingredients & Why They Work
All these ingredients come together beautifully, providing layers of flavor and texture, plus a festive look. I usually find it easiest to shop for the instant pudding mixes and use quality Oreos for that authentic “dirt” crunch. Pro tip: grab the sandwich cookies with extra filling—it makes the dessert creamier!
- Milk: Needed to prepare pudding just right—don’t skip the chill time to get that perfect set.
- Instant chocolate pudding mix: Adds rich, smooth chocolate flavor that’s the base of your “dirt.”
- Instant vanilla pudding mix: Acts as a neutral canvas—especially once tinted orange for that spooky vibe.
- Orange food coloring: Essential for creating that perfect Halloween orange—it makes your vanilla pudding pop visually.
- Gummy worms: Adds that fun, creepy-crawly element kids and adults adore.
- Oreo cookies: Crushed to look like “dirt” topping—choose regular Oreos for the classic flavor.
- Pumpkin candies: Cute seasonal touch to cap off each cup, making the dessert extra festive.
- Bone sprinkles (optional): For an extra spooky detail if you want to take the decoration up a notch.
Make It Your Way
I love customizing this Halloween Dirt Cake Cups Recipe depending on who’s coming over. Sometimes I’ll swap gummy worms for mini marshmallows or use different candy toppers like candy eyeballs or chocolate bats. The layered pudding also gives you a chance to play with color—try green or purple if you want something totally wild!
- Variation: One year, I tried mixing in peanut butter with the chocolate pudding for a nutty twist—everyone was surprised but loved it!
- Dietary swaps: Use dairy-free milk and pudding mixes for a vegan-friendly version that still tastes amazing.
- Seasonal changes: In spring, I swap the orange food coloring for pastel tones and use gummy bunnies instead of worms for a fresh festival look.
Step-by-Step: How I Make Halloween Dirt Cake Cups Recipe
Step 1: Prepare the Puddings Separately
This is where it all starts—follow the box directions carefully using your measured milk for each pudding mix. Make sure to whisk at just the right speed so the pudding thickens without lumps. Chill each pudding in separate bowls—this separation is key for the layered effect later on.
Step 2: Color Your Vanilla Pudding
Add a few drops of orange food coloring to your vanilla pudding and stir well. I always go slowly with the drops—better to add more gradually than mess it up with an overly bright color. Keep stirring until you get that perfect pumpkin orange shade.
Step 3: Begin Layering in Glasses
Divide half of your chocolate pudding evenly into the bottom of each serving cup. Use a small spatula or the back of a spoon to smooth the surface gently without mixing layers.
Step 4: Add Gummy Worms & Crushed Oreos
Scatter gummy worms over the chocolate pudding, then sprinkle about one-third of your crushed Oreos on top. This mix of textures really mimics dirt with creepy crawlies, which always gets a fun reaction!
Step 5: Add Orange Pudding and Oreos Again
Spoon half of your orange vanilla pudding over the Oreo layer, spreading it evenly, then sprinkle another third of the cookies on top. It’s all about those layered details that make this dessert so fun to eat and look at.
Step 6: Final Chocolate Layer & Toppings
Top everything off with the rest of the chocolate pudding, then sprinkle the last of your crushed Oreos. Finally, decorate each cup with three candy pumpkins and optional bone sprinkles to really evoke that spooky Halloween garden vibe.
Tips from My Kitchen
- Pudding Prep: Chill your puddings for at least 15 minutes before layering—it helps them set better and layer without bleeding.
- Crushing Oreos: Use a food processor for quick, uniform crumbs, or place them in a ziplock bag and crush with a rolling pin—easy and satisfying!
- Color Control: Add food coloring slowly—once mixed, it’s tricky to fix if it’s too dark.
- Serving Tip: Chill the finished cups at least 30 minutes to let layers meld and flavors blend perfectly before serving.
How to Serve Halloween Dirt Cake Cups Recipe
Garnishes
I like to keep it simple with the classic candy pumpkins and gummy worms, but frosting “spider webs” piped with white icing or edible googly eyes take the look over the top. Bone sprinkles are my secret weapon for that authentic creepy vibe without being scary.
Side Dishes
This dessert pairs fantastically with light, savory snacks like spiced nuts or a simple cheese platter to balance sweetness. For a full Halloween spread, some savory pumpkin soup or mummy hot dogs work beautifully alongside these dirt cake cups.
Creative Ways to Present
I’ve served these in mini mason jars for a rustic feel or clear plastic cups decorated with spider web stickers for a party. For kids, lining them up on a “graveyard” themed serving tray adds a fun interactive element they love.
Make Ahead and Storage
Storing Leftovers
Once assembled, these dirt cake cups store beautifully covered in the fridge for up to 2 days—perfect if you want to prep ahead before the big celebration. Just keep them tightly covered to prevent the Oreo crumbs from getting soggy.
Freezing
I don’t recommend freezing this dessert because the pudding texture changes when thawed, and the Oreos lose their crunch. It’s best enjoyed fresh or refrigerated.
Reheating
Since this is a chilled dessert, reheating isn’t necessary. Just let the dirt cups sit out for about 10 minutes if they’re too cold straight from the fridge—they’ll be perfectly creamy and ready to enjoy.
FAQs
-
Can I make Halloween Dirt Cake Cups Recipe without Oreos?
Yes, you can use crushed chocolate graham crackers or chocolate cookie crumbs as a substitution. The Oreo cookies provide the signature dark “dirt” look and great crunch, but any chocolate cookie crumb will work if you’re out of Oreos.
-
How do I get the perfect orange color for the vanilla pudding?
I recommend starting with small drops of traditional orange food coloring and stirring well, adding more drops gradually until you reach the desired shade. If you don’t have orange food coloring, mix red and yellow drops together—start with about four red and five yellow drops, adjusting as needed.
-
Can I prepare Halloween Dirt Cake Cups Recipe a day ahead?
Absolutely! In fact, preparing it a day ahead lets all the flavors meld beautifully. Just keep the cups covered tightly and refrigerated until serving to keep the layers distinct and fresh.
-
What’s a good alternative if my kids don’t like gummy worms?
Mini marshmallows, candy eyes, or even chopped candy bars can be fun and tasty replacements. Just pick something that adds a bit of texture or whimsy to keep that “dirt garden” theme alive!
Final Thoughts
Honestly, this Halloween Dirt Cake Cups Recipe has become my go-to for October celebrations because it’s fun, simple, and gets everyone smiling. I love how it combines nostalgic flavors with playful decorations, making it a treat both kids and grown-ups adore. Give it a shot—you’ll have these ready faster than you can say “trick or treat” and maybe start a new family tradition along the way!
Print
Halloween Dirt Cake Cups Recipe
- Prep Time: 25 minutes
- Cook Time: 0 minutes
- Total Time: 25 minutes
- Yield: 8 servings
- Category: Dessert
- Method: No-Cook
- Cuisine: American
- Diet: Vegetarian
Description
Halloween Dirt Cake Cups are a fun and festive dessert perfect for spooky celebrations. Layers of creamy chocolate and orange-flavored puddings are combined with crushed Oreos, gummy worms, and pumpkin candies to create an eye-catching treat that delights both kids and adults.
Ingredients
Pudding Mixes
- 4 cups milk divided, for preparing puddings
- 1 box instant chocolate pudding mix 3.4 ounces
- 1 box instant vanilla pudding mix 3.4 ounces
Decorations & Mix-ins
- Orange food coloring (see Notes)
- 1 cup gummy worms
- 22 Oreo cookies crushed
- 24 pumpkin candies
- 2 tablespoons bone sprinkles optional
Instructions
- Prepare Puddings: Use milk to prepare each box of instant pudding separately according to package instructions and chill in the refrigerator until set.
- Color Vanilla Pudding: Add a few drops of orange food coloring to the vanilla pudding and stir well. Add additional drops gradually to achieve the desired vibrant orange hue.
- Layer Chocolate Pudding: Divide half of the chocolate pudding evenly into serving glasses, spreading it carefully at the bottom of each.
- Add Gummy Worms: Place gummy worms over the chocolate pudding layer in each glass.
- Sprinkle Oreos: Sprinkle one-third of the crushed Oreo cookies over the gummy worms.
- Layer Orange Pudding: Spoon half of the orange-colored vanilla pudding over the cookie layer and spread evenly. Reserve the remaining orange pudding for another use.
- Sprinkle Oreos Again: Add another one-third of crushed Oreos over the orange pudding in each glass.
- Add Remaining Chocolate Pudding: Divide the remaining chocolate pudding evenly over the Oreos and smooth the tops.
- Final Oreo Layer: Sprinkle the remaining crushed Oreos on top of the chocolate pudding layer.
- Decorate Cups: Place three candy pumpkins on top of each glass and optionally decorate with bone sprinkles for a spooky finishing touch.
Notes
- If you don’t have orange food coloring, create orange by mixing four drops of red food coloring with five drops of yellow food coloring. For gel food coloring, use less and add gradually while stirring until your desired color is reached.
- You can prepare the puddings a few hours ahead and assemble just before serving to keep the textures fresh.
- Bone sprinkles are optional but add a nice Halloween aesthetic if available.
Nutrition
- Serving Size: 1 cup
- Calories: 250 kcal
- Sugar: 28 g
- Sodium: 150 mg
- Fat: 10 g
- Saturated Fat: 5 g
- Unsaturated Fat: 4 g
- Trans Fat: 0 g
- Carbohydrates: 38 g
- Fiber: 2 g
- Protein: 3 g
- Cholesterol: 10 mg
