
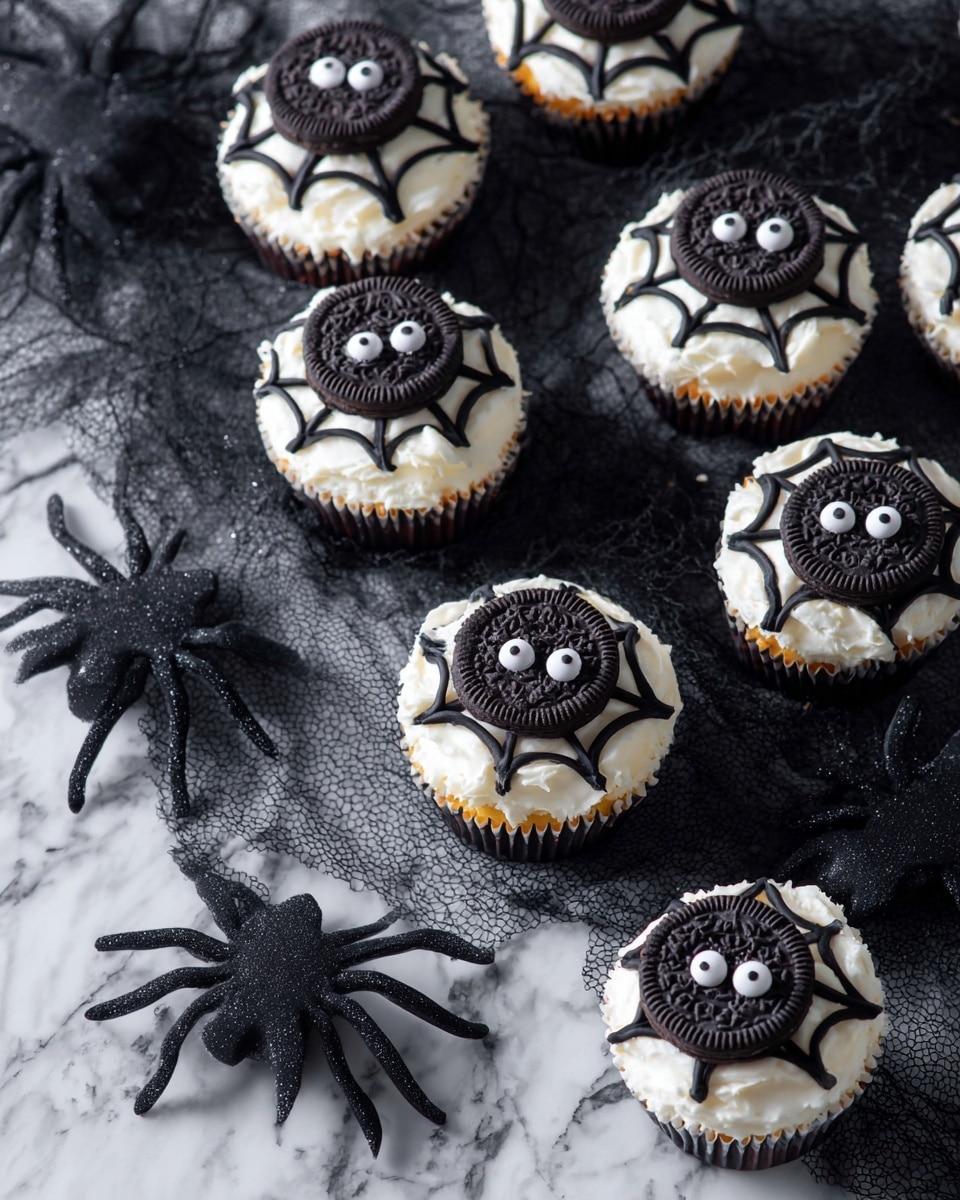
Spider Web Cupcakes Recipe
If you’re looking for a show-stopping treat that’s as fun to make as it is to eat, this Spider Web Cupcakes Recipe is your new go-to. I’ve made these for Halloween parties, and believe me, they steal the spotlight every single time. The rich chocolate cupcakes combined with creamy buttercream frosting and a stunning spider web design will wow your friends and family while being surprisingly simple to pull off.
Why This Recipe Works
- Perfect balance of flavors: The cocoa powder and instant coffee granules deepen the chocolate taste without overpowering it.
- Soft and moist cupcakes: Using buttermilk and hot water makes the cupcakes tender and airy every time.
- Frosting that holds its shape: The buttercream is fluffy yet firm enough to pipe intricate spider webs cleanly.
- Fun and festive appearance: The spider web design with mini Oreos and candy eyeballs turns cupcakes into little works of art.

Ingredients & Why They Work
The magic of this Spider Web Cupcakes Recipe lies in choosing ingredients that complement each other beautifully. Each one plays a part to ensure your cupcakes taste decadent, stay moist, and hold up well to the detailed decorating that makes the spooky design pop.
- All-purpose flour: The base for our cupcakes, it gives structure and a tender crumb.
- Cocoa powder: Using natural or dutch-processed cocoa amps up the chocolate flavor and gives that rich color.
- Instant coffee granules: Optional, but trust me, it intensifies the chocolate without tasting like coffee.
- Baking soda and baking powder: These leavening agents ensure the cupcakes rise perfectly and stay fluffy.
- Salt: A little salt enhances all the sweetness and chocolate notes.
- Unsalted butter: For both the cupcakes and frosting, it adds richness and the right fat texture.
- Granulated sugar: Sweetens the cupcakes perfectly without making them dense.
- Eggs: They bind everything, add moisture, and contribute to the structure.
- Buttermilk: Adds tenderness and a slight tang that balances the chocolate.
- Hot water: Helps bloom the cocoa, making the chocolate flavor more intense and adding moisture.
- Powdered sugar: Essential for the smooth, sweet buttercream.
- Vanilla extract: Adds warmth and rounds out the frosting’s flavor.
- Candy eyeballs and mini Oreos: For adorable spider decorations that elevate your cupcake’s theme.
- Black gel food coloring: Perfect for vibrant, deep black spider web details without thinning the frosting.
- Piping bag and Wilton 4 tip: Essential for controlling your lines and creating neat spider webs.
Make It Your Way
One of the things I love about this Spider Web Cupcakes Recipe is how flexible it is. Whether you want a vegan twist, a burst of seasonal spice, or a less sweet frosting, it’s easy to tweak while still keeping that gorgeous spider web look.
- Variation: I once swapped out the cocoa for a pumpkin spice mix during fall and added cream cheese frosting instead — still spooky but with a cozy vibe!
- Dietary tweaks: For dairy-free, try coconut oil in place of butter and a plant-milk buttermilk substitute with lemon juice — works surprisingly well.
- Difficulty level: If you’re a frosting newbie, practice piping the spider web lines on parchment before decorating the cupcakes — it makes all the difference.
Step-by-Step: How I Make Spider Web Cupcakes Recipe
Step 1: Prepping the batter for perfection
Start by preheating your oven to 350º F and lining your muffin pan with liners — I use cupcake liners with fun patterns that peek through later! Mix your dry ingredients — flour, cocoa powder, instant coffee granules, baking soda, baking powder, and salt — in one bowl, and set it aside.
In a separate bowl, beat your room temperature butter and sugar until it’s light and fluffy, about 2 minutes — this is key for a tender cupcake. Add your eggs one at a time, beating well after each addition. Alternate adding the buttermilk and dry ingredients to the butter mixture, finishing with hot water. Just mix until combined to avoid overworking the batter.
Step 2: Baking the chocolate cupcakes
Fill your cupcake liners halfway — don’t overfill or your batter might spill over during baking. Bake for about 17-19 minutes, or until a toothpick inserted comes out with a few moist crumbs. Once baked, let them cool completely, because warm cupcakes won’t hold your frosting well and can turn your spider webs into a sugary mess.
Step 3: Whipping up the dreamy frosting
Beat the butter with vanilla extract until fluffy and pale, then slowly add powdered sugar on low to keep your kitchen powdered, and avoid a gritty texture. If it gets too thick, a splash of milk or cream will soften it nicely. For that dramatic black spider web, take a small portion of the frosting and mix in black gel food coloring — this tip really stands out when piping.
Step 4: Decorating with spider webs and creepy crawlies
Spread a generous layer of white frosting on each cupcake — smooth and even is the goal here! Transfer the black-colored frosting into a piping bag with a Wilton 4 tip. First, pipe a horizontal line across the cupcake, then two diagonal lines crossing to form an ‘X’. Now connect these lines with curved lines to create the web pattern — two curved lines per section. It looks intricate, but once you get the hang of it, it’s incredibly satisfying.
Add a mini Oreo at the center as your spider body, attach candy eyeballs with a dab of frosting, and pipe eight little spider legs (four on each side) onto the Oreos. Voila — spooky and adorable cupcakes ready to impress!
Tips from My Kitchen
- Butter at room temp: Soft, not melted, butter makes creaming easier and frosting smoother.
- Don’t overbake: Watch your cupcakes closely toward the end; overbaking dries them out.
- Practice piping: If spider webs intimidate you, try on parchment paper first to build confidence.
- Use gel coloring: Avoid liquid food coloring to keep frosting at the perfect consistency for piping.
How to Serve Spider Web Cupcakes Recipe
Garnishes
I love topping these cupcakes with those classic candy eyeballs and mini Oreos because they add personality and a hint of crunch. Sometimes I also sprinkle a little edible glitter or shimmer dust for an extra eerie shimmer that’s perfect for party nights.
Side Dishes
These cupcakes pair beautifully with a warm drink — think pumpkin spice latte or a rich hot chocolate. For a party, serving with a cauldron of punch or spiced cider ups the fun factor and keeps your guests cozy.
Creative Ways to Present
For Halloween, I arranged spider web cupcakes on a black platter lined with faux spider webs and added small plastic spiders around them for an extra spooky vibe. At a kids’ party, I like putting each cupcake inside a little clear box with themed stickers—it’s like giving a mini Halloween package.
Make Ahead and Storage
Storing Leftovers
I store leftover Spider Web Cupcakes in an airtight container at room temperature for up to two days. If your kitchen is warm, refrigerate them, but bring them back to room temperature before serving for the best taste and texture.
Freezing
If you want to freeze them, I recommend freezing the unfrosted cupcakes separately, wrapped in plastic wrap and then foil. Frost after thawing to keep that fresh, creamy texture. You can freeze frosted cupcakes, but the texture may change slightly, especially with delicate decorations.
Reheating
To reheat, I pop unfrosted cupcakes into the microwave for about 10 seconds to bring back softness but avoid microwaving frosted ones to preserve the frosting design. If necessary, let frosted cupcakes sit at room temperature to avoid cold frosting dulling the flavors.
FAQs
-
Can I make the Spider Web Cupcakes Recipe with a different flavor?
Absolutely! While chocolate pairs perfectly with the spider web theme, you can swap the cocoa for vanilla or spice cake mixes and keep the same decorating technique. Just make sure the frosting contrasts enough for the web to stand out.
-
What’s the best way to pipe the spider web without mess?
Practice makes perfect! Try piping the web on parchment paper first to get comfortable. Also, use gel food coloring to avoid thinning your frosting, which can cause messy lines. Pipe slowly and steady your hand by resting your elbow on the counter.
-
How long do these cupcakes stay fresh?
They’re best eaten within two days if stored at room temperature or refrigerated. After that, they tend to dry out, but you can refresh them by briefly warming unfrosted cupcakes before frosting or serving.
-
Can I make the frosting ahead of time?
Yes! Buttercream frosting can be made a day or two ahead and stored in an airtight container in the refrigerator. Bring it to room temp and re-whip before using to restore its fluffy texture.
Final Thoughts
This Spider Web Cupcakes Recipe holds a special place in my kitchen because it’s one of those recipes that never fails to bring smiles—whether it’s kids marveling at the spider webs or adults sneaking an extra cupcake when no one’s looking. It’s straightforward enough for everyday bakers but offers that wow factor to make your baking moments memorable. Trust me, once you try this, you’ll want to make these creepy-cute cupcakes every season. So grab your mixer, start mixing, and enjoy the fun of creating edible art!
Print
Spider Web Cupcakes Recipe
- Prep Time: 35 minutes
- Cook Time: 19 minutes
- Total Time: 1 hour 24 minutes
- Yield: 24 cupcakes
- Category: Dessert
- Method: Baking
- Cuisine: American
Description
These Spider Web Cupcakes are a spooky and delicious treat perfect for Halloween or themed parties. Rich chocolate cupcakes are topped with creamy vanilla buttercream frosting, decorated with black icing spider webs, mini Oreos, and candy eyeballs to create adorable edible spiders.
Ingredients
Chocolate Cupcakes
- 2 cups (240g) all purpose flour
- 3/4 cup (63g) cocoa powder, natural unsweetened or dutch processed cocoa powder
- 1 tsp instant coffee granules such as Folger’s, optional
- 1/2 tsp baking soda
- 1 tsp baking powder
- 1 tsp salt
- 1/2 cup (113g) unsalted butter, 1 stick, room temperature
- 1 1/2 cups (297g) granulated sugar
- 2 large eggs
- 1 cup (236ml) buttermilk
- 1/2 cup (118ml) hot tap water
Frosting
- 1 1/2 cups (339g) unsalted butter, 3 sticks, room temperature
- 1 tsp vanilla extract
- 2-3 cups (227-339g) powdered sugar
- Dash milk or heavy cream if frosting becomes too thick
Extras
- Candy eyeballs
- Piping bag
- Wilton 4 piping tip
- Black gel food coloring
- Mini Oreos
Instructions
- Preheat and prepare pan: Preheat the oven to 350º F. Line a muffin pan with muffin liners to prepare for baking.
- Mix dry ingredients: In a mixing bowl, combine the all purpose flour, cocoa powder, instant coffee granules, baking soda, baking powder, and salt. Set aside this dry mixture.
- Cream butter and sugar: In a separate bowl, beat the unsalted butter and granulated sugar with an electric mixer for 2 minutes until pale and fluffy. Add the eggs and beat again for 30 seconds to combine well.
- Add liquids and dry ingredients: Add half of the buttermilk to the butter mixture and beat for about 20 seconds. Then add half of the dry ingredients and mix. Next add the remaining buttermilk plus the hot water and beat just until mixed. Finally, add the remaining dry ingredients and beat on low speed until fully combined.
- Fill and bake: Fill muffin liners halfway with the cupcake batter. Bake in the preheated oven for 19 minutes or until a toothpick inserted into the center comes out with a few moist crumbs. Allow cupcakes to cool completely before frosting.
- Make frosting: In a mixing bowl, beat the unsalted butter and vanilla extract with an electric mixer until fluffy, 1-2 minutes. Gradually add the powdered sugar on low speed until combined. If desired, add black gel food coloring for decoration. If frosting is too thick, add a dash of milk or heavy cream to reach desired consistency. For extra fluffy frosting, add 1/4 cup heavy whipping cream and whip for 3-4 minutes.
- Assemble cupcakes: Remove 1 cup of frosting and dye it black with gel food coloring. Spread a generous amount of white frosting on each cooled cupcake. Transfer the black frosting to a piping bag fitted with a Wilton 4 piping tip. Pipe horizontal and diagonal lines crossing over the cupcake, then connect these lines with curved lines to create a spider web effect.
- Decorate spiders: Place a mini Oreo in the center of each spider web. Use a small amount of frosting to attach candy eyeballs to the Oreo. Pipe 4 legs on each side of the Oreo with black frosting to create the spider legs. Repeat for remaining cupcakes.
Notes
- Use room temperature butter and eggs for better mixing and texture.
- Instant coffee granules enhance the chocolate flavor but are optional.
- Ensure cupcakes are completely cooled before frosting to prevent melting the frosting.
- If frosting becomes too thick, add milk or cream a teaspoon at a time until spreadable.
- Use gel food coloring to avoid altering frosting consistency compared to liquid dye.
- Mini Oreos can be substituted with other small cookies as spider bodies if desired.
- Store cupcakes in an airtight container at room temperature for up to 2 days or in the refrigerator for up to 4 days.
Nutrition
- Serving Size: 1 cupcake
- Calories: 320 kcal
- Sugar: 30 g
- Sodium: 180 mg
- Fat: 18 g
- Saturated Fat: 11 g
- Unsaturated Fat: 6 g
- Trans Fat: 0 g
- Carbohydrates: 38 g
- Fiber: 3 g
- Protein: 4 g
- Cholesterol: 55 mg


