
Berry Galette Recipe
I’m so excited to share this Berry Galette Recipe with you because it’s honestly one of my favorite ways to enjoy fresh berries any time of the year. There’s something wonderfully rustic and inviting about a galette — more casual than a pie but just as satisfying. Plus, it’s forgiving and straightforward, making it perfect for anyone who loves baking but doesn’t want to fuss over perfection.
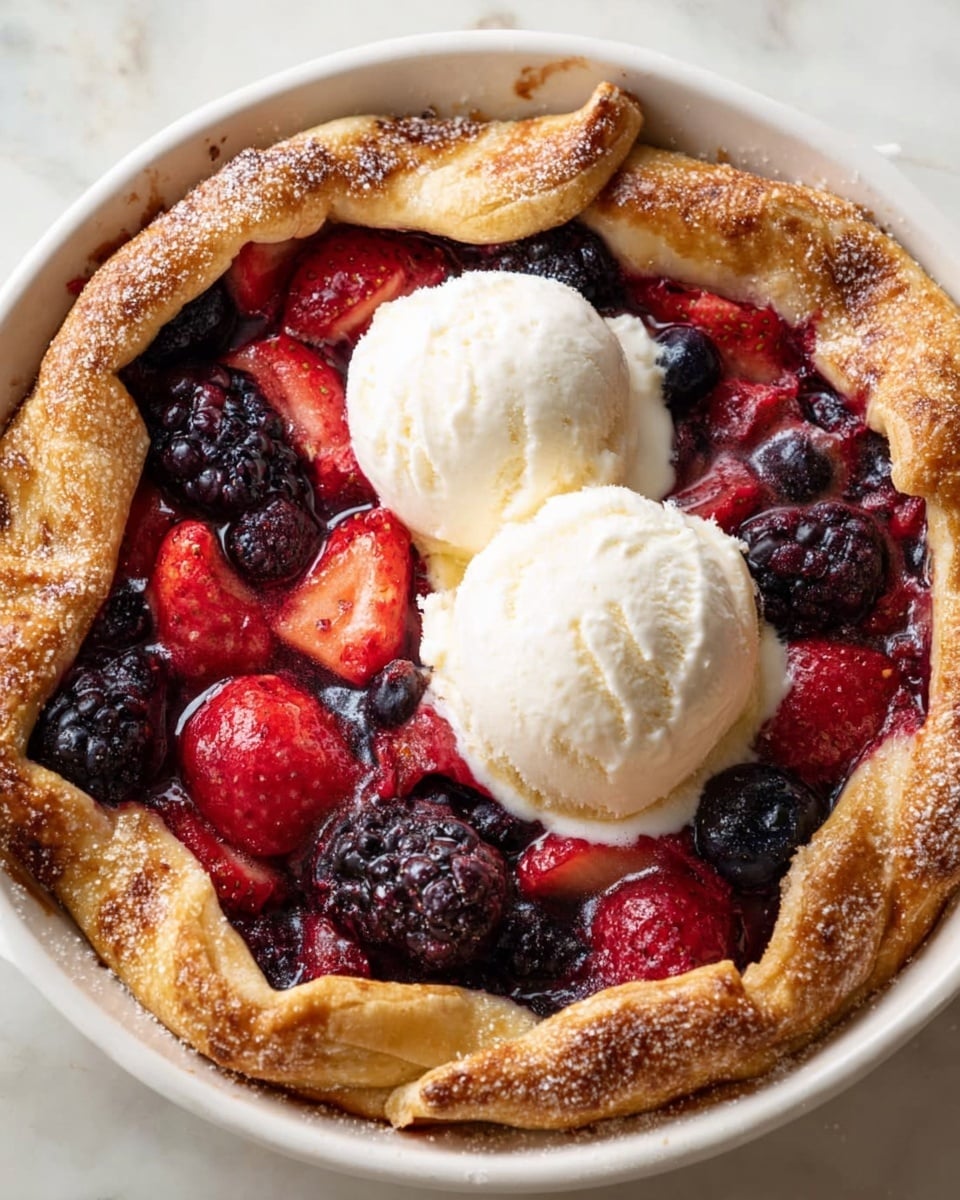
This Berry Galette Recipe works so well when you want a quick yet elegant dessert that you can whip up with whatever berries you have on hand. It’s naturally bright and fresh, with that buttery crust pulling everything together beautifully. You’ll enjoy how it’s both impressive and approachable, especially when you serve it warm with a scoop of vanilla ice cream. Trust me, once you try it, it’ll become your go-to berry dessert.
Why This Recipe Works
- No-Fuss Preparation: Using store-bought pie dough lets you skip stressful dough making but still get that homemade feel.
- Flexible Fruit Combo: Mixed berries create a vibrant, fresh filling that’s never too sweet or too tart.
- Rustic Elegance: The folded edges give a charming, free-form look that’s easier than a traditional pie crust.
- Balanced Sweetness & Texture: A touch of cornstarch thickens the juicy berries, ensuring a perfect bite without a soggy crust.

Ingredients & Why They Work
The beauty of this Berry Galette Recipe is that the ingredients are simple, yet they come together to create a stunning, flavorful dessert. Each element plays a specific role, so grabbing fresh, good-quality berries and a crisp chilled dough really makes a difference.
- Mixed berries: Combining blueberries, raspberries, blackberries, and strawberries offers a variety of textures and a burst of natural sweetness and tartness.
- Granulated sugar: Sweetens the berries gently without overpowering their natural flavor.
- Cornstarch: Acts as a thickening agent to keep the berry juices from running everywhere during baking.
- Lemon zest & juice: Adds brightness and balances the sweetness with a little acidity.
- Vanilla extract: Provides subtle warmth and depth, rounding out the flavor.
- Pie dough: Whether homemade or store-bought, a good flaky crust is essential for that perfect galette texture.
- Egg: Used for the egg wash to give the crust a beautiful golden-brown finish.
- Coarse sugar (optional): Sprinkled on top for an extra sparkle and crunch.
Make It Your Way
This Berry Galette Recipe is a flexible canvas, and I always encourage you to make it your own. Whether you prefer a little more sweetness, different fruits, or even a vegan twist, there’s room to experiment and find what suits your taste best.
- Variation: I’ve swapped out the berries for stone fruits like peaches and plums during summer, which was deliciously juicy and fragrant.
- Dietary Modification: For a dairy-free version, just make sure to use vegan pie dough or make your own with coconut oil.
- Flavor Boost: Adding a sprinkle of cinnamon or nutmeg to the filling adds a warm touch that’s especially cozy in cooler months.
Step-by-Step: How I Make Berry Galette Recipe
Step 1: Preheat & Prep Your Space
Start by heating your oven to 400°F (200°C). Line a baking sheet with parchment paper — this prevents sticking and makes cleanup easier, which you’ll definitely appreciate. I like to have everything handy on the counter so once the dough is ready, I can move quickly to assembly.
Step 2: Mix the Berries
In a large bowl, gently toss together your mixed berries, sugar, cornstarch, lemon zest, lemon juice, and vanilla extract until the berries are lightly coated but not crushed. This step is key for building flavor and ensuring the filling isn’t too runny after baking. I usually let it sit for 5-10 minutes while I roll out the dough to really meld the flavors.
Step 3: Roll Out the Dough
Place your chilled pie dough onto the prepared parchment sheet. If it’s not already the right size, roll it out into roughly a 12-inch circle. Don’t worry if it’s not perfectly round — rustic is the charm of a galette! Keep the dough cool so it doesn’t get too soft and sticky to handle.
Step 4: Assemble the Galette
Spoon the berry mixture into the center of the dough, making sure to leave at least a 2-inch border all the way around. Now, fold the edges of the dough up over the berries, pleating as you go to create those charming rustic folds — a little unevenness just adds character. Then beat the egg and brush it lightly all over the dough edges; this helps it brown beautifully in the oven.
Step 5: Final Touches & Bake
Sprinkle the exposed berries and crust edges with a tablespoon of coarse sugar for sparkle and a nice crunchy texture. Pop the galette on the parchment-lined baking sheet into your preheated oven and bake for 30-35 minutes. You’ll know it’s done when the crust is a golden brown and the berry juices are bubbling and thickening. Pro tip: keep an eye on the edges to make sure they don’t get too dark — if they brown too quickly, you can loosely cover with aluminum foil partway through baking.
Step 6: Cool & Enjoy
Once out of the oven, let your Berry Galette cool for at least 10 minutes before slicing. This resting time lets the filling thicken so it won’t be a juicy mess on your plate. I love serving it warm with a scoop of vanilla ice cream or a dollop of freshly whipped cream — that contrast is just heavenly.
Tips from My Kitchen
- Keep Dough Cold: Warm dough is harder to handle and won’t fluff up as nicely when baked, so chill it well before rolling.
- Don’t Overmix the Filling: Gently toss berries so they stay mostly intact for that satisfying bite and pretty presentation.
- Use Parchment Paper: It makes transferring the galette easier and keeps your baking sheet spotless—win-win!
- Watch the Crust: If edges brown too quickly, shield them with foil to prevent burning while the berries finish bubbling.
How to Serve Berry Galette Recipe
Garnishes
I usually keep it simple and let the galette shine on its own, but topping it with a dusting of powdered sugar or a few fresh mint leaves adds a pretty touch. Sometimes I drizzle a little honey or berry syrup over the top for extra sweetness and shine. My absolute favorite? A scoop of vanilla bean ice cream melting into the warm, juicy berries—pure comfort in every bite.
Side Dishes
This galette pairs beautifully with light sides like a fresh arugula salad if you’re serving it as part of a brunch or light dinner. For dessert, it’s perfect alongside a cup of strong coffee or lightly sweetened tea to balance the berries’ sweetness. Sometimes I also add a small bowl of whipped mascarpone cheese on the side for guests who want a richer touch.
Creative Ways to Present
For a special occasion, I’ve arranged mini berry galettes on a large wooden board alongside fresh flowers and seasonal greenery—totally charming and rustic-chic. Another time, I baked individual galettes in small tart pans for a pretty, personal-sized dessert. It’s such a versatile recipe that lends itself well to both casual weekends and festive gatherings.
Make Ahead and Storage
Storing Leftovers
Once cooled, I store leftover Berry Galette covered loosely with foil or plastic wrap in the fridge. It keeps nicely for up to 3 days and still tastes great warm or cold. The crust may soften a bit, but I think it’s still delightful — just reheat if you like that freshly-baked vibe.
Freezing
If I want to freeze, I bake the galette fully, then cool it and wrap it tightly in plastic wrap followed by aluminum foil to prevent freezer burn. From what I’ve found, it freezes well for about 1 month. When you’re ready, thaw overnight in the fridge before reheating.
Reheating
To revive that crisp crust, I reheat leftovers in a 350°F oven for about 10-15 minutes until warmed through. Microwave can make the crust soggy, so I try to avoid that. If you’re in a hurry, a quick warm-up in a toaster oven works too and keeps that texture intact.
FAQs
-
Can I use frozen berries in this Berry Galette Recipe?
Yes! Just be sure to thaw them completely and drain any excess liquid before mixing with the sugar and cornstarch. This helps prevent your filling from becoming too watery while baking.
-
How do I prevent the crust from getting soggy?
Adding cornstarch to the filling helps thicken the berry juices. Also, using chilled dough and not overfilling the galette keeps the crust nicely crisp. Baking at a high temperature ensures the crust cooks quickly and stays golden.
-
Can I make the pie dough from scratch?
Absolutely! I’ve made this Berry Galette Recipe with homemade dough, and it adds wonderful flavor. Just make sure to chill the dough until firm before rolling out to make handling easier.
-
What’s the best way to serve berry galette?
I love it warm with vanilla ice cream or whipped cream to balance the sweet-tart berries. A sprinkle of powdered sugar or a drizzle of honey enhances the presentation and taste.
-
Can I make this recipe vegan?
Yes, use vegan pie dough and substitute the egg wash with a little almond milk or aquafaba brushed on the crust for color. The filling is naturally vegan since it’s fruit-based!
Final Thoughts
This Berry Galette Recipe is truly one of my kitchen favorites because it combines ease, flavor, and beauty all in one. It’s the kind of recipe you’ll feel proud serving to guests but can also relax and enjoy on a random Tuesday evening. Baking it reminded me how accessible baking can be when you embrace the rustic charm and not aim for perfection. Give it a try, play around with your favorite fruits, and I bet it’ll become a sweet staple in your baking repertoire, just as it is in mine.
Print
Berry Galette Recipe
- Prep Time: 10 minutes
- Cook Time: 35 minutes
- Total Time: 55 minutes
- Yield: 6 servings
- Category: Dessert
- Method: Baking
- Cuisine: American
- Diet: Vegetarian
Description
This Berry Galette recipe features a rustic, free-form tart packed with mixed berries like blueberries, raspberries, blackberries, and strawberries. The sweet and tangy filling is enhanced with lemon zest and vanilla, wrapped in a flaky pie crust, and baked to golden perfection. Perfect for a dessert that’s simple to prepare yet impressive to serve.
Ingredients
Filling
- 2 cups mixed berries (blueberries, raspberries, blackberries, strawberries, chopped)
- ¼ cup granulated sugar
- 1 tablespoon cornstarch
- 1 teaspoon lemon zest
- 1 tablespoon lemon juice
- 1 teaspoon vanilla extract
Crust & Finishing
- 1 sheet store-bought pie dough or homemade, chilled
- 1 egg (for egg wash)
- Optional: coarse sugar for sprinkling
Instructions
- Preheat Oven: Preheat your oven to 400°F (200°C) and line a baking sheet with parchment paper to prevent sticking and for easy cleanup.
- Prepare the Filling: In a mixing bowl, combine the mixed berries, ¼ cup granulated sugar, cornstarch, lemon zest, lemon juice, and vanilla extract. Toss gently until all berries are evenly coated with the mixture.
- Roll Out Dough: Place the chilled pie dough on the prepared parchment paper. If it isn’t already a 12-inch circle, roll it out gently to achieve this size.
- Assemble the Galette: Spoon the berry mixture into the center of the dough, leaving a 2-inch border around the edges free. Fold the edges of the dough up over the berries, making pleats as you go, so the center filling remains exposed.
- Apply Egg Wash: Beat the egg lightly and brush it evenly over the folded crust edges to give a golden, glossy finish after baking.
- Sprinkle Sugar: Sprinkle coarse sugar over the crust edges for extra crunch and sweetness, if using.
- Bake the Galette: Bake in the preheated oven for 35 minutes until the crust is a beautiful golden brown and the berry filling is bubbling hot.
- Cool & Serve: Remove from the oven and let the galette cool for at least 10 minutes to allow the berry juices to thicken. Serve warm, optionally accompanied by vanilla ice cream or whipped cream.
Notes
- Use a mix of fresh or frozen berries—just thaw and drain excess liquid if using frozen.
- If you prefer a less sweet galette, reduce the sugar slightly.
- For a dairy-free option, substitute the egg wash with almond milk or melted coconut oil.
- Make sure to chill your pie dough thoroughly before rolling to make it easier to handle and improve flakiness.
- Serve with a scoop of vanilla ice cream or a dollop of whipped cream for a classic pairing.
Nutrition
- Serving Size: 1 slice
- Calories: 280 kcal
- Sugar: 18 g
- Sodium: 150 mg
- Fat: 12 g
- Saturated Fat: 4 g
- Unsaturated Fat: 7 g
- Trans Fat: 0 g
- Carbohydrates: 38 g
- Fiber: 4 g
- Protein: 3 g
- Cholesterol: 45 mg


