
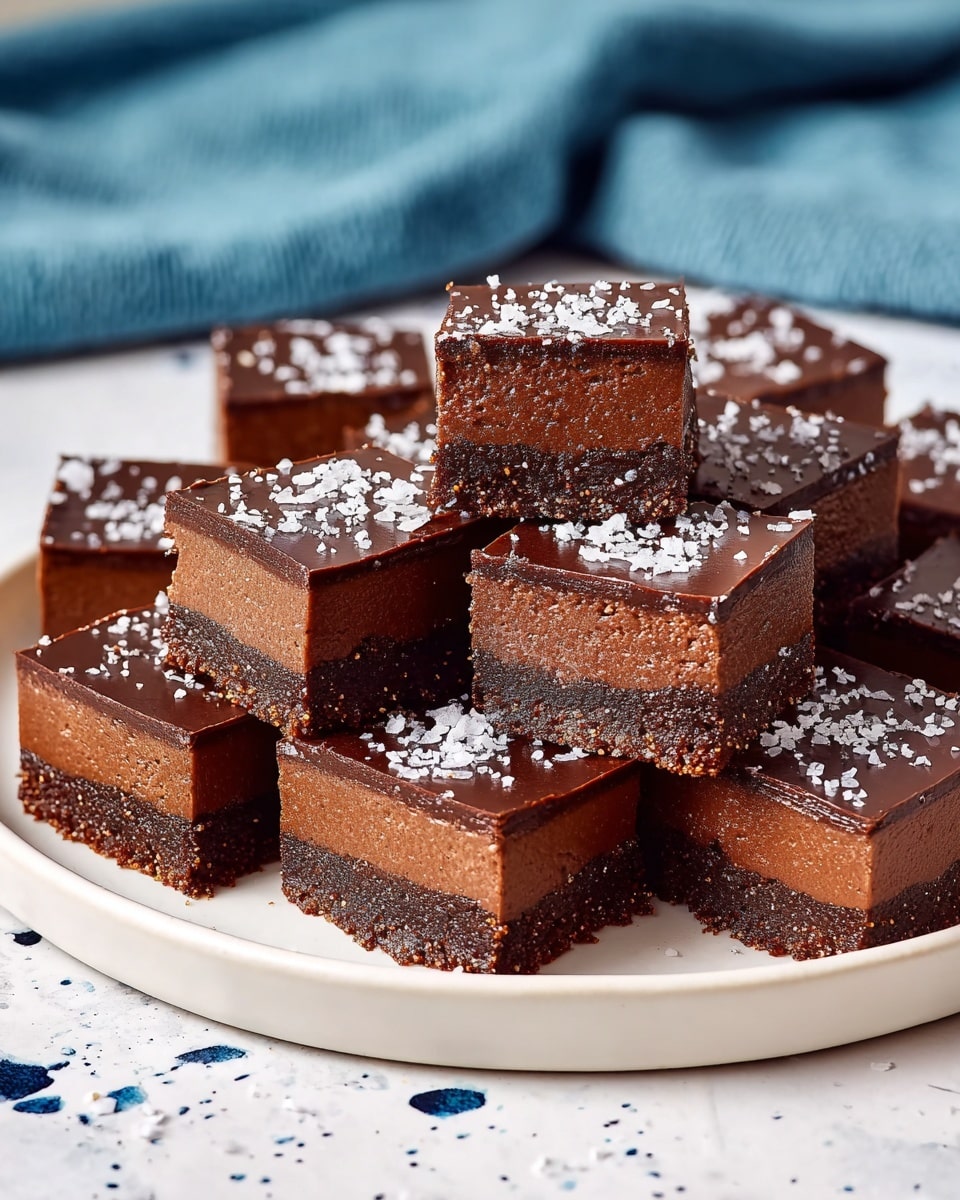
No-Bake Fudgy Chocolate Squares Recipe
I can’t get enough of these No-Bake Fudgy Chocolate Squares Recipe — they’re like the ultimate crowd-pleaser when you want something rich, chocolatey, and fuss-free. Whenever I bring these to a gathering or just need a quick chocolate fix at home, they hit the spot every single time. No oven? No problem. These squares come together easily and set up beautifully in the fridge for a melt-in-your-mouth experience.
What makes this No-Bake Fudgy Chocolate Squares Recipe so special is its perfect balance of crunch and creamy fudge, thanks to a cookie crumb crust and smooth layers of bittersweet chocolate. If you’re looking for a dessert that impresses without keeping you tied to the stove, this is it — plus, the hint of espresso and sea salt really take the flavor up a notch. Trust me, once you try them, you’ll keep coming back for more.
Why This Recipe Works
- No Oven Needed: Perfect for hot days or if you want to avoid heating up your kitchen.
- Fudgy Texture: The combination of chocolate, butter, and condensed milk creates a silky, fudge-like consistency that’s irresistible.
- Flavor Balance: A touch of espresso powder and flaky sea salt boost the chocolate’s depth without overpowering it.
- Simple Yet Elegant: Uses pantry staples but results in a dessert that looks and tastes like you spent hours on it.

Ingredients & Why They Work
This No-Bake Fudgy Chocolate Squares Recipe works beautifully because each ingredient plays a key role — from the cookie crumbs that give it structure to the high-quality bittersweet chocolate that provides richness and complexity. A quick tip: picking fresh high-cocoa content chocolate really makes a difference!
- Chocolate wafer cookies: They create a sturdy, flavorful base; I love using Oreos or any chocolate wafers you prefer since they blend easily and add texture.
- Unsalted butter: Adds richness and helps bind the crust and topping layers smoothly together.
- Granulated sugar: Just a little to enhance sweetness and balance bitter chocolate notes.
- Kosher salt: Enhances the chocolate’s flavor; I use Diamond Crystal for its pure texture.
- Bittersweet chocolate (70% cacao): Provides depth with the perfect bittersweet bite — choose quality bars for best results.
- Sweetened condensed milk: This is the magic ingredient that makes the fudge dense and creamy without baking.
- Instant espresso powder: Intensifies chocolate flavor subtly without adding coffee taste.
- Vanilla extract: Adds warmth and rounds out the dessert’s flavor beautifully.
- Flaky sea salt: A finishing touch that adds crunch and contrast to the sweetness.
Make It Your Way
One of my favorite things about the No-Bake Fudgy Chocolate Squares Recipe is how easy it is to tweak — you can play around with the type of chocolate or add-ins to suit your mood or what you have on hand. For example, if you’re feeling nutty, adding chopped toasted pecans inside the fudge is a game changer!
- Variation: I once swapped bittersweet for dark chocolate chips mixed with a handful of dried cherries — the subtle tartness balances the fudgy sweetness wonderfully.
- Dietary tweaks: You can use dairy-free butter and dark chocolate to make a veg-friendly version.
- Texture adjustments: If you like crunch, sprinkle some crushed cookies or nuts between layers.
Step-by-Step: How I Make No-Bake Fudgy Chocolate Squares Recipe
Step 1: Prepare Your Base Crust
Start by pulsing your chocolate wafer cookies in a food processor until they become fine crumbs — stop occasionally to scrape down the sides so they’re evenly ground. Melt half the butter and mix it with the crumbs, sugar, and a pinch of salt. Press this mixture firmly and evenly into the bottom of a parchment-lined 8×8-inch pan. I like to use the flat bottom of a measuring cup to get a nice compact crust. Pop it in the freezer for about 15 minutes to set — this step is key so your crust stays intact when layering the fudge on top.
Step 2: Make the Fudgy Chocolate Layer
Now melt two cups of bittersweet chocolate with four tablespoons of the remaining butter in the microwave — remember to heat in 30-second bursts, stirring in between to avoid burning. Once melted and smooth, stir in the sweetened condensed milk, espresso powder, vanilla, and the rest of the salt. Pour this luscious mixture over your chilled crust, smoothing it evenly with an offset spatula. Refrigerate uncovered for about an hour until it’s mostly set.
Step 3: Top with a Glossy Chocolate Finish
Finally, melt the remaining half-cup chocolate with the last four tablespoons of butter until shiny and smooth, then pour this over the fudge layer for a glossy top. Spread it carefully for an even finish and refrigerate again until fully firm, usually about 30 minutes. Afterward, sprinkle generously with flaky sea salt — it adds a fantastic crunch and elevates every bite. Lift out your squares with the overhanging parchment and slice into 36 little pieces. Pro tip: run your knife under warm water and dry it before slicing for the cleanest cuts!
Tips from My Kitchen
- Cookie Choice: I’ve tried various wafers — homemade chocolate wafers work too — but avoid cookies with cream filling unless you want a sweet extra hint.
- Melting Chocolate: Take your time melting chocolate gently to avoid seizing; stirring frequently helps get that smooth texture.
- Firm Layering: Freezing the crust before adding the fudge makes slicing so much easier and less messy.
- Perfect Slices: Warm your knife under hot water for clean edges, wiping dry before each cut to keep the squares sharp and neat.
How to Serve No-Bake Fudgy Chocolate Squares Recipe
Garnishes
I love sprinkling these chocolate squares with flaky sea salt right before serving — the salty crunch contrast is addictive. Sometimes, I add a few cocoa nibs or a dusting of powdered sugar if it’s a special occasion and I want an elegant touch. Fresh berries alongside also balance the richness perfectly.
Side Dishes
For an extra indulgent treat, I like pairing these with a scoop of vanilla bean ice cream or a dollop of whipped cream. A cup of strong coffee or espresso on the side really complements the chocolate and espresso flavors in the squares. If you’re hosting, fresh fruit platters make a nice contrast too.
Creative Ways to Present
When I want to impress my guests, I place these squares on a pretty tray with layers of parchment paper to keep them neat. For holiday gatherings, I sometimes drizzle melted white chocolate over the top or scatter edible gold flakes for a festive look. Another fun idea is serving them in mini cupcake liners for easy grab-and-go treats.
Make Ahead and Storage
Storing Leftovers
These No-Bake Fudgy Chocolate Squares keep beautifully in an airtight container in the fridge for up to a week. I usually store them layered with parchment paper between so they don’t stick together. Just bring them to room temperature for about 10 minutes before eating for the best texture.
Freezing
Freezing works wonderfully if you want to make this recipe ahead for a party or save leftovers longer. Wrap the squares tightly in plastic wrap and place them in a freezer-safe container for up to one month. When ready to enjoy, thaw them in the fridge overnight — the texture stays just as fudgy and delicious.
Reheating
I don’t usually reheat these since I love the cool, fudgy texture straight from the fridge, but if you prefer a softer bite, let the squares sit at room temperature for 20-30 minutes. Avoid microwaving, which can make the chocolate grainy or oily.
FAQs
-
Can I use other types of cookies for the crust?
Absolutely! While chocolate wafer cookies are classic, you can experiment with graham crackers, gingersnaps, or even nutty shortbread cookies for different flavors. Just make sure to pulse them finely for a good crust texture.
-
Why do you add espresso powder?
The instant espresso enhances the chocolate’s depth and richness without adding a strong coffee flavor. It’s a secret ingredient I swear by to make the chocolate taste more vibrant.
-
How do I get clean cuts when slicing these squares?
Run your knife under hot water before slicing, then dry it well. This warms the blade, allowing it to glide through the fudge without cracking the chocolate topping.
-
Can I make this recipe dairy-free?
Yes! Swap out the butter for a plant-based alternative and choose dairy-free chocolate. Just be sure to check the labels of your condensed milk substitute if using one.
-
How long do these stay fresh?
If stored properly in the fridge, these fudgy squares stay fresh and tasty for up to one week. For longer storage, freeze them for up to a month.
Final Thoughts
I honestly can’t recommend this No-Bake Fudgy Chocolate Squares Recipe enough — it’s become my go-to whenever I want a decadent dessert without the fuss. The best part? It feels fancy but comes together in no time, no oven required. You’ll love how easy it is to whip up and how every bite melts into rich, chocolate bliss. So next time you want to treat yourself or friends, give this recipe a shot — your taste buds will thank you!
Print
No-Bake Fudgy Chocolate Squares Recipe
- Prep Time: 20 minutes
- Cook Time: 5 minutes
- Total Time: 2 hours 10 minutes
- Yield: 36 squares
- Category: Dessert
- Method: No-Cook
- Cuisine: American
Description
Delight in these rich and fudgy no-bake chocolate squares, made with a buttery cookie crust and layers of decadent chocolate ganache. Perfect for any occasion, these easy-to-make treats combine bittersweet chocolate, sweetened condensed milk, and a hint of espresso for a wonderful depth of flavor, finished with a sprinkle of flaky sea salt.
Ingredients
Crust
- Cooking spray
- 1 (9-ounce; 255 g) package chocolate wafer cookies (about 72 cookies), such as Dewey’s, Oreos, or Goya Chocolate Maria Cookies
- 8 tablespoons unsalted butter (113 g; 1 stick), cut into 1 tablespoon pieces, divided
- 1 tablespoon granulated sugar (13 g)
- 1/4 teaspoon Diamond Crystal kosher salt
Filling
- 12 ounces chopped bittersweet chocolate (340 g; 2 1/2 cups), 70% cacao, divided
- 4 tablespoons unsalted butter (57 g; 1/2 stick), cut into pieces
- 1 (14-ounce) can sweetened condensed milk
- 2 teaspoons instant espresso powder
- 2 teaspoons vanilla extract
- 1/2 teaspoon Diamond Crystal kosher salt
Topping
- 4 tablespoons unsalted butter (57 g; 1/2 stick)
- 1/2 cup chopped bittersweet chocolate (3 ounces; 85 g)
- Flaky sea salt, to garnish
Instructions
- Prepare the pan and crust: Lightly spray an 8- by 8-inch baking pan with cooking spray. Line the bottom and sides with parchment paper, leaving a 2-inch overhang on two sides. Lightly spray the parchment with cooking spray and set aside.
- Make the crust mixture: In a food processor, pulse the chocolate wafer cookies until finely ground, about 15 pulses, scraping down sides as needed. Melt 8 tablespoons butter in a small microwave-safe bowl on high for about 1 minute, stirring occasionally. Stir the melted butter, sugar, and 1/4 teaspoon salt into the ground cookies using a flexible spatula.
- Form the crust: Transfer the cookie mixture to the prepared pan and firmly press it into an even, compact layer using a flat-bottomed glass or measuring cup. Freeze the crust uncovered until firm, about 15 minutes.
- Prepare the filling: In a large microwave-safe bowl, combine 2 cups chopped bittersweet chocolate with 4 tablespoons butter. Microwave on high, stirring every 30 seconds, until melted and smooth, about 2 minutes. Stir in sweetened condensed milk, instant espresso powder, vanilla extract, and the remaining 1/2 teaspoon salt until well combined.
- Assemble the filling layer: Pour the chocolate filling over the chilled crust and spread evenly with an offset spatula. Refrigerate uncovered until set, about 1 hour.
- Make the topping: In a medium microwave-safe bowl, melt the remaining 1/2 cup chocolate with 4 tablespoons butter on high, stirring occasionally until melted, about 1 minute. Stir until fully combined and smooth.
- Finish the bars: Pour the melted chocolate topping over the set filling layer and spread evenly. Refrigerate uncovered until set, about 30 minutes. Sprinkle with flaky sea salt.
- Cut and serve: Lift the bars from the pan using the parchment overhang and transfer to a cutting board. Using a sharp knife dipped in warm water and dried between cuts, cut into 36 squares. Serve chilled.
Notes
- Oreo wafers or similar chocolate wafer cookies can be purchased online or at specialty grocery stores.
- For cleaner cuts, warm and dry the knife blade between slicing the squares to prevent sticking.
- Store finished squares refrigerated in an airtight container for up to 1 week.
- Squares freeze well for up to 1 month; thaw overnight in the refrigerator before serving.
- If using table salt instead of kosher salt, reduce the quantity by half.
Nutrition
- Serving Size: 1 square
- Calories: 220 kcal
- Sugar: 20 g
- Sodium: 85 mg
- Fat: 14 g
- Saturated Fat: 8 g
- Unsaturated Fat: 5 g
- Trans Fat: 0 g
- Carbohydrates: 24 g
- Fiber: 2 g
- Protein: 2 g
- Cholesterol: 30 mg


